The event log consolidation and process tracking tables might grow too large after a while. You can configure your system to periodically purge records that are no longer relevant, e.g. after 12 months. This chapter shows:
•How to use the included database purge utility to purge records automatically on all supported databases
•How to setup scheduled jobs on Microsoft SQL Server® to automate the purging of records
|
EventSentry includes a command-line application that can purge records from the EventSentry database. The utility can be scheduled to run on a regular basis using the EventSentry application scheduler or the Windows Task Scheduler. See Purging Records Automatically for more information. |

Setting up an automatic job (Microsoft SQL Server® 2005 and later)
1.Open the "Microsoft SQL Server® Management Studio" and navigate to "SQL Server Agent" -> "Jobs".
2.Right-click "Jobs" and select "New Job ..."
3.Specify a name for the job (e.g. "EventSentry Database Purge") and click on "Steps" in the left pane.
4.In the steps window, click the "New..." button.
5.Give the step a descriptive name and paste one of the SQL statements below. You can specify multiple SQL statements, but separate them with a GO statement in a single line. You can obtain the SQL statements from the last step of the web-based maintenance wizard.
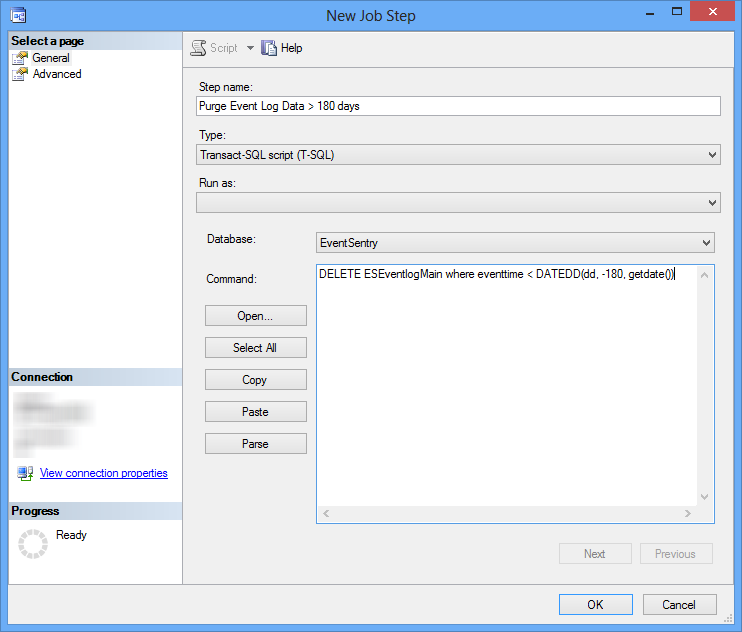
6.Make sure the correct database is selected.
7.Click the "Advanced" tab and select "Go to the next step" for the "On failure action" setting. Click OK.
8.Add another step if necessary.

|
It is recommended that you purge data frequently (with smaller amounts of data affected at each purge) to reduce the impact of the purge on the database. For example, instead of setting up a job to delete records that are older than 180 days once a month, set the job up to run at least once a week. This way each job will affect less data and as such complete more quickly. |

9.Click "Schedules" and add a new schedule.
10.Give the schedule a name (e.g. Weekly) and configure the schedule.
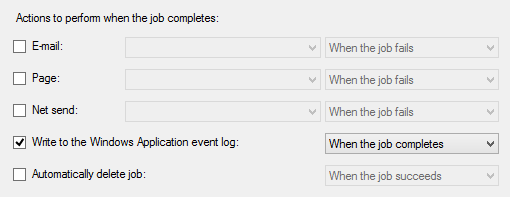
11.Click on "Notifications" to enable error reporting. Check the box "Write to the Windows Application event log" and select "When the job completes". You can change this option and only log an event if the job fails.
12.Click OK to add the schedule