How to monitor data in a SQL database
EventSentry provides the ability to monitor an custom table or custom database. This article will walkthrough monitoring the results of any SQL query from a PostgreSQL or a Microsoft SQL Server database. EventSentry will monitor updates using the Delimited Log File functionality and will provide the option to generate alerts based on the log entries.
Getting started with the es_db_to_csv utility
Step 1:
Download es_db_to_csv.exe
Save the downloaded file to %PROGRAMFILES%\EventSentry\scripts\logs\
Step 2:
Initialize the configuration
Open the Windows Terminal and navigate to the %PROGRAMFILES%\EventSentry\scripts\logs\ folder:
1 |
cd %PROGRAMFILES%\EventSentry\scripts\logs\ |
Run the es_db_to_csv utility:
1 |
.\es_db_to_csv.exe new |
Created new configuration file: config.properties
Edit the configuration file
Open config.properties that has been created in the current folder and apply your settings.
db.type
Supported values:
- mssql: Microsoft SQL Server database
- postgresql: PostgreSQL database
db.query
SQL query with a {lastRunTimestamp} use with the timestamp field used to only import the records that have been written since the last run. The columns included may be set using this query. For example, if you wanted to limit the number of output columns, the order, or the naming you could customize the SQL query.
db.query=SELECT recorddate as Timestamp, Level, Message FROM AuditLogs WHERE recorddate > '{lastRunTimestamp}' ORDER BY recorddate desc
timestamp.columnName
The is the column name that stores your timestamps. Each time the utility runs the most recent timestamp will be store to provide only records that have changed since the utiltiy last ran.
csv.includeHeaders
This determines whether to include the column names as the CSV header. Since we will be monitoring for additions to the table we will set this to false.
csv.output
Filename where results will be saved.
Step 3:
Analyze your query
The analyze option will test your database connection, run your SQL query and analyze the output to determine the best match. The es_db_to_csv utility will evaluate the average content length and content variability to determine which fields are most useful as lookup text and which are standard text or integer fields.
1 |
.\es_db_to_csv.exe analyze |
1 2 3 4 5 6 7 8 9 10 11 12 13 14 15 |
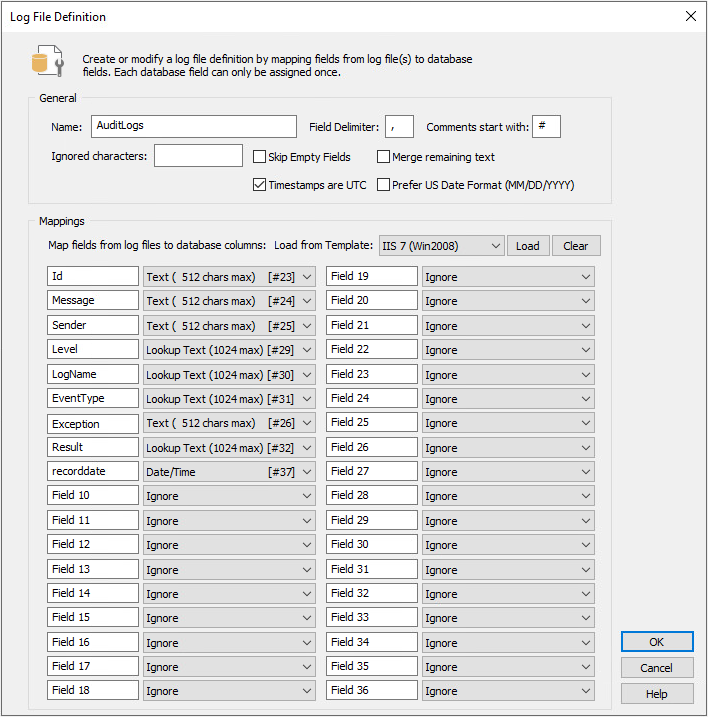
=== Column Recommendations === - Id => #23: Text (512 chars max) - Message => #24: Text (512 chars max) - Sender => #25: Text (512 chars max) - Level => #29: Lookup Text (1024 chars max) - LogName => #30: Lookup Text (1024 chars max) - EventType => #31: Lookup Text (1024 chars max) - Exception => #26: Text (512 chars max) - Result => #32: Lookup Text (1024 chars max) - recorddate => #37: Date/Time Apply these recommendations? [Y/N] (Default: Y) > Y Enter a name for this Mapping: > AuditLogs |
The es_db_to_csv utility will provide the option to automatically create the mapping directly in your EventSentry configuration. Please note this requires an elevated prompt and the EventSentry Management Console should be closed.
EventSentry Configuration
In the EventSentry Management Console we will review and assigning a Delimited Log File definition.
Step 1:
Review the Log File Definition:
- Open the EventSentry Management Console 2. In the tree on the left, navigate to Packages -> Log Files
- Right click Log Files and select Define Files and File Types
- In the Log File Definition section click the [+] button
AuditLogs definition
Step 2:
Review the Log File Type
Under Packages -> Log Files -> Define Files and File Types, click the [+] in the Log Files section to add the Log File Types
AuditLogs location

Step 3:
Assign the Log Files
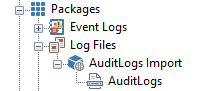
- Under Packages -> Log File, right click and select Add Package and name it AuditLogs Import
- Right click the newly created AuditLogs Import and select Add File
- Add the recently created File Types to the package
- Assign them to the local server
- Save the configuration
EventSentry Application Scheduler (Recommended)
- Open the EventSentry Management Console.
- Navigate to the "Packages" section and right click System Health and select Add Package
- Add the name of the package, we will call it AuditLogs Import
- Right click the newly added package and click Add, then the Application Scheduler item
- Select Regular Schedule, select all days of the week and leave 00:00
- In the Process field select the executable es_db_to_csv.exe, then append "run"
- Click "OK"
- Save the configuration
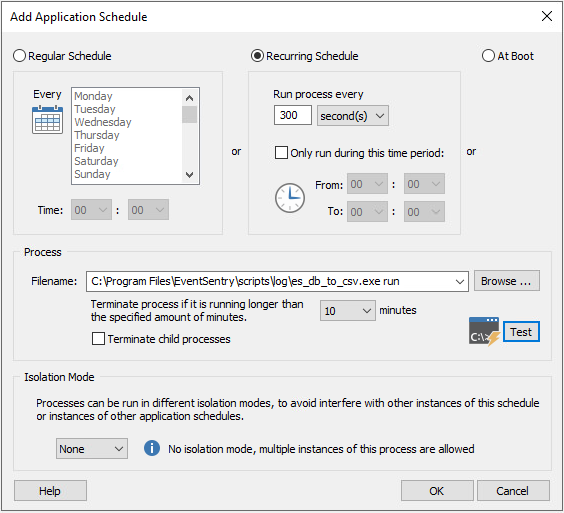
Logs will be imported every 5 minutes or 300 seconds
Windows Task Scheduler
- Open the Windows Task Scheduler.
- Click on "Create Basic Task" in the "Actions" pane.
- Enter a name and description for the task, then click "Next."
- Choose the trigger for the task daily and configure the schedule.
- Click "Next" and select "Start a Program" as the action.
- Click "Browse" and select the script es_db_to_csv.exe, then append "run" that pulls the logs.
- Click "Next," review the settings, and click "Finish" to create the task.
By following these steps, you ensure that the script runs at the specified intervals, allowing EventSentry to import the logs based on the predefined settings.