Multi-Tenant Setup of EventSentry for MSPs using multiple databases
This HowTo illustrates how to configure EventSentry to support multiple tenants (customers), utilizing a single installation with multiple databases:
- Single EventSentry installation
- One database per customer for isolation
- One EventSentry Web Reports installation with one profile per customer
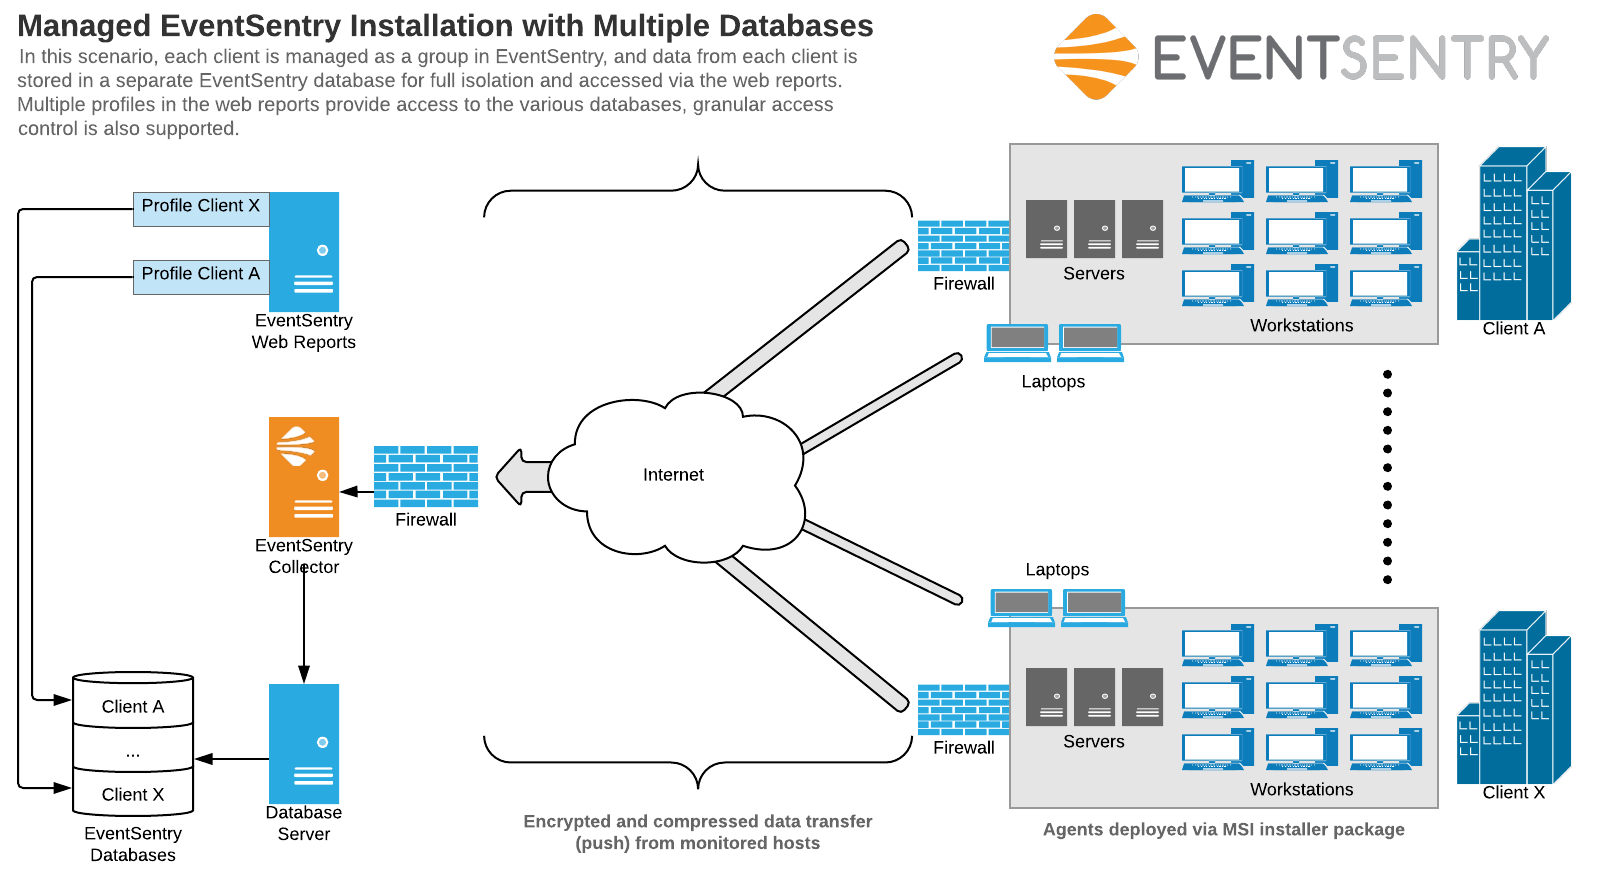
In this scenario, computers from different networks will transmit data through the same central collector service, but store data in separate databases. Note that a centralized view of all data (from all customers) through the web reports is not possible with this setup, since each customer's data is stored in a separate database.
The instructions below will need to be repeated for each customer.
1. Setting up a new database:
1) In the management console on the left under "Actions", right click actions and add a new action.
2) Choose the "Database" type and give the action a unique, descriptive name, e.g. the name of the customer.
3) On the right side of the EventSentry console are the action settings, click the "Initialize or Update Database" button. This will launch a wizard to automatically set up a new database for you. Just like when choosing an action name, choose a unique database name during the wizard prompts. Consider adding additional identifiers like the name of the year, if you plan on rotating databases (e.g. Customer1_2022).
2. Setting up groups
1) In the management console on the left under "Groups", right click groups and add a new group.
2) Add all hosts to be monitored to the group, this can be completed later as well.
3. Assigning the database to the group
1) In the management console on the left under "Groups", right click the group for this customer and choose Properties.
2) On the top right area of the properties page under Database Override, select the database which was just created in step 1, e.g. Customer1_2022. Your customer's specific database is now assigned to the customer's specific group. If the customer's hosts are represented in more than one group, then assign the database to those groups as well.
4. Configure packages to use the group-specific database:
1) In each package that you want to use for forwarding data to your group database, right click the package's name on the left side of the EventSentry management console and choose Properties.
2) In the right side of the console, in the Overrides section, turn on the "Override Actions of all objects in this package" checkbox and also enable the "Use group specific database actions" checkbox.

3) Repeat these steps for every package that should be stored in the group-specific database.
Once you push or distribute these configuration changes to your agents, the machines will start sending data to their customer's specific database based on group membership.
5. Setting up database purging in a single script (optional):
1) In the toolbar under Home > Scripts -> User Embedded, open the auto_db_purge.cmd script and adjust the contents so that all database are purged, for example:
"C:\Program Files\EventSentry\Database Wizards\es_db_purge.exe" "**Customer1**" AllTables **90**d postgres **YourPwd** /shrinkindexes /count

"C:\Program Files\EventSentry\Database Wizards\es_db_purge.exe" "**Customer2**" AllTables **90**d postgres **YourPwd** /shrinkindexes /count

"C:\Program Files\EventSentry\Database Wizards\es_db_purge.exe" "**Customer3**" AllTables **90**d postgres **YourPwd** /shrinkindexes /count
6. Configuring profiles in the Web Reports
In order to access the data in each of these databases in the web reports, a profile needs to be added for each database in the web reports.
• In the Web Reports menu choose Settings and then select Profile Editor. Click "Create New Profile" in the upper left corner.
• Specify a unique and descriptive profile name (Such as Customer1) and the Header. Whichever value you specify will appear in large bold letters at the top left corner of each page. Further down the page specify the new database info (database name, port number, etc) in the Database Connection section, and click the Test Connection button to verify that the connection works. Click Submit to save the new database profile.
• Once the page finishes refreshing there will be a small down-arrow next to the EventSentry logo on the top left corner of the web reports. Click that down-arrow to select any profile name and choose which database you'd like to access.
• If you allow customers to access the web reports, then ensure that each customer gets a valid login (Settings > Security & Accounts) and has the Allowed Profiles section configured to specify the customer's web reports profile they can access. This ensures that the customer will only be able to view the web reports profile that's connected to their respective database. If the Allowed Profiles list is not configured for a web reports user account (or inherited from a web reports group), that user would be able to choose any web reports profile, and thus would be able to view the contents of other customer databases.