How to install, auto-update and deploy Sysmon automatically using EventSentry's Application Scheduler
The System Monitor service & driver ("Sysmon" for short) logs various events - mostly in response to process activity that occurs on a system - to the Microsoft-Windows-Sysmon/Operational event log. Sysmon events are similar to the 4688 and 4689 events logged by Windows to the security event log when a process starts and exits. The events generated by Sysmon are significantly more detailed however, and cover other areas such as network activity, file write activity, and more.
With Sysmon enabled, users can create sophisticated event log filter rules to nefarious activity on their network. Additionally, when enabled in the Processes compliance feature, EventSentry can intercept Sysmon event id 3 which is logged when a process performs an outgoing network connection. This data is correlated with process tracking data collected from the Windows security event log and is available in the web reports. If Sysmon data is available for a process tracking entry, then a black plus icon will be shown next to the PID in the web reports. Network data detected by Sysmon can also be correlated with NetFlow data (if available). More information on EventSentry Sysmon integration can be found here).
This How-To Guide will cover setting up the Application Scheduler, which will run a script at boot time installing Sysmon if it is not already installed. Updating if there is a new version, or pushing new configuration.
Index
- Adding the embedded script to use with the Application Scheduler
- Creating, configuring & assigning the Application Scheduler package
- Saving the configuration
Prerequisites
- Download Sysmon
- Extract the files to a shared folder which is accessible on the network (Example: \\192.168.1.10\shared)
- Ensure that all users have access to that network path (Alternatively, you can specify a user inside the script)
- [Optional] Add a custom configuration file to the network accessible folder (We provided an example configuration file at the end of this article)
- [Optional] Add es_sysmon_version.txt file to the network accessible folder for auto-update function
1. Adding Embedded script to use with the Application Scheduler
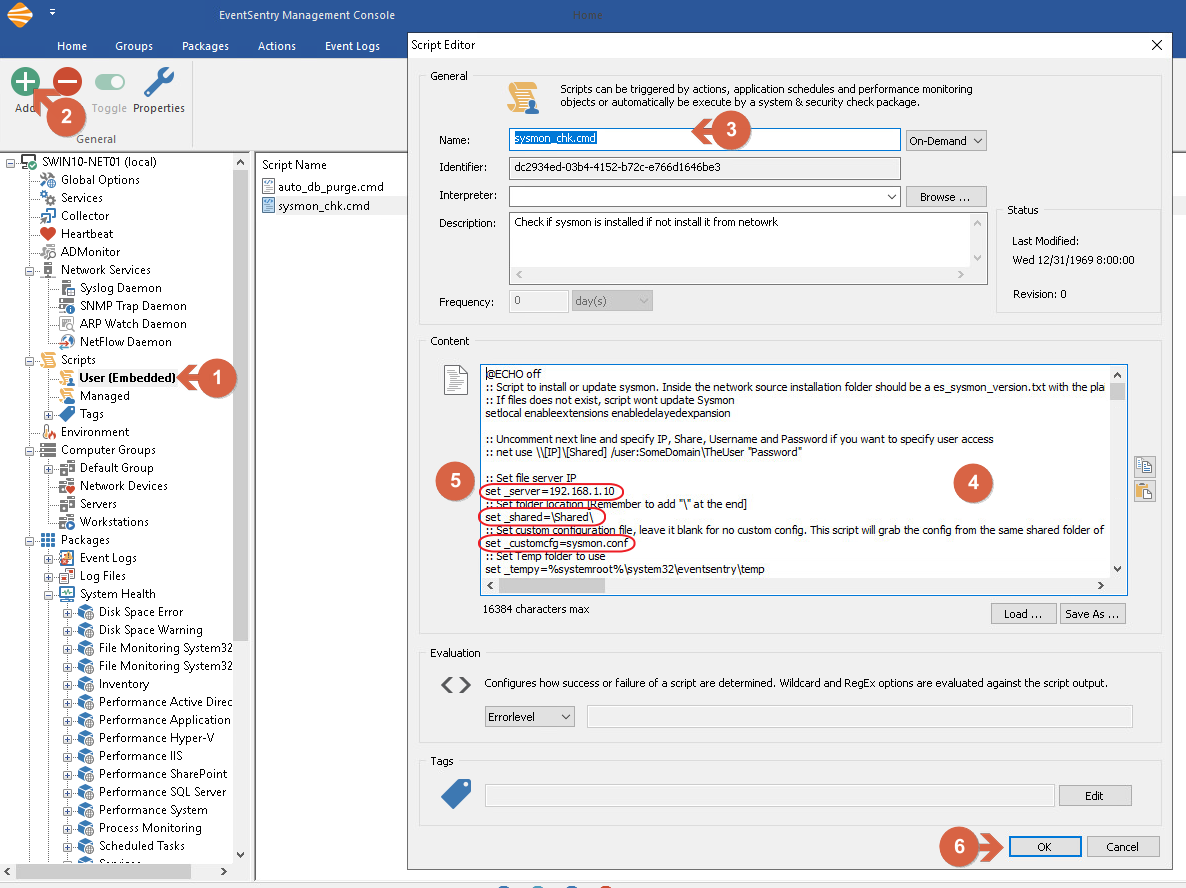
From the EventSentry Management Console, under the "Scripts" Tree menu, click on User (Embedded) (1) and then from the ribbon on top, click ADD (2). From Script Editor Windows, enter Script name (sysmon_chk.cmd in this case) (3) in content, copy-paste the script code (4).
The lastest version of the script can be downloaded from our Github repository.
Note: This script will check for access to the shared path and check to see if Sysmon is already an installed service on the host. If not, it will install it. You can specify a custom configuration file to be deployed during the install or update process.
Updating the Sysmon configuration The script will look for the es_sysmon_version.txt file in the shared folder to check the version number. That file must be created and contain the version number in a 9 digit plain version number, for example 13.00.000. The first 4 digits (13.00) are used for the Sysmon version. The last 3 digits (000) will be used for configuration versioning. For example if you want to push a new configuration to all computers, just increment this last number from 000 to 001 and so on. During new installations or the update process the configuration (if it is specified) will be always updated.
Remember to replace the correct information for your network in these two lines: (5) (path must start and end with )
set _server=192.168.1.10
set _shared=\Software\Sysmon\
set _customcfg=sysmon.conf
Sysmon.exe and Sysmon64.exe should be available in the provided network path.
Click OK (6)
Adding Embedded Script
2. Creating, configuring and assigning the Application Scheduler Package
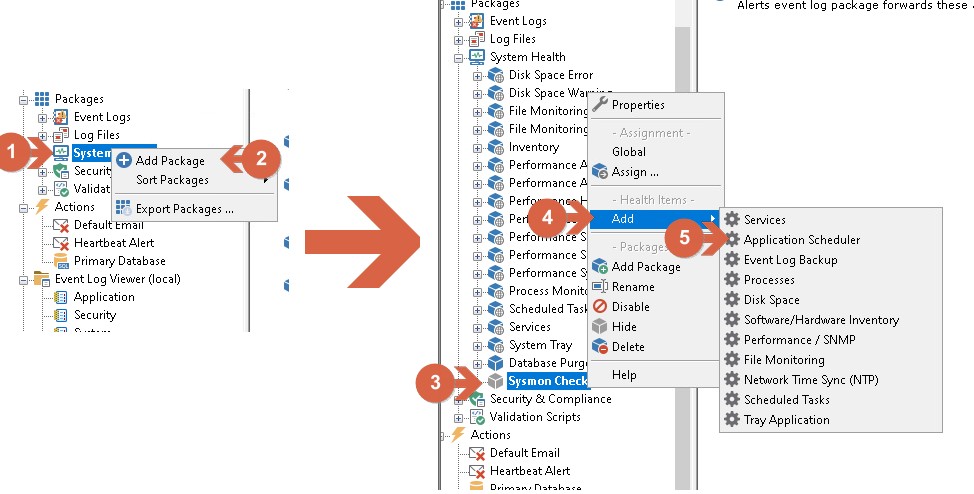
Now that the Embedded script is created, a "System Health > Application Schedule" Package must be created and assigned to all hosts that need to have Sysmon installed.
Under "Packages," right-click "System Health" (1), and click "Add Package" (2), "Sysmon Check" is used for the package name in this guide. Right-click on the newly created package (3) and then click "Add" (4), then Application Scheduler (5).
Creating Application Scheduler Package
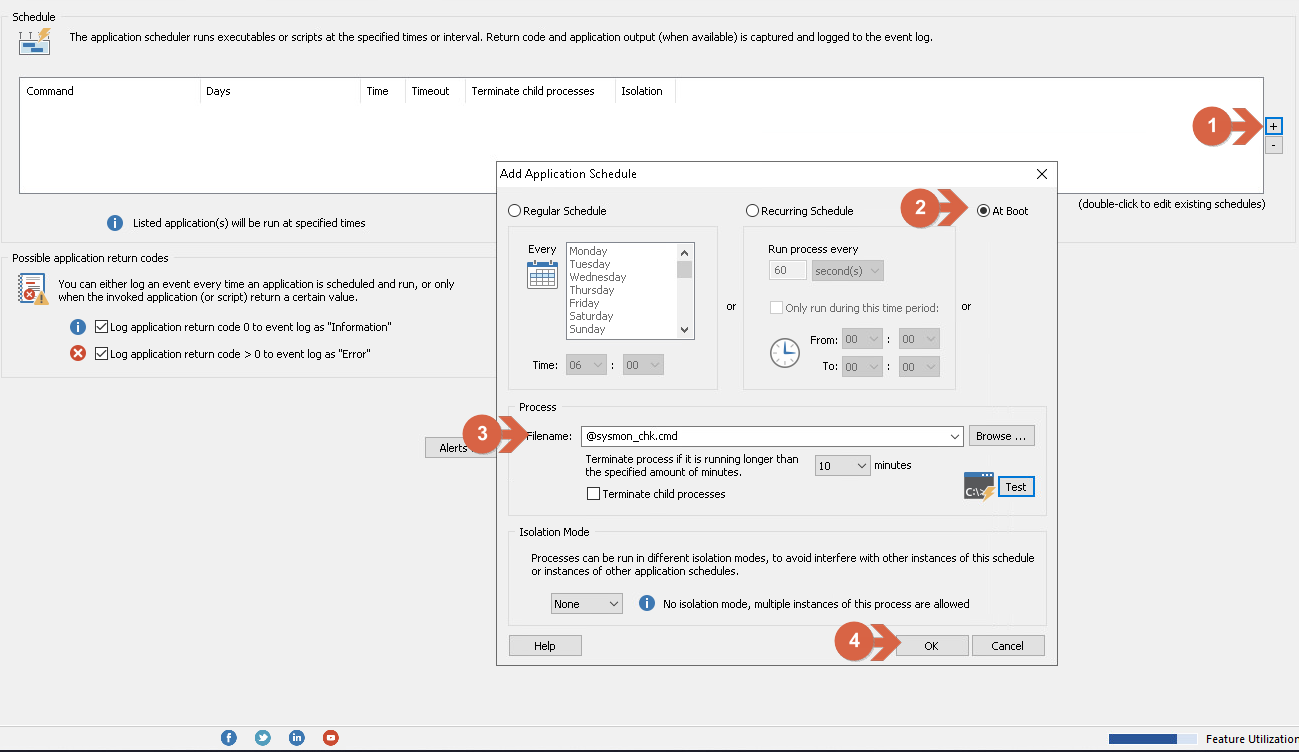
In the "Application Schedule" window, click on "+" (1). In the "Add Application Schedule" window, select "At Boot" (2), or you can schedule a specific time. In the "Process" section, select "sysmon_chk.cmd" from the filename dropdown (the newly created embedded script) (3). Click on OK to finish configuring the new Application Scheduler (4).
Configuring Application Scheduler Package
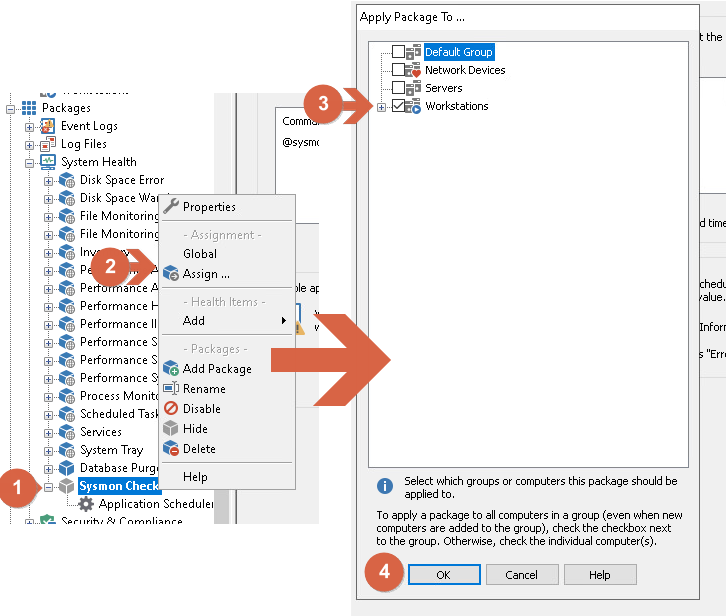
Assign the newly created package to any computers/servers you want EventSentry to install Sysmon on. To do so, right-click the new package ("Sysmon Check" in this guide) (1) and then click on "Assign" (2). From the "Apply Package To..." window, select the computers/groups that you want to assign this package to., (3) then click OK (4).
Assigning Application Scheduler Package
3. Saving the configuration
From the top menu, click Home (1) and either click the "Save" or "Save & Deploy" icon (2). It may be necessary to manually push the configuration if the collector is not in use. The remote agents usually get the new configuration in a couple of minutes. Once Sysmon is installed on the remote host(s), you'll find the data collected in the web reports under "Network > Processes > Sysmon." Make sure the "Sysmon Network Events" box is checked in the Process Tracking item of your Complete Tracking package, located in the EventSentry console under the Security & Compliance packages.
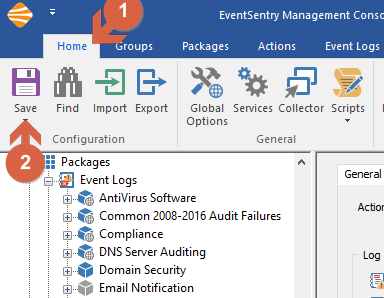
Save Configuration.
Example configuration file
Attached here is a security focused Sysmon configuration file that can be downloaded and used with this script: