There seems to be a new variant of ransomware popping up somewhere every few months (Locky being the most recent one), with every new variation targeting more users / computers / networks and circumventing protections put in place by the defenders for their previous counterparts. The whole thing has turned into a cat and mouse game, with an increasing number of software companies and SysAdmins attempting to come up with effective countermeasures.
I’ve already proposed two ways to counteract ransomware on file servers with EventSentry in part 1 and part 2, both of which take a little bit of time to implement (although I’d argue less than it would take to restore all of your files from backups). The last part of the series, remediation, offers a way to remotely log off an infected user. In this post I’m proposing a third, and better, method with the following improvements:
- Easier & faster to setup
- More effective
- Free (works with EventSentry & EventSentry Light)
In the first article we configured file integrity monitoring on a volume, and if the number of file modifications occurring during a certain time interval exceeded a preset threshold, the ransomware would be stopped in its tracks. In the seconds article we used bait (canary) files to accomplish the same thing.
In this third installment we’ll keep track of the number of file modifications made by a user to detect if an infection is underway. To effectively defeat ransomware, we have to be able to distinguish between legitimate user activity and an infection. To date we know this:
- Users add/change/remove files, but the number of changes made by a user in a short amount of time (say 15 min) is generally small
- Ransomware always runs in the context of a user, and as such an infection will usually come from one user (unless things go really awry and multiple users are infected). The approach here will work equally well, regardless of the number of infections.
Thus, to detect an infection, EventSentry will be counting the number of file modifications (event 4663) with its advanced threshold capabilities. If the threshold is exceeded, EventSentry will trigger an action of your choice (e.g. disable the user, remove a file share, stop the server service, …) to limit the damage of the ransomware.
Here is what you need:
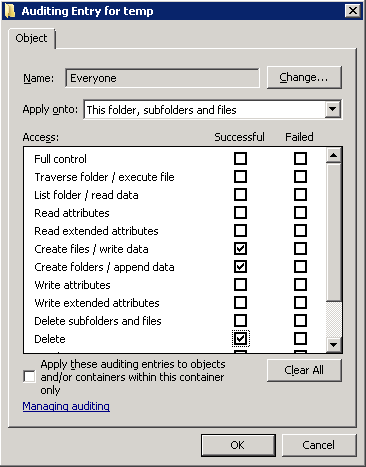
- Object Access / File System Auditing enabled
- Auditing enabled on the files which are to be protected
- EventSentry installed on the server which needs to be protected
This KB article explains how to configure EventSentry and enable auditing (preferably through group policy) on one or more directories. I recommend referencing the KB article when you’re ready to configure everything. Pretty much everything in the KB article applies here, although we will make a small change to the threshold settings of the filter (last paragraph of section (4)).
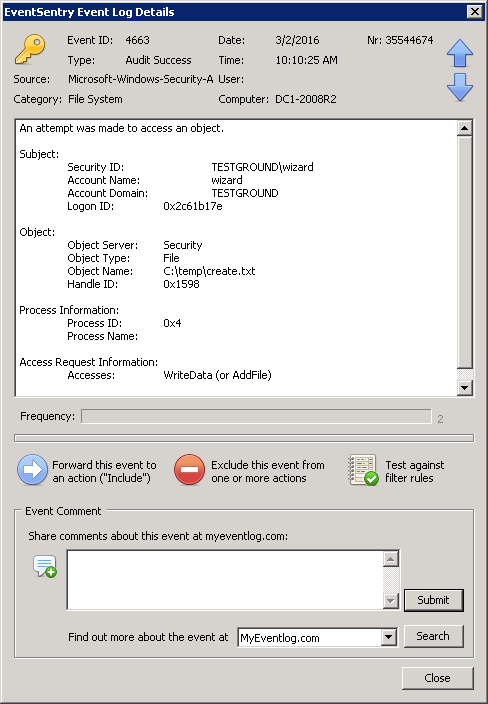
Once auditing is setup, Windows will log event 4663 for every write access which is performed by a user. An example event looks like this:
The default behavior of a filter threshold in EventSentry is to simply count every filter match towards the threshold. In our case, every 4663 event encountered would count towards the threshold. You can think of there being one bucket for all 4663 events, with the bucket being emptied whenever the threshold period expires, say every 5 minutes. If the bucket fills up we can trigger an alert.
This doesn’t work so well on a file server, where potentially hundreds of users are constantly modifying files. It would take some time to come up with a good baseline (how many file modifications are considered “normal”) that we could use as a threshold, and there would still be a chance for a false positive. For example, a lot of 4663 events could be generated during a busy day at the office, thus causing the threshold to reach its limit.
A better way is to assign each user their own “personal” threshold which we can then monitor. Think of it like each user having their own bucket. If a user writes to a file, EventSentry adds the 4663 event only to that user’s bucket. Subsequently, an alert is only triggered when a user’s bucket is full. Any insertion string of an event can be used to create a new bucket.
We can do this by utilizing the insertion string capabilities of the filter threshold feature. Setting this up is surprisingly easy – all we have to do is change the Threshold Options to “Event”, click the “Insertion Strings” button and select the correct insertion string. What is the correct insertion string? The short answer is #1.
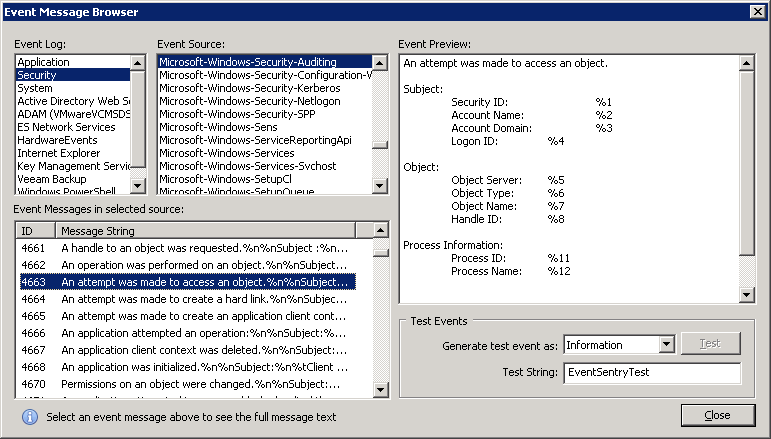
The long answer lies in the “Event Message Browser”, which you can either find through the Tools – Utilities menu in the EventSentry Management Console or in the EventSentry SysAdmin Tools. Once in there, click on “Security”, then “Microsoft-Windows-Security-Auditing”, then 4663. You will see that the number next to the field identifying the calling user (“Security ID”) is %1.
Enough with the theory, here is what you need to implement it (assuming EventSentry is already installed on the servers hosting the file share(s)):
- Enable global auditing globally and audit the file share(s). See section 2 & 3 of KB 279.
- Determine what action you want to take when a ransomware infection has been detected. See either section 1 of KB 279 or “Dive! Stopping the Server Service” from the previous blog post.
- Create a package & filter looking for 4663 events. See section 4 of KB 279 and review the additional threshold settings below.
Customizing the threshold
Once you have the package & threshold filter for 4663 events in place, we need to modify the threshold settings as explained above. Edit the filter, click the threshold tab and make sure your filter looks like the one shown below:
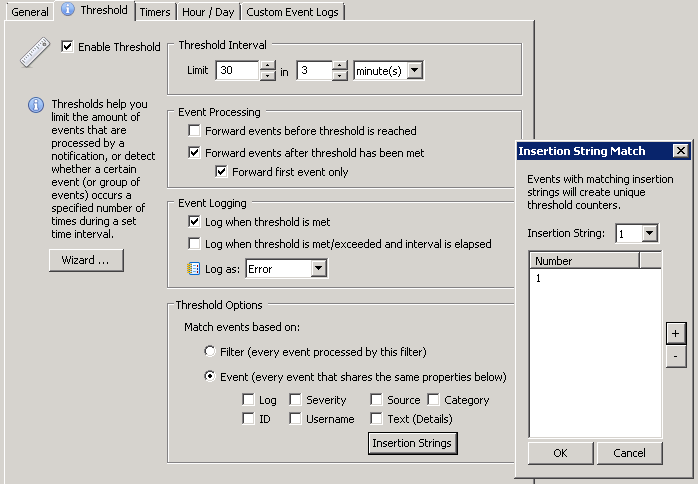
The only variable setting is the actual threshold, since it depends on how fast the particular variant of ransomware would be modifying files. A couple of things to keep in mind:
- The interval shouldn’t be too long, otherwise it will take too long before the infection is detected.
- Make sure the actual event log filter is only looking at 4663 events, no other event ids.
With the above example, any user modifying any file (on a given server) more than 30 times in 3 minutes will trigger any action associated with the filter, e.g. shutting down the server service. Note that the action listed in the General tab will be triggered as soon as the threshold is met. If 30 4663 events for a single user are generated within 45 seconds, the action will be triggered after 45 seconds, it won’t wait 3 minutes.
Bonus – Disabling a user
One advantage of intercepting 4663 events is that we can extract information from them and pass them to commands. While shutting down the Server service is pretty much essential, there are a few other things you can do once you have data from the events, e.g. the username, available. You can now do things like:
- Disabling the user
- Removing the user from the share permissions
- Revoking access to select folders for the user
There are a couple of caveats when (trying to) disable a user however:
- The user account (usually the computer account) under which the EventSentry service runs under (usually LocalSystem) needs to be part of the Account Operators group so that it has permission to disable a user
- Disabling a user is usually not enough though, since Windows won’t automatically disconnect the user or revoke access. As such, any ransom/crypto process already running will continue to run – even if the user has been disabled.
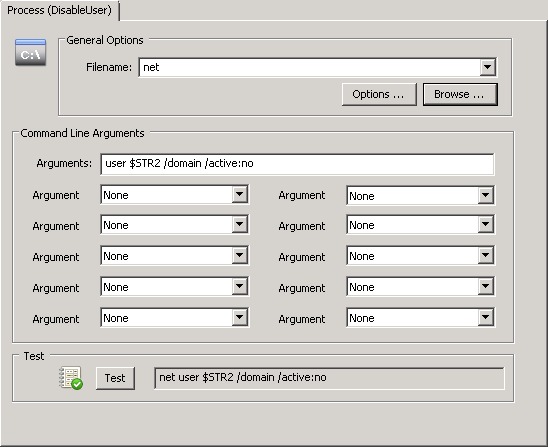
Disabling a user account from the command line is surprisingly simple (leave Powershell in the drawer). To disable the user john.doe, simply run this command:
net user john.doe /domain /active:no
Note that since “net user” doesn’t support a domain prefix (MYDOMAIN\john.doe won’t work), we need to make sure that we pass only the username (which is insertion string %2) and the /domain switch to ensure the user is disabled on the domain controller. Of course you would need to omit the /domain switch if the users connecting to the share are local users. The action itself would look like the screenshot below, where $STR2 will be substituted by EventSentry with the actual user listed in the event 4663:
That’s it, now just push the configuration and you should be much better prepared to take any ransomware attacks heading your users way.
Oh, and check those backups, would you?