The System Administrator! AKA the Sysadmin. The keeper of the network, computers – well basically all things technology. The one who is hated for imposing complex passwords and other restrictions, but taken for granted when everything works well.
They are the first to be called when “facebuuk.com” reports: “domain does not exist”. They are the first to be contacted in the early hours of the morning with a “I can’t print” complaint – without ever receiving a cordial “Good morning, how are you?” greeting. They are the ones who are expected to fix a personal laptop, with the promise of some donuts that never arrive.
If you are a Sysadmin, then I’m sure you’ve been there. While Diana at the reception desk keeps calling you when she can’t listen to her favorite radio because the page won’t load, but never opening a ticket. Then you are reading that this January’s Patch Tuesday has about 98 CVEs, 10 of which are considered critical.
In the list of CVEs, you recognize the usual actors: NTLM, ODBC Driver, RPC, Print Spooler, Microsoft Office, Microsoft Exchange Server, etc. You think, “When are they going to fix everything for good?”
You need to be everywhere at the same time – add paper to Carla’s printer on the second floor, who was hysterical because she couldn’t print.
Alas, it’s too late to go back and choose another career. You have made up your mind, you are going to be the best Sysadmin you can be. Some days you have slight concerns about your mental health, but you roll up your sleeves and keep going – one coffee at a time.
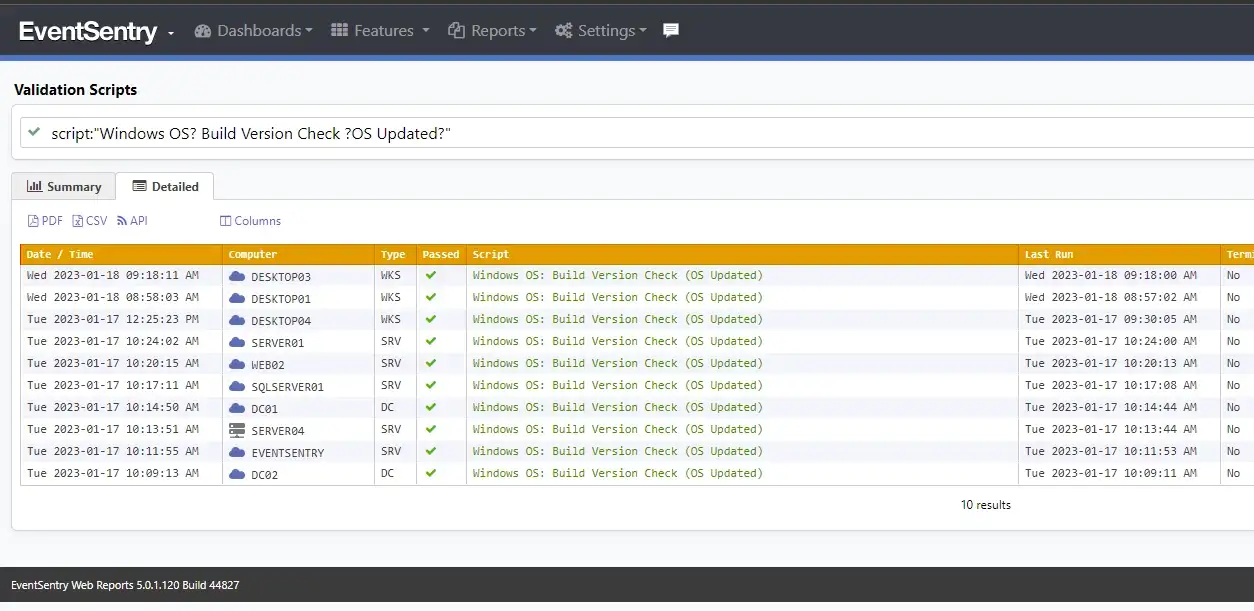
Unfortunately, there is no software to make Carla read the printer error message before calling you. But with EventSentry, you can check if the Patch Tuesday patches have been applied – even if you don’t use WSUS (or especially when you use it). For example, with validation scripts you can quickly see if any machines on the network are not running the latest build (patch) of Windows:
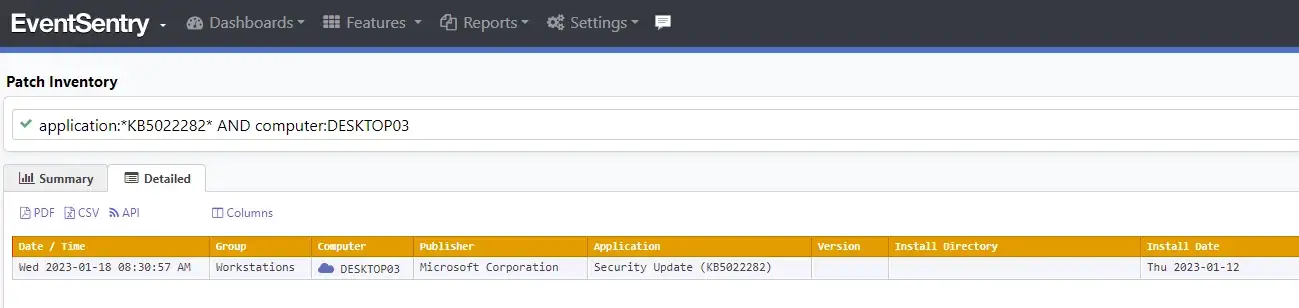
And you can also search if the patch for CVE-2023-21674 (KB5022282) (Windows Advanced Local Procedure Call (ALPC) Elevation of Privilege Vulnerability) was applied on the CEO’s computer:
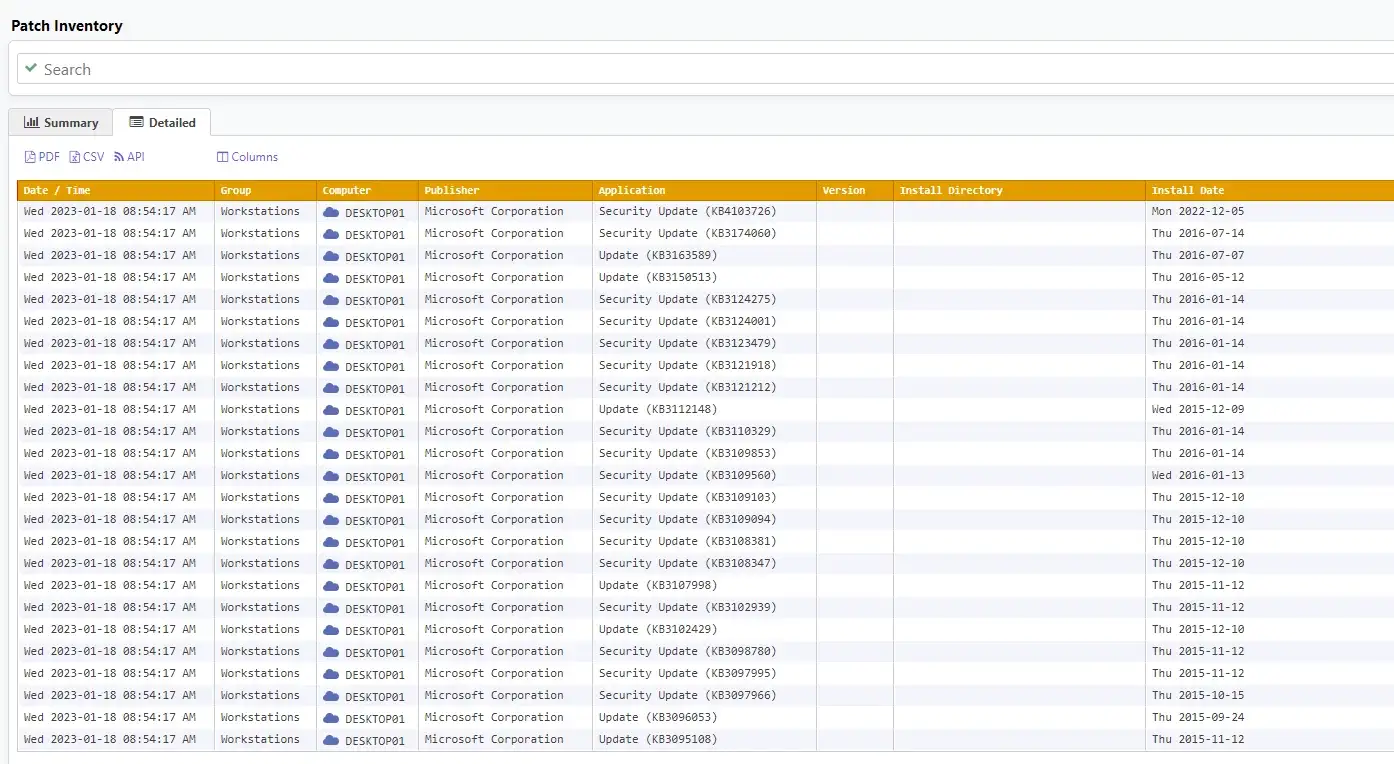
And of course, you can also check if Carla’s printer is out of paper or toner – before making the trip upstairs to her office:
And best of all, everything posted here is included & enabled by default with EventSentry. No need to spend hours configuring or activating options. Simply install EventSentry and you will have access to all of this – out of the box!
In the career of a Sysadmin, there are many day-to-day things that you can’t control. That’s why we created EventSentry, so that you can have control over the network, the devices and, most importantly, the patches. Which of course, leaves you more time to fix Diana’s internet radio!
Almost everyone in IT has heard of VNC – which actually stands for “Virtual Network Computing”. The RFB (Remote Framebuffer) protocol which VNC relies on, was developed around 1998 by Olivetti & Oracle Research Labs. Olivetti (unlike Oracle) isn’t much known outside of Italy/Europe, and the ORL was ultimately closed in 2002 after being acquired by AT&T. But enough of the history.
When the need arises to remotely log into a (Windows) host on the network, Microsoft’s Remote Desktop application (which utilizes Microsoft’s RDP protocol – not RFB) is usually the default choice. And why wouldn’t it be? It’s built into Windows, there is no additional cost, and it’s usually quite efficient (=fast) – even over slower connections.
Remote Desktop has a few disadvantages though, especially when it comes to the IT help desk:
You cannot view the remote user’s current desktop
It’s not cross-platform
You can’t use RDP if it’s disabled or misconfigured
Especially when troubleshooting user problems, being able to see exactly what the user is doing is obviously very beneficial. VNC-based applications are a good alternative since they allow you to view the user’s desktop and subsequently interact with the user. This makes VNC viable for help desk as well as troubleshooting. Nevertheless, VNC-based solutions have their own shortcomings:
Free variations of VNC usually offer no deployment assistance
With over 10 variants available, finding the best VNC implementation is a daunting task
VNC is still deemed as somewhat insecure
VNC can be slow
We set out to solve these shortcomings by creating a number of scripts around UltraVNC that integrate with the EventSentry management console (although they’ll work well without EventSentry as well!). Using the QuickTools feature, you can then connect to a remote host via VNC with 2 clicks, even if the remote host doesn’t have VNC installed.
Important: The scripts only work in environments where you have administrative access to the remote hosts. The scripts need to copy files to the remote host’s administrative shares and control the remote VNC service.
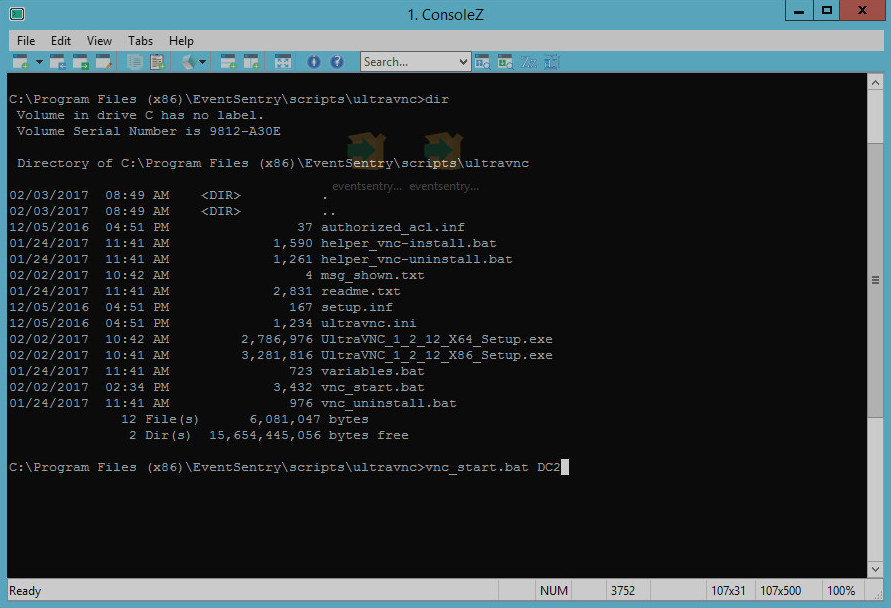
Alternatively, you will also be able to start a VNC session by running the following command:
vnc_start.bat remotehost.yourdomain.com
Even better, VNC can be automatically stopped and deactivated (until vnc_start.bat is run again) once the session is completed in order to reduce the attack surface.
VNC Deployment
As long as you have administrative access to the remote host(s), the script will remotely install VNC and even setup a firewall exclusion rule if necessary – although the UltraVNC installer takes care of this out of the box.
Security
To reduce the attack surface of machines running VNC you can automatically stop the VNC service after you have disconnected from the remote host. Our connection script will automatically start the remote service again when you connect the next time.
For the utmost security you can also completely uninstall VNC when you are done, a script (vnc_uninstall.bat) is included for this purpose.
Speed
Even though VNC is generally not as fast as RDP, it’s usually sufficiently fast in LAN environments (especially for shorter trouble-shooting sessions) and the UltraVNC port which we’ll be covering in this post performs reasonably well even over slower WAN connections.
Integration with EventSentry
Monitoring workstations with EventSentry strengthens the capabilities of any IT helpdesk and IT support team with:
Software & Hardware Inventory
Access to process utilization and log consolidation
Enhanced security with security log & service monitoring
User console logon tracking
Pro-active troubleshooting with access to performance and other system health metrics
Remote desktop sharing is an additional benefit with the UltraVNC package which is included with the latest version of EventSentry (v3.3.1.42). Customizing the scripts and integrating them with EventSentry literally shouldn’t take more than 5 minutes, and once setup & configured will allow you to remotely control any monitored host with a couple of clicks. The scripts do not require EventSentry, but are included with the setup and integrate seamlessly into the EventSentry Management Console.
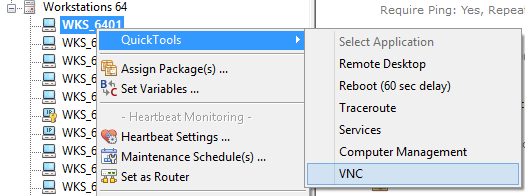
The EventSentry Management Console includes the “QuickTools” feature which allows you to link up to 8 commands to the context menu of a computer item. EventSentry ships with a few default QuickTools commands, for example to reboot a remote machine. Once configured, you simply right-click a computer icon in the EventSentry Management console and select one of the pre-configured applications from the QuickTools sub menu.
EventSentry QuickTools
How does it work?
When you run the vnc_start.bat script, it will first check to see if UltraVNC is already installed on the remote host. If it is, it will skip the installation routine and bring up the local VNC viewer. If you configured the script to automatically stop the VNC service when not in use, it will start the service beforehand. When you disconnect, it will (optionally) stop the VNC service again so that VNC is not accessible remotely anymore.
If VNC is not installed, the script will remotely install & configure UltraVNC using psexec.
If you do not want to leave the UltraVNC service installed on the remote computer, the vnc_uninstall.bat script can be run when the remote session is done. Automatically stopping the remote VNC service is however sufficient in most cases.
Installation
The scripts need to be configured before they can be used in your environment, unless you are an EventSentry user, in which case you only need to download & install the prerequisites.
Super Quick Setup for EventSentry Users It’s no secret, we’re a little biased towards our EventSentry users, and as such setting this up with an existing EventSentry installation is rather easy:
Get psexec.exe and save it in C:\Program Files (x86)\EventSentry\resources.
Download the UltraVNC installers (they have 32-bit and 64-bit – download for the platforms you have on your network) and store them in the C:\Program Files (x86)\EventSentry\scripts\ultravnc folder.
Install UltraVNC on the computer where EventSentry is installed so that the VNC Viewer is available. It’s not necessary to install the whole package, only the viewer component is required.
If “VNC” is not listed in your QuickTools menu, then you will need to add it under Tools->Options->QuickTools. Simply enter “VNC” as the description and specify the path to the vnc_start utility, e.g. “C:\Program Files (x86)\EventSentry\scripts\ultravnc\vnc_start.bat $COMPUTER”. You can optionally check the “Hide” box to prevent the script output from being shown before you connect.
You’ll notice that no password was configured – that’s because you will be logging in with a Windows user and password – only allowing domain admins access by default. This can be configured in the authorized_acl.inf file, if you want to give additional groups and/or users access that are not domain admins.
That’s literally it – easy as pie. Even though we designed this thing to be easy peasy, since things do occasionally go wrong I recommend testing a first connection from the command line. Just open an administrative command prompt, navigate to C:\Program Files (x86)\EventSentry\scripts\ultravnc and type vnc_start somehost.
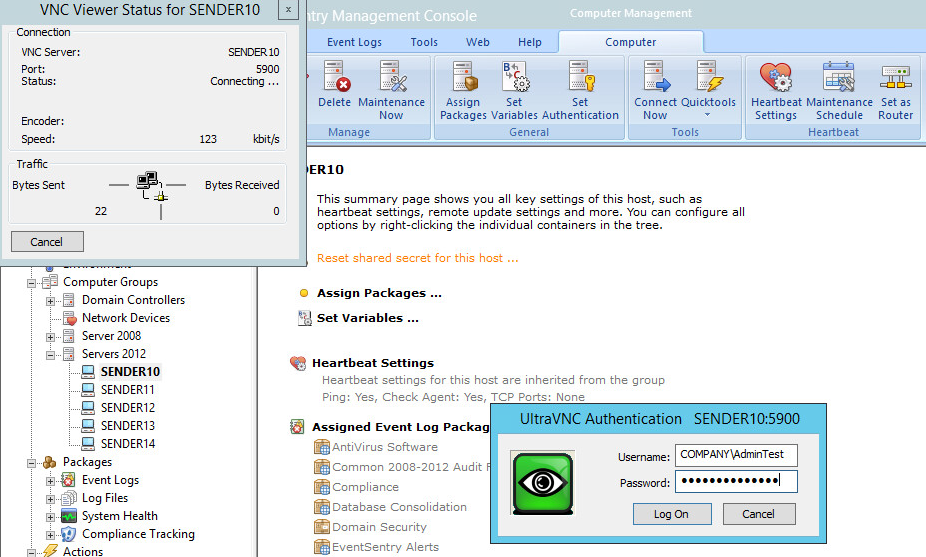
Now just right-click any host – or use the “Quicktools” button in the ribbon – and select the “VNC” menu option. Keep in mind that first-time connections will take longer since the VNC setup file has to be copied and installed on the remote computer. Subsequent connections should be faster.
VNC Viewer Connect Dialog
Manual Normal-Speed Setup for Non-EventSentry Users
So you are not an EventSentry user but still want to utilize these awesome scripts? No problem – we won’t hold it against you. The setup is still easy – you’ll just need to customize a few variables in the variables.bat file.
In variables.bat, set the VNCSETUP_X86 and VNCSETUP_X64 to the setup file names you just downloaded.
Download the PSTools and extract psexec.exe into the working directory, or a directory of your choice.
In variables.bat, point the PSEXECFILE variable to the location where you just saved psexec.exe.
Optional: Edit the authorized_acl.inf file to specify which Windows group or user will have access to VNC. You can either change the first line, or add additional lines to give additional users and/or groups permission.
Install the respective version of UltraVNC on your workstation so that the VNC Viewer is available.
Open a command line window and navigate to the folder to which VNCSOURCE points to. Test the setup by running vnc_start hostname, replacing “hostname” with an actual host name of a remote host of course.
When presented with the login screen of the VncViewer, log in with a Windows domain admin user.
That wasn’t so bad now, was it? Just remember that you’ll need to initiate any VNC session with the vnc_start.bat file. Just launching the Viewer won’t work – even if VNC is already installed on the remote machine – since the VNC service is stopped by our scripts by default. To use the folder names we created, you’ll just run
C:\Deployment\UltraVNC\vnc_start hostname
Enjoy, and happy RFBing!
Connecting to remote host
Configuration – variables.bat For the sake of completeness the variables.bat file is explained below:
VNCSETUP_X86: The file name of the 32-bit installer. This needs to only be changed whenever UltraVNC comes out with a new version. VNCSETUP_X64: The file name of the 64-bit installer. This needs to only be changed whenever UltraVNC comes out with a new version.
REMOTEINSTALLPATH: The directory where the script files will be copied to on the remote host.
VNCSOURCE: This is the folder where all the vnc-related files, including the setup executables, are located on the source host from where you initiate VNC connections – e.g. C:\Deployment\UltraVNC. VNCINSTALLDIR: The directory in which UltraVNC will be installed in (on the remote hosts).
VNCPASSWORD: This variable is not currently used since UltraVNC is automatically configured to authenticate against Windows, by default giving only Domain Admins access to VNC. This is generally more secure than using a password. You can edit the file authorized_acl.inf to give additional users and/or groups access to VNC. The file supports one ACL entry per line.
PSEXECFILE: Unfortunately we are not allowed to bundle the nifty psexec.exe file for license reasons, so you’ll have to download the PsTools and point this variable to wherever you end up copying the psexec.exe file to. If you already have psexec.exe installed then you can save yourself 2 minutes of time and just specify the path to the existing file here.
SET_VNC_SVC_TO_MANUAL: If you don’t entirely trust the security of VNC, maybe because you know what a brute force attack is, and you only want administrators to access VNC then you can set this variable to 1. As long as you only connect to the remote host(s) using the vnc_install.bat script, the scripts will ensure that the remote VNC service is started before you connect and stopped after you disconnect. Between the two of us, I’d always leave this set to 1 unless you have the desire to launch the VNC Viewer directly, or need non-administrators to be able to connect to the remote host(s).
ADD_FIREWALL_RULE: As the name (almost) implies, this will create a firewall exclusion rule on the remote host(s) if you’ve been doing your homework and enabled the Windows firewall. If you don’t like our boring firewall rule name then you can even change the name below by editing the FW_RULE_NAME variable. Enabling this is usually not necessary since the UltraVNC setup adds firewall exclusion rules by default.
VNCVIEWER: If you find that a different version of the VNC viewer works better than the version which we are shipping, then you can change the file name here.
Last week, we talked about the security-focused utilities of the freeware EventSentry SysAdmin Tools, part of the larger EventSentry network-management solution. The SysAdmin Tools offer a set of graphical and command-line utilities designed to help you with your daily administrative tasks. These tools are constantly under development, always being honed to provide simple yet powerful functionality. Three of these tools are vital monitoring utilities: CheckDB, CheckTCP, and CheckURL. Here’s what they can do.
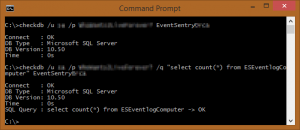
CheckDB verifies a database connection through the Open Database Connectivity (ODBC) interface. With this capability, you can not only verify that a database server is up and running, you can also check that a database is online. You can optionally run a SQL statement of your choice. CheckDB is particularly useful because it doesn’t merely verify that a database server is online (e.g. through a port check), it also verifies that a SQL statement was successful. That capability improves the usability of this tool because it verifies that the SQL server is accepting logins and is working correctly (at least as far as that statement is concerned). Also, this tool will work with any database that supplies ODBC drivers, so it will work with MySQL, MSSQL, and so on. You can schedule CheckDB from within EventSentry (“Application Scheduler”), and even time it. The scheduling capability is a bit advanced, and the setup requires a few steps, but after getting it up and running, you can easily schedule a statement and configure it to notify you if it takes more than two seconds, for example. The parameters of this command-line utility are straightforward: The <DSN/Connectionstring> parameter is the DSN or connection strong to connect to; the /q (or /query) parameter is the SQL query you can run upon successful connection; the /u (or /username) parameter is the DSN unsername to connect as; and the /p (or /password) parameter is the password for “username.” CheckDB can log output either to the console or to the event log, making it easy to receive alerts from the utility through EventSentry or any other log monitoring software. The /I (/logToLog) and /c (/logToConsole) parameters take care of this functionality.
CheckTCP is another command-line application, this one letting you quickly determine whether a TCP port on a host is open. Additionally, you can receive initial data sent from the remote host through an open TCP connection, such as when connecting to most SMTP hosts. CheckTCP exists because Windows doesn’t really offer a built-in way to check whether a TCP port is open. Yes, Nmap is a powerful utility, but you probably often just want to know whether a server that you rebooted is available for remote desktop login. For that, you can simply run “checktcp server123 3389.” It’s not fancy, but it accomplishes a vital task. If you use the /s switch, you can get only the first line of the response. For example, if you use it against a mail server, you would get this:
checktcp /s mymailserver 25
Data: 220 mx.somedomain.com Microsoft ESMTP MAIL Service ready at Fri, 25 Apr 2014 15:07:33 -0500
The parameters of this command-line utility are straightforward: The /s parameter, as mentioned, gets initial data from the remote port (for example, when connecting to an SMTP port); the <Port> parameter displays the TCP port to connect to; and <Hostname> identifies the IP address of hostname to connect to. Although you can use this utility to display any data sent by the remote host over the established connection, CheckTCP is not intended to be used as a port scanner.
CheckURL is the HTTP version of CheckDB, and it lets you detect changes in web pages (through checksums) and look for text inside web pages. With CheckURL you’ll know when a web page changes or when a particular string is or isn’t included in a page. You might use this tool to monitor your corporate pages (at least those which are static and don’t have dynamic content) and also development pages to ensure that they don’t return a HTTP error. This is beneficial because you can have CheckURL look for specific text on the pages. The checksum feature is cool, too, because it lets you know when a page changes. As with with CheckDB, you can schedule CheckURL from within EventSentry (“Application Scheduler”), and even time it. The scheduling capability is a bit advanced, and the setup requires a few steps, but after getting it up and running, you can easily schedule a statement and configure it to notify you if it takes more than two seconds, for example. At NETIKUS.NET, we monitor our online store that way. If the store takes more than three seconds to load, we get an alert. Like CheckDB, CheckURL can log output either to the console or to the event log, making it easy to receive alerts from the utility through EventSentry or any other log monitoring software. CheckURL supports SSL as well as proxy servers.
More to Come!
This is just a taste of the free, constantly evolving tools available in EventSentry SysAdmin Tools. Give them a try—you won’t be able to stop with just one.
Part of our larger EventSentry network-management solution, the freeware EventSentry SysAdmin Tools offer a set of graphical and command-line utilities designed to help you with your daily administrative tasks. These tools are constantly under development, always being honed to provide simple yet powerful functionality. Three of these tools are vital security utilities: Password Assistant, Service Secure, and Task Secure. Let’s take a look at what they offer.
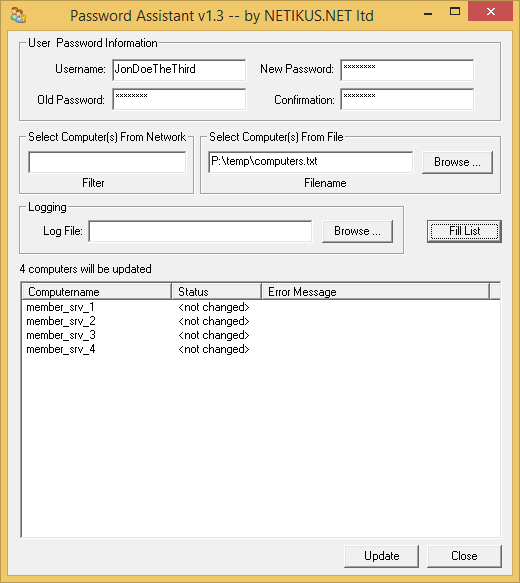
Password Assistant Password Assistant is a simple yet powerful tool that lets you update the passwords of user accounts on multiple Windows machines. You simply enter the username, the old password, and the new password (with confirmation); after doing so, you can select the computer name(s) from a network neighborhood list (with a filter option) or choose the computer(s) from a text file. The update process can also be logged to a text file.
All the parameters of the command-line utility are provided in clear terms: The /u (or /username) parameter specifies the username whose password needs to be changes, the /pwold parameter takes that account’s old password, and the /pwnew parameter accepts the new password; there are also /n (or /network), /f (or /filepath), and /filter parameters for specifying computers, as mentioned above. The /ignore_rest parameter ignores the rest of the labeled arguments following this flag, and the /version parameter displays version information and exits.
A great sample use of Password Assistant is when you need to update the administrator passwords on all of the workstations in your environment. Password Assistant provides a one-stop interface—or a simple command-line utility—for making the task hassle-free.
ServiceSecure
Service Secure provides a simple command interface that displays all of your system’s services, grouped by service account. The tool also lets you easily reset service passwords by specifying username and password rather than having to manually configure those services through the Microsoft Management Console (MMC).
All the parameters of the command-line utility are provided in clear terms: The /p (or /password) parameter sets a password; the /c (or /changepwd) parameter changes a password; the /r (or /restart) parameter restarts the service after the password has been changed; the /u (or /username) parameter lists only those services running under a certain username; the /ignore_rest parameter ignores the rest of the labeled arguments following this flag; the /version parameter displays version information and exits.
Suppose service security has been compromised, and you need to quickly change the passwords of a user account used by a number of services. That task is no longer a logistical nightmare: You can now simply use ServiceSecure in a batch file and update all affected services in your entire network in a matter of moments.
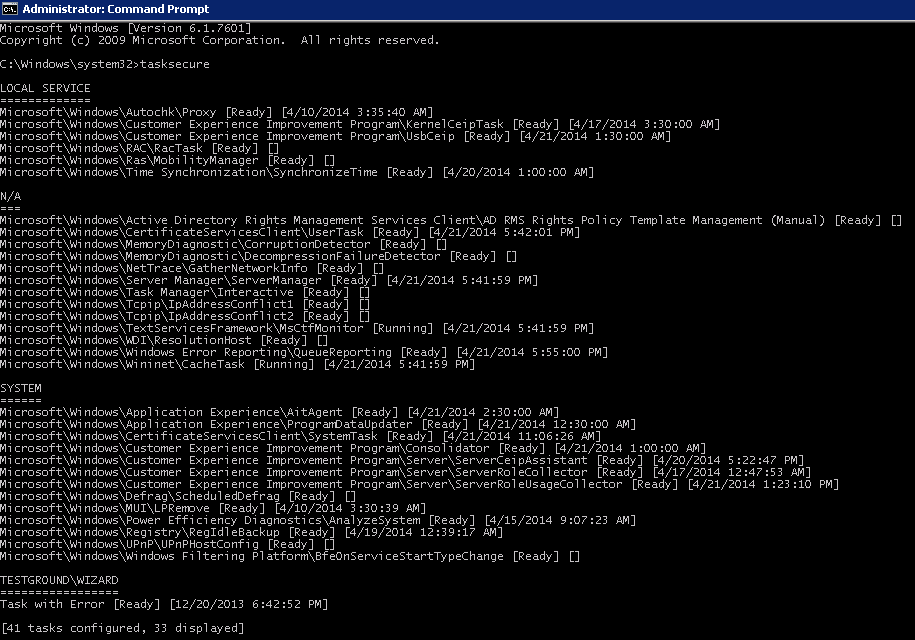
TaskSecure
Task Secure provides a simple command interface that displays all of your system’s scheduled tasks, grouped by task account. The tool also lets you easily manage the passwords stored in scheduled tasks on your network. Simply specify the username and password, and Task Secure will reset the password stored in all scheduled tasks (using the specified username) on the specified computer (local or remote).
All the parameters of the command-line utility are provided in clear terms: The /r (or /remote_host) parameter lists all the scheduled tasks on a given host; the /u (or /username) parameter lists only those scheduled tasks running under a certain username; the /p (or /password) parameter sets a password for every scheduled task configured for a certain user account; the /ignore_rest parameter ignores the rest of the labeled arguments following this flag; the /version parameter displays version information and exits.
Suppose you need to quickly change the passwords of all the scheduled tasks used by one user. You can now simply use Task Secure in a batch file and update all scheduled tasks in your entire network in a matter of moments.
More to Come! This is just a taste of the free, constantly evolving tools available in EventSentry SysAdmin Tools. Give them a try—you won’t be able to stop with just one.
I’m assuming that most readers are familiar with what RAID, the “Redundant Array of Inexpensive Disks”, is. Using RAID for disk redundancy has been around for a long time, apparently first mentioned in 1987 at the University of California, Berkeley (see also: The Story So Far: The History of RAID). I’m honestly not sure why they chose the term “inexpensive” back in 1987 (I suppose “RAD” isn’t as catchy of a name), but regardless of the wording, a RAID is a fairly easy way to protect yourself against hard drive failure. Presumably, any production server will have a RAID these days, especially with hard drives being as inexpensive as they are today (unless you purchase them list price from major hardware vendors, that is). Another reason why RAID is popular, is of course the fact that hard drives are probably the most common component to break in a computer. You can’t really blame them either, they do have to spin an awful lot.
Lesson #1: Don’t neglect your backups because you are using RAID arrays
That being said, we recently had an unpleasant and unexpected issue in our office with a self-built server. While it is a production server, it is not a very critical one, and as such a down-time of 1-2 days with a machine like that is acceptable (albeit not necessarily desired). Unlike the majority of our “brand-name” servers, which are under active support contracts, this machine was using standard PC components (it’s one of our older machines), including an onboard RAID that we utilized for both the OS drive as well as the data drive (it has four disks, both in a RAID 1 mirror). Naturally, the machine is monitored through EventSentry.
Well, one gray night it happened – one of the hard drives failed and a bunch of events (see myeventlog.com for an example) were logged to the event log, and immediately emailed to us. After disappointingly reviewing the emails, the anticipated procedure was straightforward:
1) Obtain replacement hard drive
2) Shut down server
3) Replace failed hard drive
4) Boot server
5) Watch RAID rebuilding while sipping caffeinated beverage
The first 2 steps went smoothly, but that’s unfortunately how far our IT team got. The first challenge was to identify the failed hard drive. Since they weren’t in a hot-swappable enclosure, and the events didn’t indicate which drive had failed, we chose to go the safe route and test each one of them with the vendors supplied hard drive test utility. I say safe, because it’s possible that a failed hard drive might work again for a short period of time after a reboot, so without testing the drives you could potentially hook the wrong drive up. So, it’s usually a good idea to spend a little bit of extra time in that case, to determine which one the culprit is.
Eventually, the failed hard drive was identified, replaced with the new (exact and identical) drive, connected, and booted again. Now normally, when connecting an empty hard drive, the raid controller initiates a rebuild, and all is well. In this case however, the built-in NVidia RAID controller would not recognize the RAID array anymore. Instead, it congratulates us on having installed two new disks. Ugh. Apparently, the RAID was no more – it was gone – pretty much any IT guys nightmare.
No matter what we tried, including different combinations, re-creating the original setup with the failed disks, trying the mirrored drive by itself, the RAID was simply a goner. I can’t retell all the things that were tried, but we ultimately had to re-create the RAID (resulting in an empty drive), and restore from backup.
We never did find out why the RAID 1 mirror that was originally setup was not recognized anymore, and we suspect that a bug in the controller firmware caused the RAID configuration to be lost. But regardless of what was ultimately the cause, it shows that even entire RAID arrays may fail. Don’t relax your backup policy just because you have a RAID configured on a server.
Lesson #2: Use highly reliable RAID levels, or configure a hot spare
Now I’ll admit, the majority of you are running your production servers on brand-name machines, probably with a RAID1 or RAID5, presumably under maintenance contracts that ship replacement drives within 24 hours or less. And while that does sound good and give you comfort, it might actually not be enough for critical machines.
Once a drive in a RAID5 or RAID1 fails, the RAID array is in a degraded state and you’re starting to walk on very thin ice. At this point, of course, any further disk failure will require a restore from backup. And that’s usually not something you want.
So how could a RAID 5 not be sufficiently safe? Please, please: Let me explain.
Remember that the RAID array won’t be fully fault tolerant until the RAID array is rebuilt – which might be many hours AFTER you plug in the repaired disk depending on the size, speed and so forth. And it is during the rebuild period that the functional disks will have to work harder than usual, since the parity or mirror will have to be re-created from scratch, based on the existing data.
Is a subsequent disk failure really likely though? It’s already pretty unlikely a disk fails in the first place – I mean disks don’t usually fail every other week. It is however much more likely than you’d think, somewhat depending on whether the disks are related to each other. What I mean with related, is whether they come from the same batch. If there was a problem in the production process – resulting in a faulty batch – then it’s actually quite likely that another bites the dust sooner rather than later. It happened to a lot of people – trust me.
But even if the disks are not related, they probably still have the same age and wear and, as such, are likely to fail in a similar time frame. And, like mentioned before, the RAID array rebuild process will put a lot of strain on the existing disks. If any disk is already on its last leg, then a failure will be that much more likely during the RAID array rebuild process.
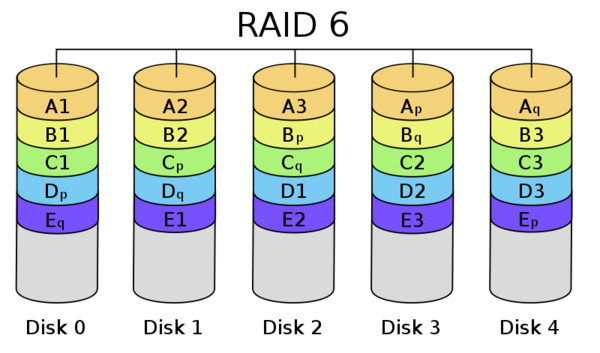
RAID 6, if supported by your controller, is usually preferable to a RAID5, as it includes two parity blocks, allowing up to two drives to fail. RAID 10 is also a better option with potentially better performances, as it too continues to operate even when two disks fail (as long as it’s not the disks that are mirrored). You can also add a hot spare disk, which is a stand-by disk that will replace the failed disk immediately.
If you’re not 100% familiar with the difference between RAID 0, 1, 5, 6, 10 etc. then you should check out this Wikipedia article: It outlines all RAID levels pretty well.
Of course, a RAID level that provides higher availability is usually less efficient in regards to storage. As such, a common counterargument against using a more reliable RAID level is the additional cost associated with it. But when designing your next RAID, ask yourself whether the savings of an additional hard drive is worth the additional risk, and the potential of having to restore from a backup. I’m pretty sure that in most cases, it’s not.
Lesson #3: Ensure you receive notifications when a RAID array is degraded
Being in the monitoring business, I need to bring up another extremely
important point: Do you know when a drive has failed? It doesn’t help much to have a RAID when you don’t know when one or more drives have failed.
Most server
management software can notify you via email, SNMP and such – assuming
it’s configured. Since critical events like this almost always trigger
event log alerts as well though, a monitoring solution like EventSentry can simplify the notification process.
Since EventSentry monitors event logs, syslog as well as SNMP traps, you can take a uniform approach to notifications. EventSentry can notify you of RAID failures regardless of the hardware vendor you
use – you just need to make sure the controller logs the error to the
event log.
Lesson #4+5: Test Backups, and store backups off-site
Of course one can’t discuss reliability and backups without preaching the usual. Test your backups, and store (at least the most critical ones) off-site.
Yes, testing backups is a pain, and quite often it’s difficult as well and requires a substantial time commitment. Is testing backups overkill, something only pessimistic paranoids do? I’m not sure. But we learned our lessen the hard way when all of our 2008 backups were essentially incomplete, due to a missing command-line switch that recorded (or in our case did not) the system state. We discovered this after, well, we could NOT restore a server from a backup. Trust me: Having to restore a failed server and having only an incomplete, out-of-date or broken backup, is not a situation you want to find yourself in.
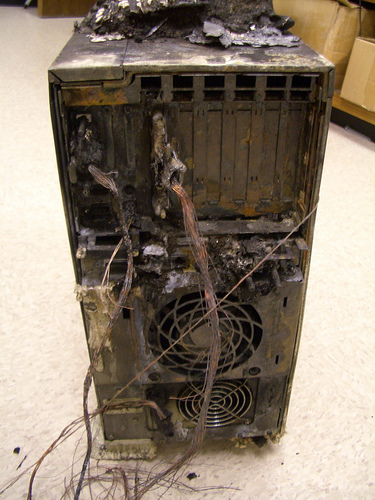
My last recommendation is off-site storage. Yes, you have a sprinkler system, building security and feel comfortably safe. But look at the picture on top. Are you prepared for that? If not, then you should probably look into off-site backups.
So, let me recap:
1. Don’t neglect your backups because you are using RAID arrays.
2. Use highly reliable RAID levels, or configure a hot spare.
3. Ensure you receive notifications when a RAID array is degraded
4. Test your backups regularly, but at the very least test them once to ensure they work.
5. Store your backups, or at least the most critical, off-site.


 You can optionally run a SQL statement of your choice. CheckDB is particularly useful because it doesn’t merely verify that a database server is online (e.g. through a port check), it also verifies that a SQL statement was successful. That capability improves the usability of this tool because it verifies that the SQL server is accepting logins and is working correctly (at least as far as that statement is concerned). Also, this tool will work with any database that supplies ODBC drivers, so it will work with MySQL, MSSQL, and so on. You can schedule CheckDB from within EventSentry (“Application Scheduler”), and even time it. The scheduling capability is a bit advanced, and the setup requires a few steps, but after getting it up and running, you can easily schedule a statement and configure it to notify you if it takes more than two seconds, for example. The parameters of this command-line utility are straightforward: The <DSN/Connectionstring> parameter is the DSN or connection strong to connect to; the /q (or /query) parameter is the SQL query you can run upon successful connection; the /u (or /username) parameter is the DSN unsername to connect as; and the /p (or /password) parameter is the password for “username.” CheckDB can log output either to the console or to the event log, making it easy to receive alerts from the utility through EventSentry or any other log monitoring software. The /I (/logToLog) and /c (/logToConsole) parameters take care of this functionality.
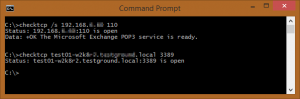 For that, you can simply run “checktcp server123 3389.” It’s not fancy, but it accomplishes a vital task. If you use the /s switch, you can get only the first line of the response. For example, if you use it against a mail server, you would get this:
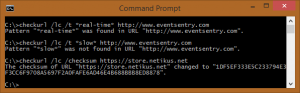 The scheduling capability is a bit advanced, and the setup requires a few steps, but after getting it up and running, you can easily schedule a statement and configure it to notify you if it takes more than two seconds, for example. At NETIKUS.NET, we monitor our online store that way. If the store takes more than three seconds to load, we get an alert. Like CheckDB, CheckURL can log output either to the console or to the event log, making it easy to receive alerts from the utility through EventSentry or any other log monitoring software. CheckURL supports SSL as well as proxy servers.