Managing Windows Services & Service Credentials

Every Windows server runs a seemingly ever increasing number of services which range from built-in services providing core Windows functionality (e.g. Print Spooler, Bitlocker, WMI) to 3rd party services added when installing 3rd party software (e.g. various software update services, MySQL) – all of which run in the context of a specific user account.

For example, Windows Server 2012 includes more than 300 services, about half of which are automatically running (this particular server has SQL Server installed as well):

Services on Windows Server 2012 grouped by user

That user account is either a built-in security principal of Windows (e.g. NetworkService), a user account specifically created for that service, or another user account from the server or domain.

Common Practices
Services should always run under a user account which has the least amount of privileges necessary to do its job. It’s common, and often tempting, to run a service an administrative account like “Administrator”. While this often the easiest way to “get it working”, it’s also the least secure.

When a service runs under the “Administrator” account – especially if it’s the domain Administrator account – the service has almost unrestricted access to all resources on the host or, in case of a domain admin, on the domain. This is not something a service usually needs nor you want. It also means that the service will stop working whenever the password of the Administrator account is changed (the service will continue to work until it is restarted).

Less is Better
Whenever possible, try to use one of the built-in security principals available in Windows to run a service under, or create a specific user account for the service. For example, if you have a file synchronization app which runs as a service, create a “ServiceFileSync” or similar account and configure the service to run under that account. Carefully examine the rights the service requires, and only assign those privileges to the user account which the service actually needs.

When creating the user account, give it a very strong & complex password. Users won’t have to log on with that user account, so the password can be complex and long. You can optionally check the “password does not expire” option if you feel that the password is sufficiently secure and you have a short password expiration policy on your domain which could interfere with the service starting after the password expired.

In domain environments I also recommend giving those user accounts (since you will most likely end up with more than one) either a common prefix or suffix (e.g. svc_mysql) and/or moving the accounts into a specific OU. This makes managing and distinguishing these accounts easier – especially in teams with more than one SysAdmin.

The quick way: Local Services grouped by User Account

Sample output from srvsec

To view all locally installed services grouped by the user account they are running under, download the EventSentry SysAdmin Tools and just run srvsec.exe. This will show you all locally running services, and group the output by the user account they are running under. Srvsec can also be pointed at a remote host, and can also change the passwords stored in services. Click here for more information on srvsec.

Srvsec is a great tool to quickly see what’s going on a single host, but to manage services on an entire domain effectively a more scalable solution is available: EventSentry + AutoAdministrator – the dynamic duo!

The right way: Making sense of ALL installed services
Even when passwords for service accounts are sufficiently strong, they should still be changed on a regular basis. But which services are installed where and are using which service account?

If this is your first time examining service accounts on your network, you should first identify which services run under which user accounts. EventSentry’s service monitoring feature combined with the web-based reporting really makes this a breeze. Assuming that you have a service monitoring system health package assigned to all of your servers, you can simply open the web reports and navigate to Status – Services and get a birds-eye view of all installed services.

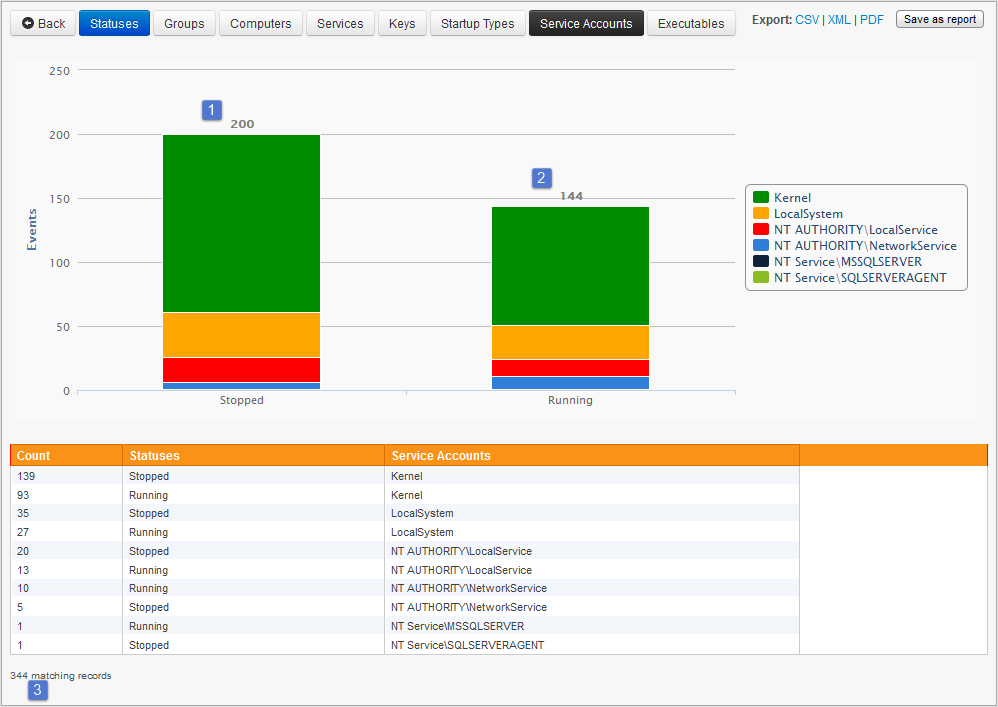
In the Overview view, all installed services are grouped by common attributes, including startup type (automatic startup services vs manual startup services), current status, service name and, most importantly for this post, the service user account.

Service overview of all services installed in a domain / forest.
Overview of all installed services in a domain.

Click the “Show All” link to see all user accounts, or click on a specific user account (e.g. “LocalSystem”) to filter the list and only show services running under this specific user account. In most cases you will want to click on “Detailed” to see a list of all services with more detail.

In addition to filtering and viewing details, you can also click on the header of the

All user accounts used by services
All service user accounts

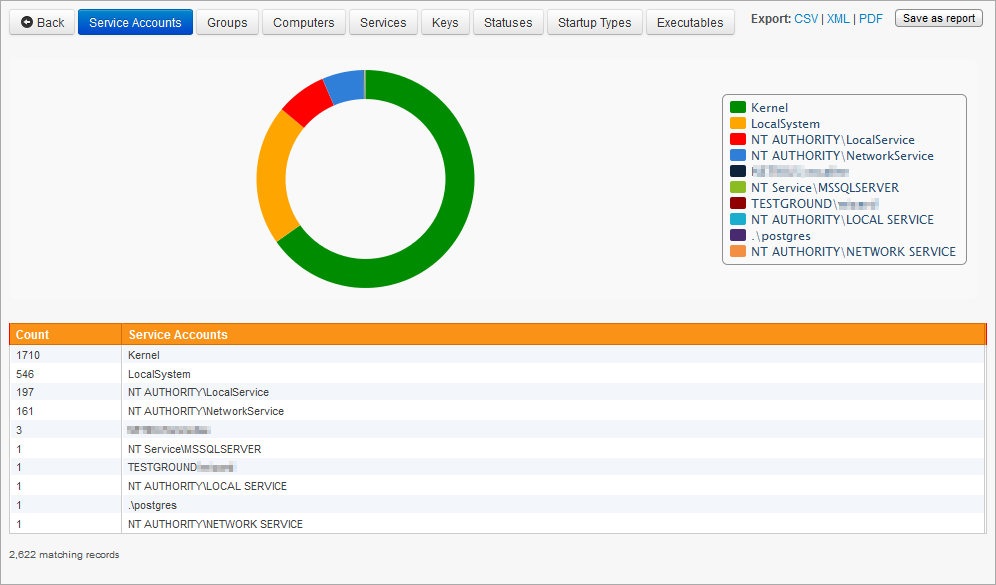
username (or any other) column to see a chart depicting all user accounts used by services from all monitored servers and workstations.

Any report viewed in the web reports can also be scheduled with a job, e.g. a list of all user accounts used by services could be emailed daily/weekly. Simply click the “Save as Report” link to create a report and setup a job.

Managing Services
The standard way to configure the user account and password used by a service is through the “Services” application in Windows. This works well for one or two servers, but not when you need to update the password for a service on multiple hosts.

Managing services with AutoAdministrator

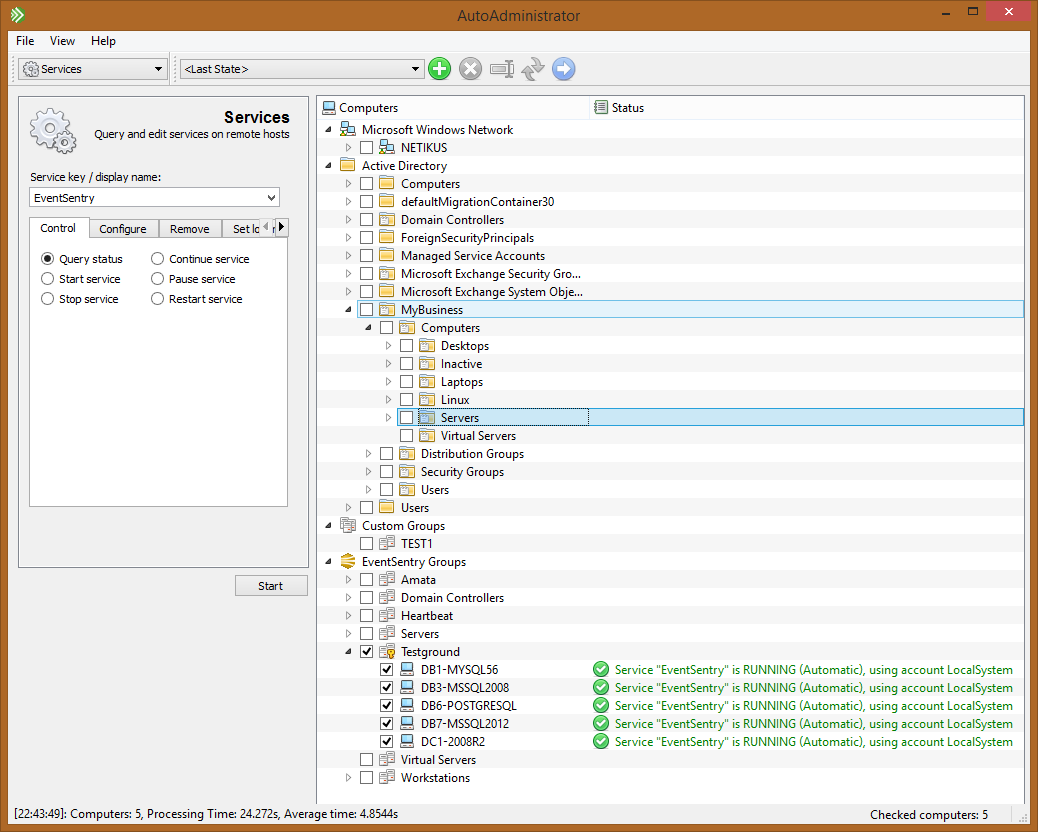
This is where AutoAdministrator comes in: A free graphical tool which lets you do just that (and quite a bit more): Update the username and/or password of a service on multiple servers in a domain or work-group. Since AutoAdministrator is multi-threaded, even tasks affecting a large amount of hosts usually only take a few seconds.

To update the stored password of a service, open AutoAdministrator and select “Services” from the drop-down list on the top left.

Service Key Name
Service Key Name

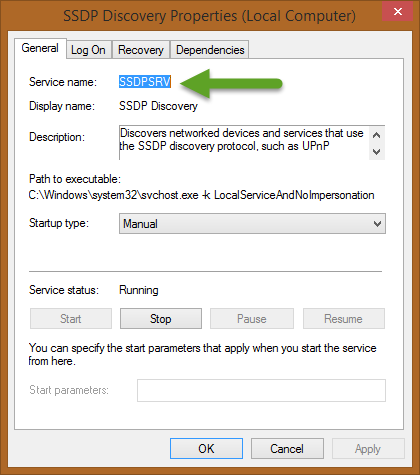
Next, select the service you wish to update from the “Service key / display name” drop-down. If the service is not listed, simply specify the service key name in the service field. The key name is the internal name used by the service and can be obtained by double-clicking a service name in the “Services” MMC application in Windows.

Updating service credentials

Next, click on the “Set logon” tab and specify the new username and/or password. Of course you can also specify other service actions, such as restarting the service or changing the start-up type.

As the next step, select the hosts you wish to apply the selected changes to. You can select hosts from Active Directory, EventSentry, custom groups or work groups (Microsoft Windows Network).

Once the correct hosts are selected, click the “Start” button. The number of hosts which will be affected by any action is always shown on the bottom right of the application.

Firefox .NET Framework Assistant Paranoia

There has been a lot of concern and uproar recently about the .NET Framework Assistant Firefox Add-On (plug-in), that Microsoft silently installs with the Microsoft .NET Framework 3.5 Service Pack 1 (which was pushed in early 2009 with Windows Update). As such, if you are using Firefox, then there this is a very high probability that you have this Firefox Add-On installed, maybe even without knowing it.

To quote Microsoft: “In the .NET Framework 3.5 SP1, the .NET Framework Assistant enables
Firefox to use the ClickOnce technology that is included in the .NET
Framework.”

There are dozens of blogs that complain about the security implications, how the Add-On cannot be uninstalled and eventually post instructions on how to remove the Add-On from your computer, essentially implying that the AddOn harbors major security risks. Contrary to most Firefox Add-Ons, this one can’t be uninstalled through the browser since it was installed at the “computer level”. As such, you have to remove files from the file system and modify the Firefox configuration to disable it.

I’d have to admit that I haven’t heard much about the ClickOnce technology before this sneaky little AddOn was set free, and the buzz words one reads in all the blogs, newspapers etc. certainly have the potential to make one uneasy and follow the surgical removal procedure without much hesitation:

  • Microsoft installs .NET AddOn without user approval!
  • AddOn can’t be uninstalled
  • AddOn silently runs .NET applications without user knowledge!
  • ActiveX security hell is back!

So is the AddOn a security risk and do you have scramble to rip it out? Not in my opinion, and I will explain why.

aa_FireFox_NetFrameworkAssistant_addon_1.jpgIn this post I will clear up some misconceptions about the ClickOnce technology, but also show you how to remove the AddOn from any number of computers with a few clicks – using our new AutoAdministrator 2.0 – just in case you do want to rip it out :-).

What most people don’t know, is that the ClickOnce “technology” is already present in Internet Explorer, and is not even close to what was/is possible with ActiveX applets.

ClickOnce applications run in a sandbox, similar to Java, and – by default – do not have any permission outside the sandbox. As such, a web site can’t just install a trojan horse or spam client on your computer – at least not using ClickOnce. The users permission is asked before elevated permissions are assigned to the application, and software that’s being installed can be signed – just like Windows applications are. Please see the Microsoft article below for more information on ClickOnce deployment and security:

ClickOnce Deployment and Security

So the AddOn is really just a gateway into something that is already on your system in the first place – .NET.  Java does the same thing, and the AddOn Microsoft provides is likely much leaner than the Java plugins – and doesn’t register a new plugin with every new Java update that is released.

Don’t get me wrong – Microsoft could have handled this much better, and the inability to uninstall the AddOn really doesn’t help their case.

Oh, and by the way, to see a sample ClickOnce application then you can click here. It’s hosted by the author of the FFClickOnce Firefox AddOn, a predecessor of the .NET Framework Assistant if you will.

However, Microsoft has recently provided information on their site that outlines the required steps to remove the Add-In from Firefox, and has also released an update that will allow you to uninstall it on a per-user basis. Keep in mind that even with this update, every user would have to uninstall the Add-On manually:

Update to .NET Framework 3.5 SP1 for the .NET Framework Assistant 1.0 for Firefox

Having said all that, you might still want or have to remove the AddOn from multiple computers if you need to remove the ability for your users to run ClickOnce applications from Firefox. The good news is that you can remove all files as well as all registry entries that are associated with this Add-On from any number of computers within a matter of minutes — using AutoAdministrator.

AutoAdministrator integrates with ActiveDirectory, and lets you query/modify files, services, registry entries and more on any number of computers with the click of a few buttons. Read on to find out more.

Microsoft states that you need to perform three steps to remove the Add-On (official removal instructions – KB963707):

1. Delete the registry key HKEY_LOCAL_MACHINE\SOFTWARE\Mozilla\Firefox\Extensions\{20a82645-c095-46ed-80e3-08825760534b}

2. In the Firefox preferences (about:config), right-click the general.useragent.extra.microsoftdotnet property and select “reset”.

3. Delete the folder %SYSTEMDRIVE%\Windows\Microsoft.NET\Framework\v3.5\Windows Presentation Foundation\DotNetAssistantExtension\DotNetAssistantExtension.

We can accomplish (1) and (3) with AutoAdministrator, which does remove the Add-On. It doesn’t reset the setting inside Firefox (2), but that should be merely a formality without the actual plug in. Our tests have shown that the plug in is gone after deleting the registry key and the directory on the file system.

There are two prerequisites for this to work: Your remote machines need to have the remote registry service running (you can temporary toggle that too with AutoAdministrator if it’s not running!) and the ADMIN$ share needs to exist.

As with all things you can do with AutoAdministrator, you should be very careful. We cannot take any responsibilities if you end up corrupting your Firefox installations, or worse, the Windows OS.

So, fire up AutoAdministrator and select the computers you want to uninstall the pesky Add-On from in the right pane. Then, select “Registry” from the toolbar and paste the key from step one in there and select “Delete key”.

aa_FireFox_NetFrameworkAssistant_Registry.jpgThe screen shot above shows the result list, using the “Read Value” option. To actually delete the key, you would need to select “Delete key”. Machines that are turned off are displayed as “Ping Failure: …”, and machines that don’t have the Add-On installed show a Windows API error message.

When you are doing ripping the registry settings out, you can delete the folder as well. This time, select “File Management” from the toolbar, and paste the directory in there. Note that the remote path should start with ADMIN$, as shown in the screen shot below:

aa_FireFox_NetFrameworkAssistant_Folder.jpgYou can also save these s
ettings as a preset, so that you can retrieve these settings at any point in the future with the click of a button.

I hope this information helps you make an informed decision as to how to proceed with the AddOn if it’s already installed in your network. You can

  1. Leave it
  2. Give your users instructions on how to disable it
  3. Roll-out the Microsoft patch to give your users the ability to uninstall it ( arguably identical to (2) )
  4. Remove it from all systems with AutoAdministrator or scripts

I think if this exercise reveals anything, then it’s that Firefox’s AddOn framework leaves some room for improvement. For example, why did Firefox not inform me that this AddOn had been installed? Skype also silently installs an AddOn, though that can be removed easily.

And if you’re really serious about browser security, then you might want to check out the Flashblock AddOn. It disables all flash animations by default, leaving placeholders that you can click to load any flash animation. This improves page load times, can help suppress annoying flash-based ads and of course helps security. I haven’t tested it on many sites yet, but it can quickly get annoying if you’re accessing a lot of web sites that contain reporting widgets that are flash-based.

So long,
Ingmar.

Announcing AutoAdministrator v2.0

After launching version 2.90 of EventSentry just a few months ago, we’re excited to announce yet another major software release coming from NETIKUS.NET ltdAutoAdministrator v2.0.

The last update of the 1.x series was released more than four years ago, so we decided to completely re-build it from scratch and add all the features that have been requested by our users since the last release. The result is a powerful tool that makes it unbelievably easy to apply changes to remote workstations and servers. Whether a change or query needs to be applied to one or 100 computers makes little difference with AutoAdministrator.

In a nutshell, AutoAdministrator lets you query or update a variety of Windows settings and services across any number of servers and/or workstations, without the need to create a script or perform the actions manually. Simply select the feature, computers (it integrates with Active Directory) and click start.

Let’s say, for example, that you needed to obtain or set the value of a registry entry across 30 machines. By just using regedit, it would probably take you a total of 15 minutes to connect, retrieve the value, and paste it to an editor/spreadsheet and move on to the next machine. The same task, using AutoAdministrator, could be done in as little as 1 minute.

aa_v20_1.jpg

Querying the “Remote Registry” service status across multiple computers

This is just one example of course, as AutoAdministrator can control services, read/set registry values, query file information, copy/delete files, manage passwords, shutdown/reboot, query logged on users, ping hosts and manage ODBC connections.

As previously mentioned, AutoAdministrator integrates with ActiveDirectory, making it a breeze to manage computers that are part of a Windows domain. You can also pull computers from the Microsoft Windows Network or create custom groups to organize computers inside AutoAdministrator. If you need to connect to remote computers using alternate (administrative) credentials, then you can assign those credentials to any Active Directory OU, group or individual computer item.

The update process itself is fully threaded, making it possible to push updates in a very short time, even to a large amount of computers.

aa_v20_2.jpg

File Management dialog, mirror / copy the
C:\Batch directory to remote computers


Another new feature is the ability to create presets, making it a snap to repeat common tasks. Simply configure the feature (e.g. query service W3SVC), select the computers and save it as a preset. The next time you open AutoAdministrator, you can simply select the preset and click “Update”.

We think that AutoAdministrator is an incredible time-saver for anybody who manages more than 10 computers, whether they are servers or workstations.

Here is a complete list of all features in the new AutoAdministrator:

Ping
Ping computers to retrieve ping statistics.

ODBC
Query, copy or delete System DSNs on remote hosts.

Passwords
Verify, update or reset passwords of user accounts on remote hosts.

Shutdown / Reboot

Shutdown, reboot or cancel a pending shutdown on remote hosts. You can optionally send a message as well.

Services

  • Control any service (Query, start, stop, continue, pause, restart)
  • Change startup type (manual, automatic, disabled)
  • Remove service
  • Change Logon (service can be automatically restarted as well)


Registry

  • Values: Read, add, delete and change
  • Keys: Add, delete
  • Copy entire keys to remote computers

File Management

  • Copy files and folders to remote computers
  • Delete files and folders from remote computers
  • Mirror local directories to remote computers

File Information

  • Query remote files to retrieve its hash, size, attributes, modification time, version, company or description
  • Remote files can be compared against a hash you provide

Logons

  • Show users that are currently logged on interactively to a computer
  • Count the number of users that are logged on (useful for terminal servers)

The scheduled release date for AutoAdministrator is January 12th 2009, and you can request a trial then at https://www.netikus.net/products_trial_request.html. If you can’t wait and would like to download the beta, then simply contact our support team at https://www.netikus.net/about_contact.html.

Happy New Year,
Ingmar.