Agent vs Agentless: Why you should monitor (event) logs with an agent-based log monitoring solution

The debate as to whether agent-based or agent-less monitoring is “better” has been answered many times over the years in magazine / online articles, blog posts, vendor white papers and others. Unfortunately, most of these articles are often incomplete, inaccurate, biased, or a combination thereof.

To make things slightly more confusing, different ISV use different methods for monitoring servers and workstations. Some use agents, some don’t, and a small few offer both both methods. But what is ultimately the best method?

What are you monitoring?

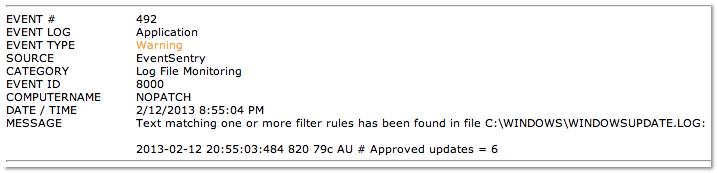
First it’s important determine what is being monitored to determine whether an agent-based or agent-less approach is better. For example, collecting system metrics like performance data usually creates fewer challenges then transmitting large amounts of (event) log data. Furthermore, agent-based monitoring is not an option for devices which run a proprietary embedded OS (think switch, printer, …) where you can’t install an agent in the first place.

Consequently I’ll be focusing on monitoring (event) logs with an emphasis on Microsoft Windows in this post. Having developed both agent-based as well as agent-less components in C++ over the years I feel that I am in a good position to objectively compare agent-based with agent-less approaches.

The Myths

Monitoring software is of course not the only type of software that uses agents, a lot of other enterprise software (backup, deployment, A/V …) uses agents as well. Below are some of the myths as to what (monitoring) using agents entails:

  • Agents may use up too many resources on the monitored hosts and slow down the monitored machines
  • Agents can become unstable and negatively affect the host OS
  • Deploying and managing agents is tedious and time-consuming
  • Installing agents may require the installation & deployment of dependencies the agents need (.NET, Java, …)
  • Installing third-party software will decrease the security of the monitored host

The Reality

It’s understandable that software which is installed on potentially every server and workstation in a network undergoes some level of scrutiny, but would you be surprised to learn that agents excel in the following areas:

1. Security: Better security since agents push data to a central component, instead of the monitored server being configured to allow remote collection.
2. Reliability: Agents can temporarily store and cache monitored logs if connectivity to the central monitoring server is lost, even if local logs are no longer available. Agents can also take corrective actions more quickly because they can work in isolation (offline). Mobile devices cannot be monitored with agent-less solutions since they cannot be reached by the central monitoring component.
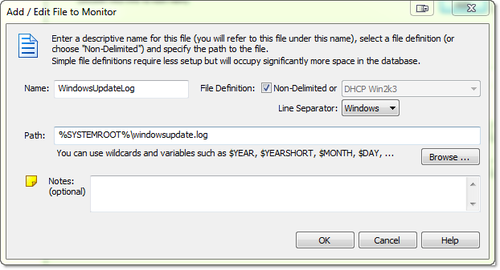
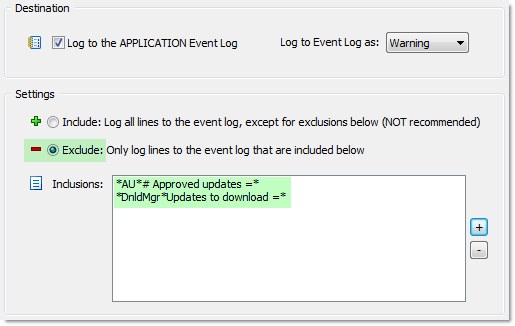
3. Performance: Agents can apply local filtering rules and only transmit data which is valuable, thus increasing throughput while decreasing network utilization.
4. Functionality: They offer more capabilities since there are essentially no limits as to what type of information can be gathered by an agent since it has full access to the monitored system.

The Easy Way Out

Developing agents along with an easy-to-use deployment mechanism requires a lot of time and resources, so it doesn’t come as a surprise to learn that many vendors prefer to monitor hosts without agents. To compensate for the short-fall, ISV which solely have to rely on an agent-less approach will do their best to:

  • Emphasize that they do not use agents
  • Persuade you that agent-less monitoring is preferable

The irony, when promoting a solution as agent-less, is that even so-called agent-less solutions do in fact utilize and agent – the only difference being that the agent is (usually) integrated into Windows. Windows doesn’t just magically service remote clients asking for a boatload of WMI data – it processes these requests through the WMI service, which, for all intents and purposes, is an agent. For example, accessing the Windows event logs via WMI traverses significantly more layers than accessing the event logs directly.

Conclusion

With the exception of network devices where an agent cannot be installed, agent-based solutions will provide a more thorough monitoring experience 9 out of 10 times – assuming that the agent meets all the checklist requirements below.

Some event log monitoring vendors will try to convince you that agent-less monitoring is better & easier (easier for whom?) – but don’t fall for it. We’ve been tweaking and improving the EventSentry agent for more than 10 years, and as a result EventSentry offers one of the most advanced and efficient Windows agents for log monitoring on the market. Developing a rock-solid, secure and fast agent is hard, but it’s the only sensible approach which doesn’t cut corners.

There are situations when deploying a full-scale monitoring solution with agents is not possible, for example when you are tasked with monitoring a third-party network where installing any software is not an option. While unfortunate, an agent-less monitoring solution can fill the gap in this case.

EventSentry also utilizes SNMP (agent-less) to gather inventory, performance metrics as well as other system data from non-Windows devices, including Linux hosts. This collection method does suffer from the above limitations, but since log data is pushed from Non-Windows devices via the Syslog protocol, it’s an acceptable compromise.

Don’t compromise when it comes to monitoring the (event) logs of your Windows infrastructure and select an architecture which scales and offers security & performance.

Technical Comparison

The table below examines the difference between agent-based and agent-less solutions in greater detail.

Resource Utilization & Performance
Agent-Based
Agent-Less
Verdict
  • Usually higher throughput since agents can analyze, filter and evaluate log entries before sending them across the network.
  • Local resource utilization depends on the implementation of the agent.
  • Agent can access (event) logs directly via efficient API access.
  • Network utilization is likely much higher since more logs have to be transmitted across the network before being evaluated. Local filtering capabilities are limited and depend on the protocol (usually WMI).
  • Network latency and utilization affect performance of monitoring solution. Network utilization cannot be controlled.
  • Accessing (event) log data remotely through WMI is much less efficient.
  • Over-saturation of central monitoring component can negatively affect monitoring of entire infrastructure.
Higher network utilization combined with the fact that remote log collection will still utilize CPU cycles on the remote host (e.g. through WMI provider) favors agent-based solutions.
Agent-less solutions have a single point of failure, while agents can filter & evaluate data locally before transmitting them to a central database.
EventSentry Agents are designed to be essentially invisible under normal operations and do not impact the host system negatively in any way.
Stability & Reliability
Agent-Based
Agent-Less
Verdict
  • Failure of an agent does not affect monitoring of other hosts.
  • Locally collected data can be cached if central monitoring component is temporarily unavailable.
  • Failure of a central component may negatively affect deployed agents if they rely on the central component and cannot cache data.
  • Failure of central monitoring system will affect and potentially disable monitoring of all hosts.
  • Hosts which lose network connectivity (e.g. laptops) cannot be monitored while unreachable.
Agent-based solutions have an advantage since local data can be cached and corrective actions can be executed even when the central monitoring component is unavailable. Cache data & logs are re-transmitted – even if the local logs have been cleared or overwritten.
Agent-based solutions can monitor hosts even when disconnected from LAN.
The EventSentry Agent auto-recovers if the process aborts unexpectedly, and by default alerts the user when this occurs. When using the collector (default), the agent caches all data locally and retransmits when the network connection becomes available again.
Deployment
Agent-Based
Agent-Less
Verdict
  • Has to be deployed either with vendor management software and/or with third-party deployment software if vendor provides installation package (e.g. MSI).
  • Larger deployments will require multiple central monitoring components, potentially distributed over several LANs.
  • Only hosts in local LAN can be monitored.
Depends on deployment tools made available by vendor as well as management tools in place for configuring Windows settings. A poorly developed deployment tool would favor an agent-less solution.
EventSentry Agents can be deployed (multi-threaded) with the management console or through 3rd party deployment software by creating a MSI installer on the fly. When using the collector (default), agent updates (patches) can be deployed automatically.
Dependencies
Agent-Based
Agent-Less
Verdict
  • Agent may have dependencies on third-party frameworks
  • Depends on whether the mechanism utilized by the monitoring software requires a Windows component to be added and/or configured.
Depends on whether agent has dependencies and whether configuration changes need to be made on the monitored hosts.
The EventSentry Agent does not depend on any 3rd party frameworks or libraries.
Security
Agent-Based
Agent-Less
Verdict
  • Potential security issues if installed agent exposes itself to the network (if not firewalled) and/or suffers from local vulnerabilities which can be exploited.
  • Remote log collection has to be enabled and at least the central monitoring component needs to have remote access.
  • Secure data transmission relies on protocols and settings from Windows.
  • Enabling multiple methods for gathering data remotely (e.g. WMI) provides additional attack vectors.
  • Credentials (usually Windows user/password) for remote systems must be stored in a central location so that the remote hosts can be queried. If the central system gets compromised, critical credentials can be exploited.
Since agent-based solutions do not require permanent remote access and monitored hosts can therefore be hardened more, they are inherently more secure IF the agent doesn’t suffer from an insecure design and/or vulnerabilities.
Agent-based solutions also have more control over how data is transmitted from the remote hosts.
If there is general concern against third-party software then the product in question should be researched in a vulnerability database like http://www.cvedetails.com.
The EventSentry Agent does not open any ports on a monitored host and resides in a secured location on disk. The agent transmits compressed data securely via TLS to the collector. No major security vulnerabilities have been discovered in the EventSentry agent since its first release in 2002.
Scope & Functionality
Agent-Based
Agent-Less
Verdict
  • Agents have full access to the monitored system and can choose which technology to utilize to get the required data (API, WMI, registry, …)
  • Easily execute local corrective action like launching a script or process
  • Agent-less solutions are limited to remote APIs provided by the monitored host, most commonly WMI. While WMI does offer a lot of functionality, there are limitations.
  • Executing scripts on remote host is more involved and only possible when host is reachable.
Agent-based solutions have an advantage since they can utilize multiple technologies to obtain data, including highly efficient direct API access. Agents can also trigger (corrective) actions locally even while the agent is unreachable.
Agent-less solutions can only monitor data which is made available by the remote protocol.
The EventSentry Agent accesses log files, event logs and other system health data almost exclusively via direct API calls. The more resource-intensive WMI interface is only used minimally, for very specific purposes. Corrective action can be taken directly on the monitored host, often only in milliseconds after an error condition (event) has occurred.


Appendix: Checklist

When evaluating software that offers agents then you can utilize the check list below for evaluation purposes.

Resource Utilization
An agent needs to consume as little resources as possible under normal operations. With the exception of short (and unusual) peak periods, a user should never know that an agent is running on their server or workstation – period.
The thought of having a resource-hogging agent running on a server sends shivers down the backs of many SysAdmins, and the agents used by certain AntiVirus vendors that rhyme with Taffy didn’t set a good precedent.
Stability & Reliability
The agent needs to run at all times without crashing – the SysAdmin needs to be able to go to sleep knowing that his agents will reliably monitor all servers and workstations. Unstable agents are just no fun, especially when they negatively impact the host OS.
If an agent that encounters an issue, it needs to at least auto-recover and communicate the issue to the admin.
Deployment
Agent deployment and management needs to be streamlined and easy – it shouldn’t be a burden on the end user. And while agent deployment is important, agent management, keeping the remote agent up-to-date, is equally important and should – ideally – be handled automatically.
Most SysAdmins have enough work the way it is, the last thing they need is baby-sitting agents of their monitoring solution.
Dependencies
The more dependencies an agent has, the more difficult it is to deploy the agent. Agents that rely on complex frameworks like .NET, Java or specific Visual Studio runtimes are difficult and time-consuming to deploy.
Furthermore, any third-party software that is installed as a dependency creates an additional attack vector and needs to then be kept up-to-date.
Security
An agent needs to be 100% secure and cannot expose the monitored host to any additional security risks. I will explain below why using agents is actually more secure than not using an agent – even though this seems counter-intuitive at first glance.

Remote Support with VNC – The Easy & Secure Way!

Almost everyone in IT has heard of VNC – which actually stands for “Virtual Network Computing”. The RFB (Remote Framebuffer) protocol which VNC relies on, was developed around 1998 by Olivetti & Oracle Research Labs. Olivetti (unlike Oracle) isn’t much known outside of Italy/Europe, and the ORL was ultimately closed in 2002 after being acquired by AT&T. But enough of the history.

When the need arises to remotely log into a (Windows) host on the network, Microsoft’s Remote Desktop application (which utilizes Microsoft’s RDP protocol – not RFB) is usually the default choice. And why wouldn’t it be? It’s built into Windows, there is no additional cost, and it’s usually quite efficient (=fast) – even over slower connections.

Remote Desktop has a few disadvantages though, especially when it comes to the IT help desk:

  • You cannot view the remote user’s current desktop
  • It’s not cross-platform
  • You can’t use RDP if it’s disabled or misconfigured

Especially when troubleshooting user problems, being able to see exactly what the user is doing is obviously very beneficial. VNC-based applications are a good alternative since they allow you to view the user’s desktop and subsequently interact with the user. This makes VNC viable for help desk as well as troubleshooting. Nevertheless, VNC-based solutions have their own shortcomings:

  • Free variations of VNC usually offer no deployment assistance
  • With over 10 variants available, finding the best VNC implementation is a daunting task
  • VNC is still deemed as somewhat insecure
  • VNC can be slow

We set out to solve these shortcomings by creating a number of scripts around UltraVNC that integrate with the EventSentry management console (although they’ll work well without EventSentry as well!). Using the QuickTools feature, you can then connect to a remote host via VNC with 2 clicks, even if the remote host doesn’t have VNC installed.

Important: The scripts only work in environments where you have administrative access to the remote hosts. The scripts need to copy files to the remote host’s administrative shares and control the remote VNC service.

Alternatively, you will also be able to start a VNC session by running the following command:

vnc_start.bat remotehost.yourdomain.com

Even better, VNC can be automatically stopped and deactivated (until vnc_start.bat is run again) once the session is completed in order to reduce the attack surface.

VNC Deployment
As long as you have administrative access to the remote host(s), the script will remotely install VNC and even setup a firewall exclusion rule if necessary – although the UltraVNC installer takes care of this out of the box.

Security
To reduce the attack surface of machines running VNC you can automatically stop the VNC service after you have disconnected from the remote host. Our connection script will automatically start the remote service again when you connect the next time.

For the utmost security you can also completely uninstall VNC when you are done, a script (vnc_uninstall.bat) is included for this purpose.

Speed
Even though VNC is generally not as fast as RDP, it’s usually sufficiently fast in LAN environments (especially for shorter trouble-shooting sessions) and the UltraVNC port which we’ll be covering in this post performs reasonably well even over slower WAN connections.

Integration with EventSentry
Monitoring workstations with EventSentry strengthens the capabilities of any IT helpdesk and IT support team with:

  • Software & Hardware Inventory
  • Access to process utilization and log consolidation
  • Enhanced security with security log & service monitoring
  • User console logon tracking
  • Pro-active troubleshooting with access to performance and other system health metrics

Remote desktop sharing is an additional benefit with the UltraVNC package which is included with the latest version of EventSentry (v3.3.1.42). Customizing the scripts and integrating them with EventSentry literally shouldn’t take more than 5 minutes, and once setup & configured will allow you to remotely control any monitored host with a couple of clicks. The scripts do not require EventSentry, but are included with the setup and integrate seamlessly into the EventSentry Management Console.

The EventSentry Management Console includes the “QuickTools” feature which allows you to link up to 8 commands to the context menu of a computer item. EventSentry ships with a few default QuickTools commands, for example to reboot a remote machine. Once configured, you simply right-click a computer icon in the EventSentry Management console and select one of the pre-configured applications from the QuickTools sub menu.

EventSentry QuickTools

How does it work?
When you run the vnc_start.bat script, it will first check to see if UltraVNC is already installed on the remote host. If it is, it will skip the installation routine and bring up the local VNC viewer. If you configured the script to automatically stop the VNC service when not in use, it will start the service beforehand. When you disconnect, it will (optionally) stop the VNC service again so that VNC is not accessible remotely anymore.

If VNC is not installed, the script will remotely install & configure UltraVNC using psexec.

If you do not want to leave the UltraVNC service installed on the remote computer, the vnc_uninstall.bat script can be run when the remote session is done. Automatically stopping the remote VNC service is however sufficient in most cases.

Prerequisites
There is not much you need:

Installation
The scripts need to be configured before they can be used in your environment, unless you are an EventSentry user, in which case you only need to download & install the prerequisites.

Super Quick Setup for EventSentry Users
It’s no secret, we’re a little biased towards our EventSentry users, and as such setting this up with an existing EventSentry installation is rather easy:

  1. Get psexec.exe and save it in C:\Program Files (x86)\EventSentry\resources.
  2. Download the UltraVNC installers (they have 32-bit and 64-bit – download for the platforms you have on your network) and store them in the C:\Program Files (x86)\EventSentry\scripts\ultravnc folder.
  3. Install UltraVNC on the computer where EventSentry is installed so that the VNC Viewer is available. It’s not necessary to install the whole package, only the viewer component is required.
  4. If “VNC” is not listed in your QuickTools menu, then you will need to add it under Tools->Options->QuickTools. Simply enter “VNC” as the description and specify the path to the vnc_start utility, e.g. “C:\Program Files (x86)\EventSentry\scripts\ultravnc\vnc_start.bat $COMPUTER”. You can optionally check the “Hide” box to prevent the script output from being shown before you connect.

You’ll notice that no password was configured – that’s because you will be logging in with a Windows user and password – only allowing domain admins access by default. This can be configured in the authorized_acl.inf file, if you want to give additional groups and/or users access that are not domain admins.

That’s literally it – easy as pie. Even though we designed this thing to be easy peasy, since things do occasionally go wrong I recommend testing a first connection from the command line. Just open an administrative command prompt, navigate to C:\Program Files (x86)\EventSentry\scripts\ultravnc and type vnc_start somehost.

Now just right-click any host – or use the “Quicktools” button in the ribbon – and select the “VNC” menu option. Keep in mind that first-time connections will take longer since the VNC setup file has to be copied and installed on the remote computer. Subsequent connections should be faster.

VNC Viewer Connect Dialog

Manual Normal-Speed Setup for Non-EventSentry Users
So you are not an EventSentry user but still want to utilize these awesome scripts? No problem – we won’t hold it against you. The setup is still easy – you’ll just need to customize a few variables in the variables.bat file.

  1. Download the package from here.
  2. Create a local folder for this project, e.g. C:\Deployment\UltraVNC.
  3. Copy all the scripts to this folder, e.g. you should end up with C:\Deployment\UltraVNC\vnc_start.bat
  4. Open the file variables.bat in a text editor and keep it open as you will be making a few modifications to this file.
  5. In variables.bat, set the VNCSOURCE variable to the directory you just created.
  6. Download the latest version of both the 32-bit and 64-bit UltraVNC installers.
  7. In variables.bat, set the VNCSETUP_X86 and VNCSETUP_X64 to the setup file names you just downloaded.
  8. Download the PSTools and extract psexec.exe into the working directory, or a directory of your choice.
  9. In variables.bat, point the PSEXECFILE variable to the location where you just saved psexec.exe.
  10. Optional: Edit the authorized_acl.inf file to specify which Windows group or user will have access to VNC. You can either change the first line, or add additional lines to give additional users and/or groups permission.
  11. Install the respective version of UltraVNC on your workstation so that the VNC Viewer is available.
  12. Open a command line window and navigate to the folder to which VNCSOURCE points to. Test the setup by running vnc_start hostname, replacing “hostname” with an actual host name of a remote host of course.
  13. When presented with the login screen of the VncViewer, log in with a Windows domain admin user.

That wasn’t so bad now, was it? Just remember that you’ll need to initiate any VNC session with the vnc_start.bat file. Just launching the Viewer won’t work – even if VNC is already installed on the remote machine – since the VNC service is stopped by our scripts by default. To use the folder names we created, you’ll just run

C:\Deployment\UltraVNC\vnc_start hostname

Enjoy, and happy RFBing!

Connecting to remote host

Configuration – variables.bat
For the sake of completeness the variables.bat file is explained below:

VNCSETUP_X86: The file name of the 32-bit installer. This needs to only be changed whenever UltraVNC comes out with a new version.
VNCSETUP_X64: The file name of the 64-bit installer. This needs to only be changed whenever UltraVNC comes out with a new version.

REMOTEINSTALLPATH: The directory where the script files will be copied to on the remote host.

VNCSOURCE: This is the folder where all the vnc-related files, including the setup executables, are located on the source host from where you initiate VNC connections – e.g. C:\Deployment\UltraVNC.
VNCINSTALLDIR: The directory in which UltraVNC will be installed in (on the remote hosts).

VNCPASSWORD: This variable is not currently used since UltraVNC is automatically configured to authenticate against Windows, by default giving only Domain Admins access to VNC. This is generally more secure than using a password. You can edit the file authorized_acl.inf to give additional users and/or groups access to VNC. The file supports one ACL entry per line.

PSEXECFILE: Unfortunately we are not allowed to bundle the nifty psexec.exe file for license reasons, so you’ll have to download the PsTools and point this variable to wherever you end up copying the psexec.exe file to. If you already have psexec.exe installed then you can save yourself 2 minutes of time and just specify the path to the existing file here.

SET_VNC_SVC_TO_MANUAL: If you don’t entirely trust the security of VNC, maybe because you know what a brute force attack is, and you only want administrators to access VNC then you can set this variable to 1. As long as you only connect to the remote host(s) using the vnc_install.bat script, the scripts will ensure that the remote VNC service is started before you connect and stopped after you disconnect. Between the two of us, I’d always leave this set to 1 unless you have the desire to launch the VNC Viewer directly, or need non-administrators to be able to connect to the remote host(s).

ADD_FIREWALL_RULE: As the name (almost) implies, this will create a firewall exclusion rule on the remote host(s) if you’ve been doing your homework and enabled the Windows firewall. If you don’t like our boring firewall rule name then you can even change the name below by editing the FW_RULE_NAME variable. Enabling this is usually not necessary since the UltraVNC setup adds firewall exclusion rules by default.

VNCVIEWER: If you find that a different version of the VNC viewer works better than the version which we are shipping, then you can change the file name here.


Monitoring Windows Updates

Automatic Windows Updates are a wonderful thing when they are working as expected, and many organizations employ WSUS or patch management software to keep their infrastructure up to date with the latest Microsoft hot fixes and service packs.

While this works for many, not everybody can afford patch management software, and, while free, managing the disk-hungry WSUS can be a daunting task as well. This leaves some sysadmins to use the old-fashioned Windows Updates to install all the regular and out-of-band patches Microsoft releases.

If you don’t feel comfortable installing patches automatically however, configuring Windows Update to “download updates for later manual installation” is often safer and more predictable. But, if you’re not logging on to the server(s), you won’t know whether one or more updates are ready for installation or not. Even if you’re just managing one server, checking in on a regular basis can be a waste of time.

updates_are_ready.pngThis is where EventSentry and its log file monitoring feature comes in. It turns out that Windows, like a diligent ship captain, logs all activity to a log file. And with all, I really do mean ALL. The file I’m talking about is windowsupdate.log, and it tells you just about everything that’s going on with Windows Update. In 3-4 steps that don’t take longer than 5 minutes, you can setup real-time monitoring of the WindowsUpdate.log file, and be notified when updates are about to be downloaded to a monitored computer.

The screenshot below shows what such an email from EventSentry would look like:

email_approved_updates.png

From then on, you can either get email notifications when patches are downloaded, or use the web-based reporting to view a report from all of your monitored hosts. On a high level, the configuration works like this:

  • 1. Setup a log file (%systemroot%\windowsupdate.log in this case)
  • 2. Create & assign a new log file package
  • 3. Define a log file filter (this tells EventSentry what to look for in the file, and where to send it)
  • 4. Setup an email action (this is usually already setup)
  • 5. Optionally setup an event log filter to forward alerts to email (the default filter setup should automatically forward warnings)

The WindowsUpdate.log is useful for troubleshooting as well, and you can consolidate the content of this file from all of your servers in the central EventSentry database. This makes searching for text and/or comparing the log from multiple servers a breeze. Having the log file accessible through the web reports is also useful when a patch caused problems and the server is offline. You can view the most recent activity from the log file through the web-based reporting even when the server is unavailable.

So how do you set this up? Assuming you have EventSentry v2.93 installed (any edition will do, including the free “light” version), you can follow the steps outlined below. Note that all steps will need to be performed in the EventSentry management console.


1. Setup a file definition.
This tells EventSentry which file you want to monitor, and sets up a logical representation of that file in the EventSentry configuration. In the “Tools” menu, click “Log Files and File Types” and then click the “Add” button.

menu_tools.png

add_file_definition.png

tree_logfile_package.png

2. Create a package and add a filter. Right-click the “Log File Packages” container, select  “Add Package” and choose a descriptive name. Since new packages are unassigned by default, right-click the newly created package, select “Assign” and assign the package to host(s) on which you want to monitor the Windowsupdate log file.

3. Setup a log file filter. This tells EventSentry which content of the monitored file you are interested in. In every log file filter you can configure a database as well as an event log filter.

Right-click the previously created package and select “Add File”. From the list, select the log file definition created in step 1, “WindowsUpdateLog”. Select the new log file.

The database tab determines which content goes to the database (in most cases you will write all file contents to the database), while the event log tab determines which log file contents are written to the event log. For this project, we are interested in the following wildcard matches:

*AU*# Approved Updates =*

*DnldMgr*Updates to download =*

The first wildcard match will tell you the total number of updates which have been approved and will be downloaded, whereas the 2nd line will fire for every individual update which will be downloaded. In most cases the first line is sufficient and the 2nd line can be skipped.

file_filter_eventlog.png

That’s it! With this setup, you will immediately get notified when patches are ready to be installed. The only thing I didn’t mention here is how to setup an email action and corresponding event log filter, since both of these are usually already setup by default. If you need help with this, please check out our documentation and/or
tutorials.

Please note that the full and evaluation version of EventSentry can inventory installed software and patches. This enables you to use the web interface for viewing/searching installed patches, and get (email) alerts when a patch has been successfully installed.

As always, happy monitoring!

Do not trust thee RAID alone

I’m assuming that most readers are familiar with what RAID, the “Redundant Array of Inexpensive Disks”, is. Using RAID for disk redundancy has been around for a long time, apparently first mentioned in 1987 at the University of California, Berkeley (see also: The Story So Far: The History of RAID). I’m honestly not sure why they chose the term “inexpensive” back in 1987 (I suppose “RAD” isn’t as catchy of a name), but regardless of the wording, a RAID is a fairly easy way to protect yourself against hard drive failure. Presumably, any production server will have a RAID these days, especially with hard drives being as inexpensive as they are today (unless you purchase them list price from major hardware vendors, that is). Another reason why RAID is popular, is of course the fact that hard drives are probably the most common component to break in a computer. You can’t really blame them either, they do have to spin an awful lot.

burnt_server.jpg

Lesson #1: Don’t neglect your backups because you are using RAID arrays
That being said, we recently had an unpleasant and unexpected issue in our office with a self-built server. While it is a production server, it is not a very critical one, and as such a down-time of 1-2 days with a machine like that is acceptable (albeit not necessarily desired). Unlike the majority of our “brand-name” servers, which are under active support contracts, this machine was using standard PC components (it’s one of our older machines), including an onboard RAID that we utilized for both the OS drive as well as the data drive (it has four disks, both in a RAID 1 mirror). Naturally, the machine is monitored through EventSentry.

Well, one gray night it happened – one of the hard drives failed and a bunch of events (see myeventlog.com for an example) were logged to the event log, and immediately emailed to us. After disappointingly reviewing the emails, the anticipated procedure was straightforward:

1) Obtain replacement hard drive
2) Shut down server
3) Replace failed hard drive
4) Boot server
5) Watch RAID rebuilding while sipping caffeinated beverage

The first 2 steps went smoothly, but that’s unfortunately how far our IT team got. The first challenge was to identify the failed hard drive. Since they weren’t in a hot-swappable enclosure, and the events didn’t indicate which drive had failed, we chose to go the safe route and test each one of them with the vendors supplied hard drive test utility. I say safe, because it’s possible that a failed hard drive might work again for a short period of time after a reboot, so without testing the drives you could potentially hook the wrong drive up. So, it’s usually a good idea to spend a little bit of extra time in that case, to determine which one the culprit is.

Eventually, the failed hard drive was identified, replaced with the new (exact and identical) drive, connected, and booted again. Now normally, when connecting an empty hard drive, the raid controller initiates a rebuild, and all is well. In this case however, the built-in NVidia RAID controller would not recognize the RAID array anymore. Instead, it congratulates us on having installed two new disks. Ugh. Apparently, the RAID was no more – it was gone –  pretty much any IT guys nightmare.

No matter what we tried, including different combinations, re-creating the original setup with the failed disks, trying the mirrored drive by itself, the RAID was simply a goner. I can’t retell all the things that were tried, but we ultimately had to re-create the RAID (resulting in an empty drive), and restore from backup.

We never did find out why the RAID 1 mirror that was originally setup was not recognized anymore, and we suspect that a bug in the controller firmware caused the RAID configuration to be lost. But regardless of what was ultimately the cause, it shows that even entire RAID arrays may fail. Don’t relax your backup policy just because you have a RAID configured on a server.

Lesson #2: Use highly reliable RAID levels, or configure a hot spare
Now I’ll admit, the majority of you are running your production servers on brand-name machines, probably with a RAID1 or RAID5, presumably under maintenance contracts that ship replacement drives within 24 hours or less. And while that does sound good and give you comfort, it might actually not be enough for critical machines.

Once a drive in a RAID5 or RAID1 fails, the RAID array is in a degraded state and you’re starting to walk on very thin ice. At this point, of course, any further disk failure will require a restore from backup. And that’s usually not something you want.

So how could a RAID 5 not be sufficiently safe? Please, please: Let me explain.

Remember that the RAID array won’t be fully fault tolerant until the RAID array is rebuilt – which might be many hours AFTER you plug in the repaired disk depending on the size, speed and so forth. And it is during the rebuild period that the functional disks will have to work harder than usual, since the parity or mirror will have to be re-created from scratch, based on the existing data.

Is a subsequent disk failure really likely though? It’s already pretty unlikely a disk fails in the first place – I mean disks don’t usually fail every other week. It is however much more likely than you’d think, somewhat depending on whether the disks are related to each other. What I mean with related, is whether they come from the same batch. If there was a problem in the production process – resulting in a faulty batch – then it’s actually quite likely that another bites the dust sooner rather than later. It happened to a lot of people – trust me.

But even if the disks are not related, they probably still have the same age and wear and, as such, are likely to fail in a similar time frame. And, like mentioned before, the RAID array rebuild process will put a lot of strain on the existing disks. If any disk is already on its last leg, then a failure will be that much more likely during the RAID array rebuild process.

raid6.pngRAID 6, if supported by your controller, is usually preferable to a RAID5, as it includes two parity blocks, allowing up to two drives to fail. RAID 10 is also a better option with potentially better performances, as it too continues to operate even when two disks fail (as long as it’s not the disks that are mirrored). You can also add a hot spare disk, which is a stand-by disk that will replace the failed disk immediately.

If you’re not 100% familiar with the difference between RAID 0, 1, 5, 6, 10 etc. then you should check out this Wikipedia article: It outlines all RAID levels pretty well.

Of course, a RAID level that provides higher availability is usually less efficient in regards to storage. As such, a common counterargument against using a more reliable RAID level is the additional cost associated with it. But when designing your next RAID, ask yourself whether the savings of an additional hard drive is worth the additional risk, and the potential of having to restore from a backup. I’m pretty sure that in most cases, it’s not.

Lesson #3: Ensure you receive notifications when a RAID array is degraded
Being in the monitoring business, I need to bring up another extremely
important point: Do you know when a drive has failed? It doesn’t help much to have a RAID when you don’t know when one or more drives have failed.

Most server
management software can notify you via email, SNMP and such – assuming
it’s configured. Since critical events like this almost always trigger
event log alerts as well though, a monitoring solution like EventSentry can simplify the notification process.
Since EventSentry monitors event logs, syslog as well as SNMP traps, you can take a uniform approach to notifications. EventSentry can notify you of RAID failures regardless of the hardware vendor you
use – you just need to make sure the controller logs the error to the
event log.

Lesson #4+5: Test Backups, and store backups off-site
Of course one can’t discuss reliability and backups without preaching the usual. Test your backups, and store (at least the most critical ones) off-site.

Yes, testing backups is a pain, and quite often it’s difficult as well and requires a substantial time commitment. Is testing backups overkill, something only pessimistic paranoids do? I’m not sure. But we learned our lessen the hard way when all of our 2008 backups were essentially incomplete, due to a missing command-line switch that recorded (or in our case did not) the system state. We discovered this after, well, we could NOT restore a server from a backup. Trust me: Having to restore a failed server and having only an incomplete, out-of-date or broken backup, is not a situation you want to find yourself in.

My last recommendation is off-site storage. Yes, you have a sprinkler system, building security and feel comfortably safe. But look at the picture on top. Are you prepared for that? If not, then you should probably look into off-site backups.

So, let me recap:

1. Don’t neglect your backups because you are using RAID arrays.
2. Use highly reliable RAID levels, or configure a hot spare.
3. Ensure you receive notifications when a RAID array is degraded
4. Test your backups regularly, but at the very least test them once to ensure they work.
5. Store your backups, or at least the most critical, off-site.

Stay redundant,
Ingmar.

Read more