Note: This article was updated in May 2017 to reflect some of the improvements SMSEagle has made to its devices, most notably support for additional wave lengths and power adapters which make the device work flawlessly in most countries in the world.
Emails are still the alert type of choice for most network administrators, but they come with a major pitfall: They either rely on your local email server, the Internet connection, or worse: both.
So if you need to get notified when your email server or Internet connection are down – and most likely you will want to get notified – text messages (aka as SMS) are a convenient way out of this monitoring conundrum.
Email to SMS, or web-based SMS services can help in some situations, but you need a different kind of beast when the Internet connection is down.
This is where hardware solutions like the SMSEagle come in. The SMSEagle is essentially a cell phone with an Ethernet jack, a web server + API, allowing you to send text messages either through its web interface or API (preferred).
SMSEagle
The SMSEagle and similar devices usually only require three things:
A valid SIM card
A physical location with coverage from your provider
An Ethernet connection to your network
With the SMSEagle in place, you no longer have to fear loss of Internet connectivity or mail server downtime – a text alert is just a few seconds away when combined with a monitoring solution like EventSentry. In fact, the SMSEagle is somewhat unique in that it actually offers its own basic network monitoring capabilities which can be used in addition to EventSentry – or to monitor the host running the EventSentry Heartbeat Monitor.
Since the SMSEagle features a web-based API, EventSentry can submit certain alerts, e.g. pertaining to Internet connectivity or the availability of a specific host and/or service, directly to the SMSEagle through its HTTP action, which will then send a SMS alert directly to your mobile device of choice.
The SMSEagle accepts mini SIM cards and works with the UMTS 800/850/900/AWS1700/1900/2100 MHz and GSM/GPRS 850/900/1800/1900 MHz wave bands and thus should work with all major cell providers. The latest models of the SMSEagle also ship with power plugs which will work in most countries, including Europe, the U.S., Australia and many others.
The setup of the device is straightforward: You first insert the SIM card, connect it to the Ethernet and power on the device. The device automatically assigns itself IP address 192.168.0.101 but can also retrieve its IP address via DHCP. More instructions & details are available in the manual.
Once you’ve setup the SMSEagle and verified that SMS messages can be sent and received, you can create an EventSentry HTTP action and point it to your SMSEagle device. The HTTP action includes a number of templates to quickly load all required fields for a specific HTTP API; simply select the SMSEagle from the drop-down and specify all the required fields such as host name and so forth. Use the test button to ensure the action is setup correctly.
EventSentry HTTP Action configured for the SMSEagle
Once the action is setup it can be referenced by one or more filters so that it is triggered under the right circumstances. Assuming that you are already monitoring a host outside your network (e.g. your ISPs DNS server, a public web site) to determine whether your Internet connection is available or not, you would want to look for EventSentry event 11000, which indicates when a host changes its availability status, such as:
EventSentry Heartbeat Alert
Host ispdns (Internet) changed its PING status from OK to ERROR. The reason for the status change was: “100% packets lost”.
A filter setup for this event would look like something like this:
Filter for EventSentry heartbeat alert
Here, we are looking for an application error generated by the Heartbeat Monitoring category of the EventSentry source. We’re also further restricting the filter to only alert us on status changes of the “ispdns” host when it goes off-line. Since the SMSEagle is listed as the action, this particular event (alert) will be sent to the SMSEagle action.
The insertion strings can be determined by either clicking on the “Lookup” button on the filter dialog, or by clicking on the “Preview” button when adding a content filter.
If you’re located in the Europe or the United States then the SMSEagle is a non-brainer. Otherwise, there are a few other devices out there who work similarly , and as long as they offer a HTTP-based API, integrating EventSentry with them should be easy.
I always enjoy visiting customer sites for training or consulting since I learn about their unique challenges and requirements, and how EventSentry can meet them.
During a recent visit an interesting question came up: How can I identify (certain) processes which run longer than a certain time period? It may sound like an odd requirement, but some software suites spawn worker processes which perform certain tasks which take a predictable amount of time, such as processing a document for example. If something goes wrong and one of the worker processes hangs, you’d want to know about it.
EventSentry does include a process monitoring feature which can ensure that a certain number of instances of processes are running, even taking their command line arguments into consideration; however it doesn’t evaluate the duration of process.
Even though you cannot do this out of the box (and given that most users don’t require this sort of thing we’re probably not going to add it), there is a pretty easy solution with a (VB)script and the application scheduler. As a reminder, the application scheduler is the standard way of extending EventSentry’s functionality.
Even though VB(Script) is not the most popular scripting language these days, we like to utilize it for a number of reasons:
* The interpreter (cscript.exe) is pre-installed on all versions of Windows
* It was developed on and for Windows, and can handle easy to moderate scripting pretty well
* It’s easy to read and customize, even by people who don’t write code on a regular basis
Of course you can utilize any scripting language with the application scheduler as long as the interpreter is installed. Now let’s see what this VBScript would look like (if you have ever used the Scriptomatic then the structure of this script may look familiar to you):
On Error Resume Next
Const wbemFlagReturnImmediately = &h10
Const wbemFlagForwardOnly = &h20
' Customize start
Const processName = "parser.exe"
Const maxAgeSeconds = 120
' Customize end
Dim returnCode
returnCode = 0
Set objWMIService = GetObject("winmgmts:\\localhost\root\CIMV2")
Set colItems = objWMIService.ExecQuery("SELECT * FROM Win32_Process WHERE Caption='" & processName & "'", "WQL", _
wbemFlagReturnImmediately + wbemFlagForwardOnly)
For Each objItem In colItems
Dim secAge
secAge = DateDiff("s", WMIDateStringToDate(objItem.CreationDate), Now())
If secAge > maxAgeSeconds Then
WScript.Echo "Process " & objItem.Caption & " (" & objItem.ProcessId & ") has been running for " & secAge & " seconds, since " & WMIDateStringToDate(objItem.CreationDate)
returnCode = 1
End If
Next
Function WMIDateStringToDate(dtmDate)
WMIDateStringToDate = CDate(Mid(dtmDate, 5, 2) & "/" & _
Mid(dtmDate, 7, 2) & "/" & Left(dtmDate, 4) _
& " " & Mid (dtmDate, 9, 2) & ":" & Mid(dtmDate, 11, 2) & ":" & Mid(dtmDate,13, 2))
End Function
In a nutshell, the script uses WMI to retrieve all running processes and then subtracts the current timestamp from the process start time to determine the runtime (duration) of the process. If it exceeds the pre-configured threshold, the script will return 1 and subsequently log an error to event log.
To get started, first configure the process name and maximum duration in lines 7 & 8. Then, added the script as an embedded script (Tools -> Embedded Scripts) with a descriptive name. Remember to give the file the correct (.vbs) extension here.
Once the file is setup as an embedded script, you can reference it from the application scheduler or an action (although it wouldn’t make much sense to use this script as an action). Create a new system health package, or add the “Application Scheduler” object to an existing system health package. Make sure the package is assigned to the correct computer or group!
To finish, add a schedule to the newly created application scheduler object; in most cases you will want to use a “Recurring Schedule” which will run in regular intervals. On the main application scheduler dialog you will want to make sure that the “Log application return code > 0 to the event log as “Error” is checked. These types of events can then be forwarded to a recipient via email for example.
This script is a pure monitoring script, it won’t take any corrective action by itself. But the script could easily be modified to automatically terminate the process if it has been running for too long. For example, you could either terminate the process with the Terminate() method via WMI, or execute pskill (Sysinternals suite) from within the VBScript. The latter may be more reliable but will require that pskill is installed on all the machines running this script. A modified version of the script is shown below:
' using "Terminate()"
If secAge > maxAgeSeconds Then
WScript.Echo "Process " & objItem.Caption & " (" & objItem.ProcessId & ") has been running for " & secAge & " seconds, since " & WMIDateStringToDate(objItem.CreationDate) & ", and will be terminated"
objItem.Terminate()
returnCode = 1
End If
' using pskill
If secAge > maxAgeSeconds Then
WScript.Echo "Process " & objItem.Caption & " (" & objItem.ProcessId & ") has been running for " & secAge & " seconds, since " & WMIDateStringToDate(objItem.CreationDate) & ", and will be terminated"
WshShell.Exec "PSKill " & objProcess.ProcessId
returnCode = 1
End If
So there you have it, how to keep long-running processes in check. Since embedded scripts are integrated into the EventSentry configuration, there is no need to manage the script on the remote host.
A nice feature of EventSentry is that any email alert you will get will automatically include the output of the script – delivered straight into your inbox.
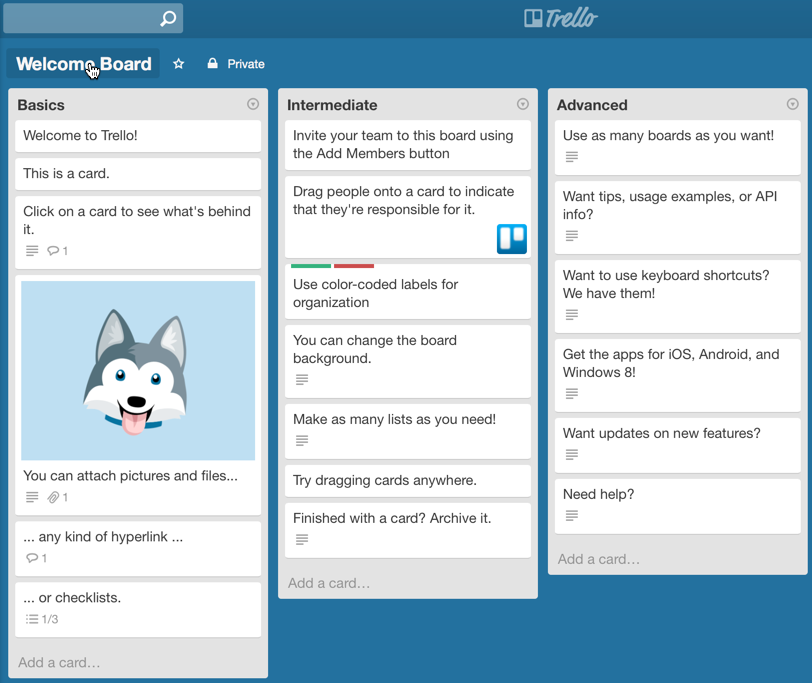
Trello is a simple yet powerful and innovative task management / collaboration platform for teams. With Trello, the developers have basically taken the familiar concept of traditional white boards where you add and remove tasks (by writing on them), and moved it to an easy-to-use online tool.
While Trello doesn’t attempt to replace the more complex project management and collaboration tools available (including its own FogBugz platform), it makes keeping track of small ToDo lists and tasks surprisingly simple, while still supporting advanced features such as due dates, attachments, assignments and more. Of course, Trello also includes a very capable mobile app for iOS and Android (I only tested the iOS version).
And best of all, it’s completely free if you stick with the basic (and for most people completely sufficient) functionality. But what does Trello have to do with EventSentry and cutting down on emails?
We’re always looking for innovative ways to make managing alerts easier and more productive, especially in larger teams. While email alerts certainly serve a purpose and can be quite useful, alerts dispatched via email suffer from a few disadvantages:
Emails sent to multiple recipients make it difficult for the recipient to know whether the alert has been acted upon or not
Alerts which have already been resolved by a team member still remain in your inbox
Emails often get lost amidst other emails and potentially critical alerts may get overlooked
How Trello Works
Trello is organized into boards, each of which can have one or more lists, each of which have multiple cards. Since Trello offers an API, you can use EventSentry’s HTTP action to submit events (alerts) directly to one (or more) Trello lists.
And this is where the fun starts. Once in Trello, alerts (now cards, or “alert cards”) can be acted upon in a variety of creative and useful ways. You can:
Receive alerts in your browser when a card is created
Move a card to a different list (e.g. “Resolved”, “Under Investigation”, …)
Assign one or more people to a card
Add comments to a card
Assign a due date to a card
Mark a card as important (you can even define your own color codes)
Receive periodic summary emails if you don’t visit the board
All of these features make managing alerts in teams with multiple SysAdmins much easier. When an alert comes in, anybody can act on it (e.g. add themselves) or assign it another team member. Any changes are immediately visible to all other team members in real-time (and we at NETIKUS love anything real-time).
Integrating EventSentry with Trello is a 3-step process:
Sign up for Trello, create a board and customize the associated lists
Get an API & access key & determine ID of your list
Setup HTTP action in EventSentry and create/modify rules
Signing up for Trello
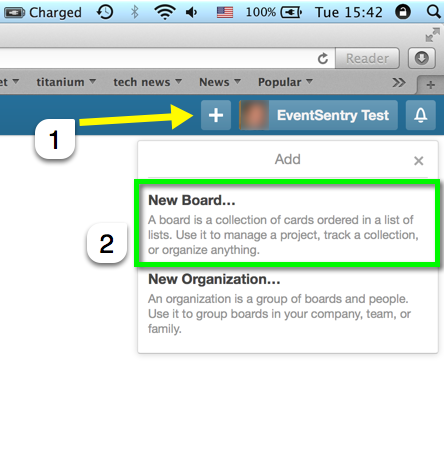
To get started, navigate to https://www.trello.com and sign up with an email address. After you log in for the first time, you will automatically get the “Welcome Board” which will show you all the things you can do with Trello. Since we don’t want to use the default board, we click the big PLUS icon on the top right instead and select “New Board”.
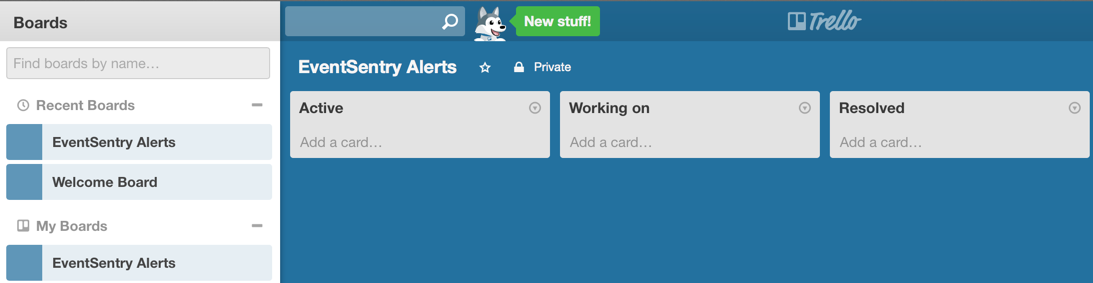
Give the board a descriptive name, e.g. “EventSentry Alerts”. Once created, the board will contain three default lists. You can either leave the list names as they are, or customize them as shown in the screen shot below. I chose “Active”, “Working on” and “Resolved”.
Template board for EventSentry alerts
Getting an API and access key
Now that you’ve signed up, the next logical step is to get the API key so that EventSentry can start submitting events to Trello. So while you are logged in, navigate to https://trello.com/1/appKey/generate and note down (aka copy & paste) the first value “Key”, a 32 character-long hexadecimal value. This is the “main” key for your user account, and will be used whenever you (or EventSentry) make an API request.
The API key doesn’t actually let us access data from the boards, for which we’ll need an access key. There are different types of access keys with customizable expiration dates available, but in this case we’ll just get a read/write key without an expiration date. Navigate to the following URL to get a universal read/write access key and substitute APIKEY with the key you obtained just before:
You will end up with a dialog similar to the one shown above, where you need to click the green “Allow” button. This will issue another hexadecimal key, this time 64 characters in length. Note this key down as well. Of course you can be less generous and issue keys which expire automatically, e.g. after 30 days. See the Trello docs for more details on the different “expiration” options available.
Getting the list ID
Our end goal is to submit cards to the “Active” list on our “EventSentry Alerts” board. In order to add a new card to this list however, we’ll need the list’s ID. Equipped with our main key and access key, we’re almost there. First, navigate to your “EventSentry Alerts” board in Trello (or whichever board you want to submit cards to) and note down the URL. For example, if the URL is https://trello.com/b/gePT9Wax/eventsentry-alerts, then you’ll want to extract the text between the /b/ and the board name, gePT9Wax in this case. Now, navigate to the URL below, and replace APIKEY with the API key, and ACCESSKEY with the access key:
What we are interested in is the list id of our “Active” list, 561e92617481e9a123aef3b00 in the example above. With the last missing piece of the puzzle in our hands, we’re now ready to setup a HTTP action in EventSentry.
Configuring EventSentry
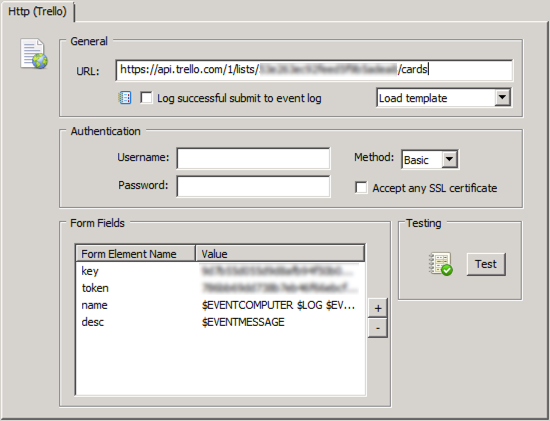
Right-click the actions container or utilize the ribbon to create a new HTTP action. In the action dialog, specify the following URL, replacing LISTID with the list id we just obtained:
https://api.trello.com/1/lists/LISTID/cards
In addition to the URL, we’ll need to specify at least 4 form fields:
The key and token fields need to be replaced with your API key and access key, whereas the name and desc fields can be customized to suit your needs: what I have shown above is just an example which should work reasonably well in most cases. You can add or remove other event variables as you wish. The upcoming v3.1 will include Trello in the template list to make this a bit easier.
Configuring an EventSentry HTTP action for Trello
Once the action is configured, click the Test button to ensure that all IDs have been specified correctly. If the test succeeds, then you should see a new card in the “Active Alerts” list in the EventSentry Alerts board.
Of course an action alone will not forward any alerts to Trello, so you will need to make some changes to your filters and packages. You can either modify existing filters / event log packages and replace the email action with the new Trello HTTP action, or add the Trello action to existing event log packages / filters. Remember that actions can be defined on a package-level through the package properties as well which can help save time.
Managing Alert Cards
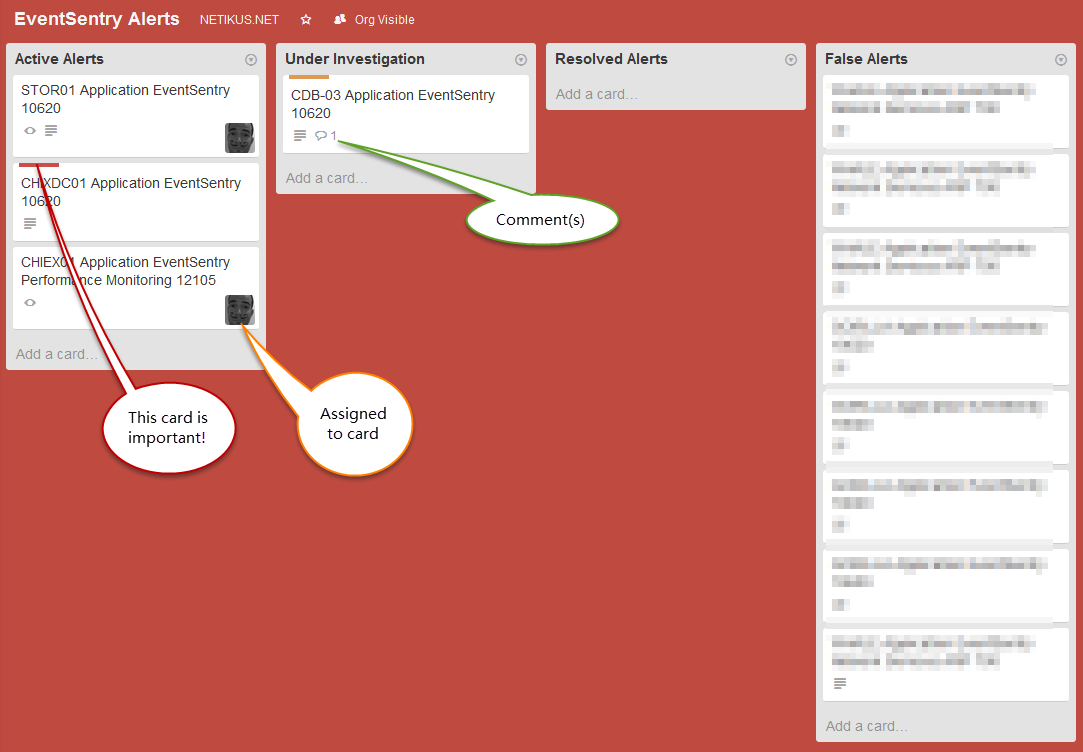
Once your first alert card arrives in the “Active” lists and is analyzed by a team member, a few actions can be taken:
You can add a team member to the card, essentially assigning the alert to them. You can add multiple team members as well
If the event is a false alert, it can be moved to a “False Alert” list, which would indicate that an exclusion filter should be setup in EventSentry
You can assign a due date, if the alert requires a resolution by a specific date
You can add a comment to the card
You can label the card (e.g. “Important”)
You can archive & delete the card
EventSentry alerts shown on a trello board
As you can see, despite its simplicity, Trello offers quite a few features to manage and collaborate. This ensures that alerts don’t disappear in an email inbox somewhere and instead are acted upon, while also allowing collaboration with comments, due dates and such.
Additional Tips & Tricks for Trello
In order to get alerted when a new alert card is created in the EventSentry Alert boards, you’ll need to subscribe to the board. This ensures that you will get a notification on your mobile phone, browser (when enabled https://blog.trello.com/how-to-use-trello-like-a-pro/) or email every time there is activity on a board. Activities include new cards being created, cards being moved to a different list, users being added to cards and so forth.
Note: You will not get a notification if the EventSentry Agent is submitting new cards while using your access key (only other users will see the alerts). This is because Trello assumes that you are creating the cards, and subsequently not notifying you about them.
One way to circumvent this restriction is to create a “service” account (e.g. eventsentry.yourcompany@gmail.com) and issue the access token under this user. Then, everybody will see the alerts.
But don’t stop there!
Of course you can use Trello for what it was originally designed to do as well – manage tasks. We’ve found it to be a great and easy way to handle ToDo lists for teams, resulting in more transparency and efficiency. Assigning a task is quick and easy, and team members can easily track progress with projects – without pesky emails floating around between team members.
Now you just have to get all your To-Do items actually done too. But at least I can now move my “Create Trello Blog Post” card into the “Done” list. And that feels good.
Every Windows server runs a seemingly ever increasing number of services which range from built-in services providing core Windows functionality (e.g. Print Spooler, Bitlocker, WMI) to 3rd party services added when installing 3rd party software (e.g. various software update services, MySQL) – all of which run in the context of a specific user account.
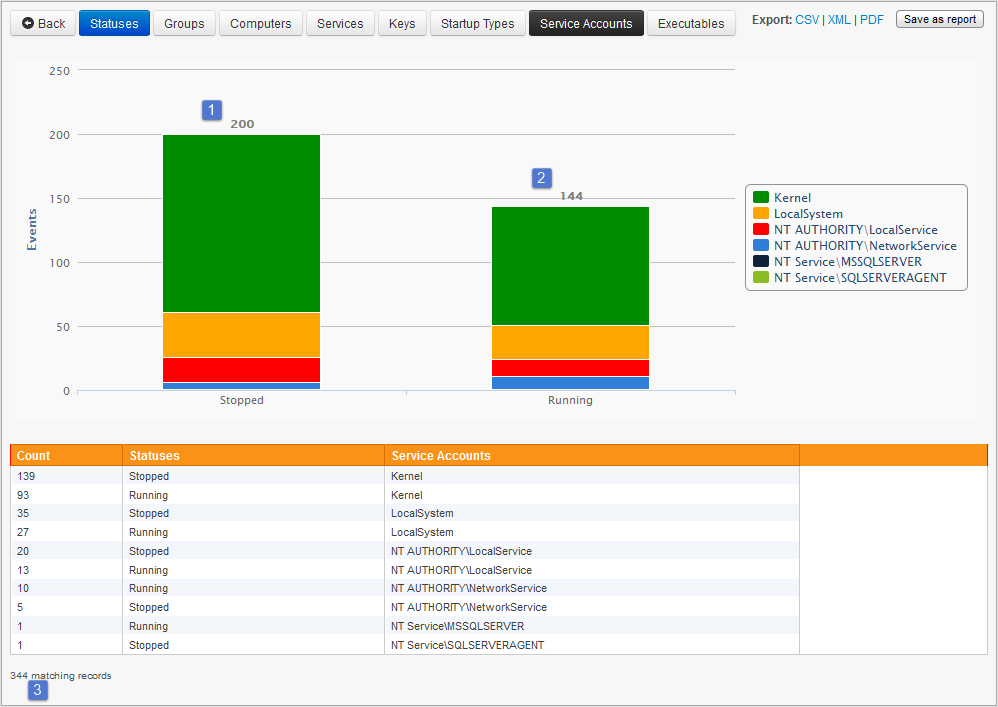
For example, Windows Server 2012 includes more than 300 services, about half of which are automatically running (this particular server has SQL Server installed as well):
Services on Windows Server 2012 grouped by user
That user account is either a built-in security principal of Windows (e.g. NetworkService), a user account specifically created for that service, or another user account from the server or domain.
Common Practices
Services should always run under a user account which has the least amount of privileges necessary to do its job. It’s common, and often tempting, to run a service an administrative account like “Administrator”. While this often the easiest way to “get it working”, it’s also the least secure.
When a service runs under the “Administrator” account – especially if it’s the domain Administrator account – the service has almost unrestricted access to all resources on the host or, in case of a domain admin, on the domain. This is not something a service usually needs nor you want. It also means that the service will stop working whenever the password of the Administrator account is changed (the service will continue to work until it is restarted).
Less is Better
Whenever possible, try to use one of the built-in security principals available in Windows to run a service under, or create a specific user account for the service. For example, if you have a file synchronization app which runs as a service, create a “ServiceFileSync” or similar account and configure the service to run under that account. Carefully examine the rights the service requires, and only assign those privileges to the user account which the service actually needs.
When creating the user account, give it a very strong & complex password. Users won’t have to log on with that user account, so the password can be complex and long. You can optionally check the “password does not expire” option if you feel that the password is sufficiently secure and you have a short password expiration policy on your domain which could interfere with the service starting after the password expired.
In domain environments I also recommend giving those user accounts (since you will most likely end up with more than one) either a common prefix or suffix (e.g. svc_mysql) and/or moving the accounts into a specific OU. This makes managing and distinguishing these accounts easier – especially in teams with more than one SysAdmin.
The quick way: Local Services grouped by User Account
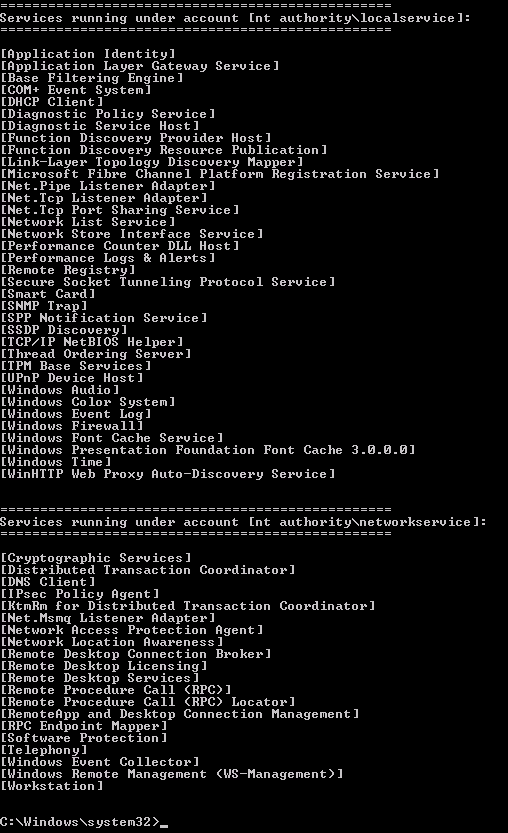
Sample output from srvsec
To view all locally installed services grouped by the user account they are running under, download the EventSentry SysAdmin Tools and just run srvsec.exe. This will show you all locally running services, and group the output by the user account they are running under. Srvsec can also be pointed at a remote host, and can also change the passwords stored in services. Click here for more information on srvsec.
Srvsec is a great tool to quickly see what’s going on a single host, but to manage services on an entire domain effectively a more scalable solution is available: EventSentry + AutoAdministrator – the dynamic duo!
The right way: Making sense of ALL installed services
Even when passwords for service accounts are sufficiently strong, they should still be changed on a regular basis. But which services are installed where and are using which service account?
If this is your first time examining service accounts on your network, you should first identify which services run under which user accounts. EventSentry’s service monitoring feature combined with the web-based reporting really makes this a breeze. Assuming that you have a service monitoring system health package assigned to all of your servers, you can simply open the web reports and navigate to Status – Services and get a birds-eye view of all installed services.
In the Overview view, all installed services are grouped by common attributes, including startup type (automatic startup services vs manual startup services), current status, service name and, most importantly for this post, the service user account.
Overview of all installed services in a domain.
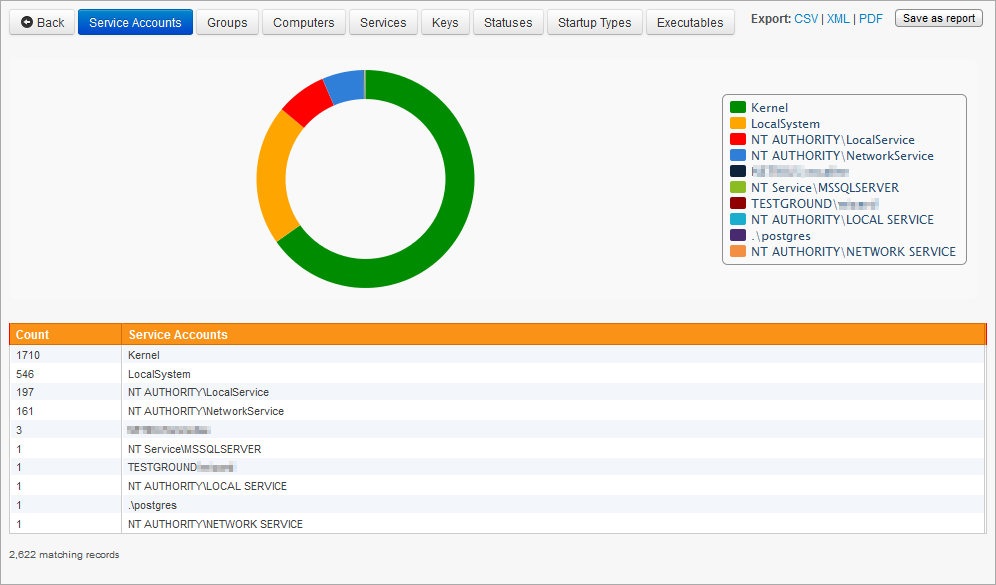
Click the “Show All” link to see all user accounts, or click on a specific user account (e.g. “LocalSystem”) to filter the list and only show services running under this specific user account. In most cases you will want to click on “Detailed” to see a list of all services with more detail.
In addition to filtering and viewing details, you can also click on the header of the
All service user accounts
username (or any other) column to see a chart depicting all user accounts used by services from all monitored servers and workstations.
Any report viewed in the web reports can also be scheduled with a job, e.g. a list of all user accounts used by services could be emailed daily/weekly. Simply click the “Save as Report” link to create a report and setup a job.
Managing Services
The standard way to configure the user account and password used by a service is through the “Services” application in Windows. This works well for one or two servers, but not when you need to update the password for a service on multiple hosts.
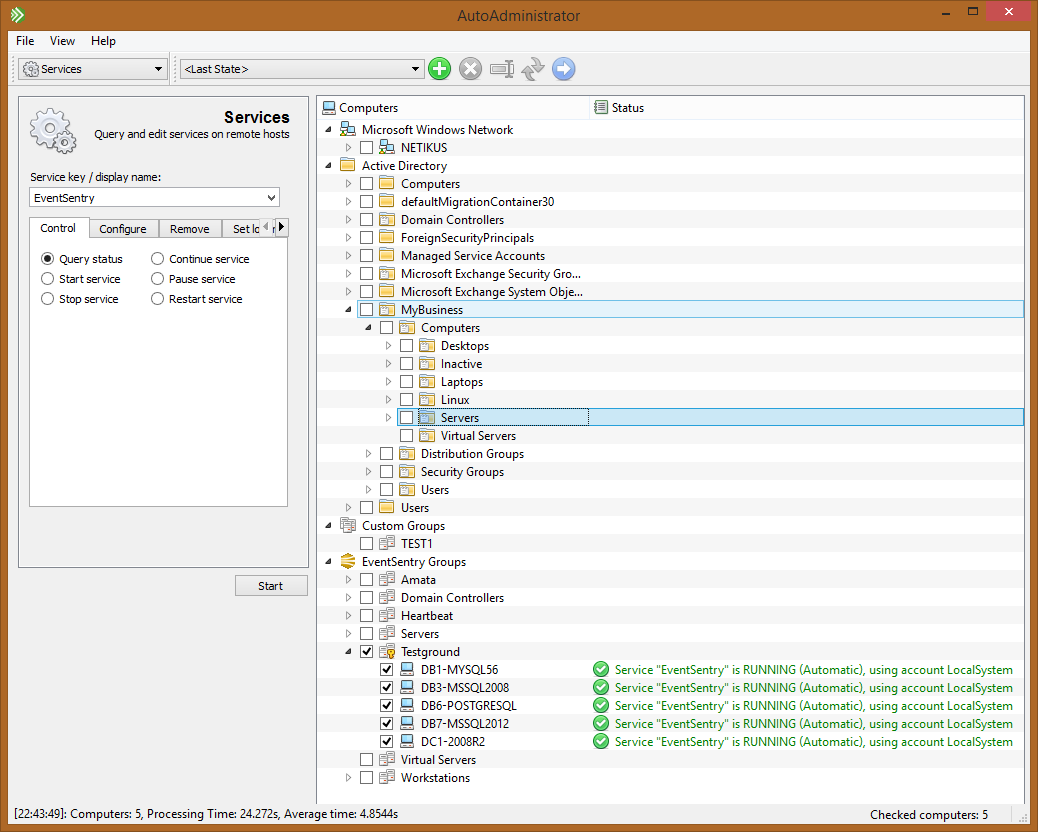
Managing services with AutoAdministrator
This is where AutoAdministrator comes in: A free graphical tool which lets you do just that (and quite a bit more): Update the username and/or password of a service on multiple servers in a domain or work-group. Since AutoAdministrator is multi-threaded, even tasks affecting a large amount of hosts usually only take a few seconds.
To update the stored password of a service, open AutoAdministrator and select “Services” from the drop-down list on the top left.
Service Key Name
Next, select the service you wish to update from the “Service key / display name” drop-down. If the service is not listed, simply specify the service key name in the service field. The key name is the internal name used by the service and can be obtained by double-clicking a service name in the “Services” MMC application in Windows.
Updating service credentials
Next, click on the “Set logon” tab and specify the new username and/or password. Of course you can also specify other service actions, such as restarting the service or changing the start-up type.
As the next step, select the hosts you wish to apply the selected changes to. You can select hosts from Active Directory, EventSentry, custom groups or work groups (Microsoft Windows Network).
Once the correct hosts are selected, click the “Start” button. The number of hosts which will be affected by any action is always shown on the bottom right of the application.
Over the past couple months, we’ve taken time to go through the various EventSentry SysAdmin Tools, one by one, and show you how they can benefit your environment in powerful ways. We’ve talked about the security tools, the networking tools, and the “check” monitoring utilities. As you know, the SysAdmin Tools offer a set of graphical and command-line utilities designed to help you with your daily administrative tasks. These tools are always being honed to provide simple yet powerful functionality.
This month, let’s take a look at the extremely beneficial file-system utilities: ADSList, CheckSum, DirMon, DirectorySize, FileReplace, PurgeTemp, and SuperDel. Here’s what they can do.
ADSList
ADSList scans a folder structure to find any alternate data streams (aka “hidden” data streams). Alternate date streams are a feature of the NTFS file system in which you can hide payload (additional files) inside existing files. The jury is still out about whether malware uses these streams, but it’s always a good idea to make sure nobody has hidden something malicious in alternate data streams, because the Windows Explorer and directory listings don’t show them.
ADSList lists any alternate data streams that are associated with a file. When the tool finds an alternate data stream, it displays the name of the stream along with the regular file the stream is associated with. The output will also show a summary that lists the number of files analyzed, the number of files that have an alternate data stream associated with them, the number of alternate data streams that have been found, and the elapsed time.
The main purpose of ADSList is to give you a command-line utility that can be run/scheduled on a regular basis to reveal any hidden streams on a server or workstation. The /s option lets you include subdirectories.
CheckSum
CheckSum generates a one-way checksum (error detection scheme) of a file with a configurable algorithm and displays it onscreen. This capability is useful for ensuring the integrity of a file and making sure that it hasn’t been modified. CheckSum not only supports the SHA set of cryptographic hash functions (e.g., SHA256, SHA512), but also less secure hash functions (e.g., MD5).
To display and create a file’s checksum, simply supply the filename as the first argument. Keep in mind that generating checksums of large files (e.g., greater than 100Mb) can take a significant amount of time and CPU time.
The CheckSum utility is also included in EventSentry as an add-on to the File Monitoring feature, which can automatically generate SHA checksums and detect file modifications based on checksum changes.
DirMon
Directory Monitor (DirMon) is a useful troubleshooting tool that monitors a directory (and optionally subdirectories) and displays all file changes in real-time. You simply run it on the command line, and it displays any file activity occurring on a given folder (or subfolder).
DirMon will show you when files are added, deleted, or modified. DirMon also lets you specifically include or exclude filters, so you can skip files that you aren’t interested in or show only files that you are interested in. The /I (/includefiles) option includes only files that match a wildcard filter, and the /e (/exclude) option does the opposite. The /s (/subdirectories) option includes subdirectories.
DirectorySize
The DirectorySize (dirsize.exe) utility calculates the current size of a directory, including subdirectories, and displays it onscreen. The output shows the number of files and directories searched, and the total size in physical (actual size taken up on the disk) and logical (actual file size) bytes.
DirectorySize will process the current directory if you pass no command-line arguments.
PurgeTemp
PurgeTemp is a new and exciting tool that lets you purge files that are older than a certain number of days. The tool traverses the %TEMP% directory (or a manually specified directory) and deletes files that have not been modified in 120 days (by default). Because it scans the temp folder by default, you can incorporate PurgeTemp into a login script or run it with Task Scheduler to clean up temp files, for example. It’s a great way to keep users’ temp folders small.
You can customize and configure all of PurgeTemp’s parameters, including /t (time in days) and /p (path). When called without arguments, PurgeTemp simply shows the configured temp directory, the number of files in the directory, and their cumulative size.
SuperDelete
SuperDelete (superdel.exe) essentially deletes all instances of a specific file. It parses a directory (including subdirectories) and deletes multiple occurrences of one file.
Suppose you have a thumbs.db file that Windows Explorer creates in every folder containing images, and you want to remove that from every folder on a drive. You can use SuperDelete for that purpose, using the <directory> variable to specify the directory to search (subdirectories are included), and the <fileToDelete> variable to find all occurrences of a file in the directory (wildcards are supported).
FileReplace
FileReplace is a command-line utility that parses a directory (including subdirectories) and replaces multiple occurrences of one template file with a template file of the same name.
Suppose you have 50 instances of various myfile.txt files scattered on your computer. You can quickly replace them all with a new myfile.txt file.
Another useful example is this: You have file C:\WebSite\Default\index.html and want to replace all other index.html files in the directory D:\WWW (including subdirectories) with C:\WebSite\Default\index.html. FileReplace lets you accomplish that with one command.
Streamline Your File System!
This is just another taste of the free, constantly evolving tools available in EventSentry SysAdmin Tools. Give them a try—they’re all free and will help you manage your IT infrastructure more effectively.