! Updates !
There have been 2 (!) follow-up posts to this article (part 2 and part 3), with even better approaches to defeating ransomware. I highly recommend that you jump directly to the most recent article which offers the best & easiest approach for protecting against Ransomware:
Defeating Ransomware with EventSentry & Auditing (part 3)
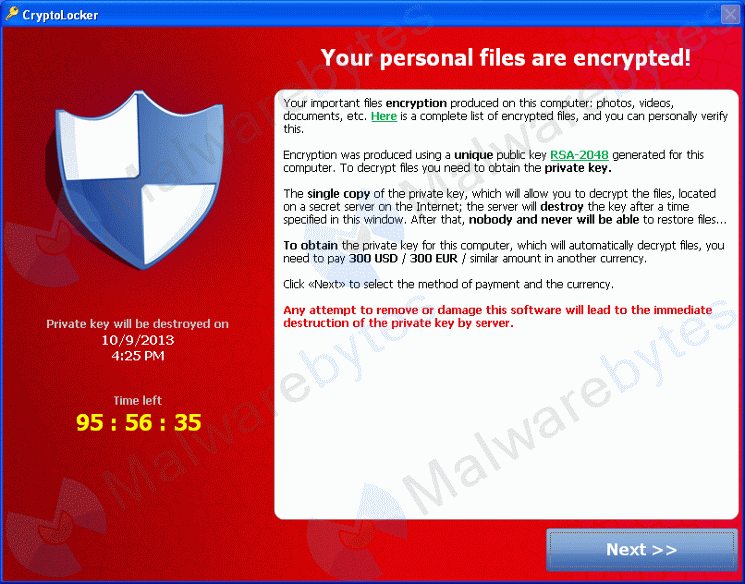
It seems as if CryptoLocker has been making the rounds lately, much to the dismay of users who don’t have working backups of their precious office documents.
While I admire Cryptolocker’s simplicity and effectiveness from a purely technical and entrepreneurial standpoint, what the software is doing does appears to be illegal in most countries and so I’d like to offer some advise on how to tame the beast. If you’re looking for a 5-minute fix then I have bad news: implementing the CryptoLocker defense I have outlined below, while completely free, will take a little more than 5 minutes to implement. But knowing that you have an effective defense against CryptoLocker may very well be worth it. After all, CryptoLocker seems to find its way into a lot private networks these days.
The ideas set forth in this blog post apply mostly to Windows-networks with file servers, but could be adapted for individual computers as well (though this is not covered here – let me know if you’d like me to include this scenario).
About CryptoLocker
For those who have not heard of CryptoLocker yet, it is a piece of software which encrypts pretty much all common office-type documents, including Microsoft Office, AutoCAD, PDFs, images and more. This blog article from MalwareBytes has a complete list of extensions. Once encrypted, CryptoLocker charges you to decrypt (your own files) again. It’s public key cryptography gone wrong; I wonder if Diffie & Hellman saw this one coming. And to make the whole spiel even more interesting, you only get a limited amount of time to pay before your files will remain encrypted. Forever. Oh – and the longer the wait, the more you have to pay. And with recent bit coin exchange rates in excess of USD 1000, the amount that needs to be paid can be uncomfortably high.
It is pretty difficult to defend against something like CryptoLocker other than through usual means of AntiSpyware software, user eduction and strict policies against opening and downloading files from the Internet, email attachments and such. In most cases CryptoLocker comes in form of a ZIP attachment disguised with a PDF icon.
One reason CryptoLocker is so effective – yet difficult to block – is because it exhibits the same behavior as users would: It “simply” accesses and modifies files like a user would. And infecting a machine isn’t all that difficult since CryptoLocker doesn’t require any elevated permissions to run. On the contrary, it wants to run in the same context the user does, so that it can access and see the same files a user does. As such, security features like UAC are utterly useless against ransomware like CryptoLocker – it’s a whole new type of software.
Backups
The most effective defense against CryptoLocker is to have a working, tested backup. Let me repeat this: A WORKING and TESTED backup. Users have lost all their data because they thought that they had a backup in place when their backup was broken in some way.
We’ve seen posts of users who deleted all the files CryptoLocker encrypted, thinking they had a working backup. They had a backup, but it was apparently not recently tested and as a result the user lost all of their data.
Naturally, CryptoLocker does not like backups. It dislikes them so much that when CryptoLocker runs, it even tries to delete any Windows Shadow Copy backups. Cloud backup services (including Dropbox, Skydrive and Google Drive etc.) which keep versions of your files offer some protection, but restoring older versions of your files may be a tedious process.
The Defense
The most obvious defense against CryptoLocker is AntiSpyware software, e.g. MalwareBytes. Most AntiSpyware & AntiVirus software still uses signatures however, so new versions of the ransom ware often remain undetected at least for a few days.
So instead of detecting CryptoLocker itself, we can sniff its tracks so to speak. CryptoLocker’s predictable behavior can be used against it. CryptoLocker’s objective is of course to encrypt and hold hostage as many files as possible, so to increase the likelihood of the user purchasing the decryption key from the thugs.
And it is that very pattern that we will try to exploit and use as a trigger to detect and take corrective measures. The approach consists of measuring how many files are being changed in a certain time interval, and if a certain threshold is being exceeded (say more than 10 files modified in 1 minute) we assume that CryptoLocker found its way into our castle. Even though users modify their documents on a regular basis, users can usually make only so many changes at a time and most likely at a much slower rate than any sort of script / software would.
Another approach would be to create one or more honeypot or canary files, which we know (or hope) a user would not modify. If a checksum change in one of those files were detected, we could (more or less) safely assume that CryptoLocker was on one of his rampages again and take corrective measures. The honeypot file would have to be modifiable by users (otherwise CryptoLocker would also not be able to modify it), which makes accidental modifications by users possible (although somewhat unlikely).
This 2nd approach isn’t quite as solid in my opinion, since CryptoLocker is most certainly adapting to changes, and may skip files that it may suspect are a trap. For example, it could skip small files or skip directories with a very small number of files and so forth.
A more sophisticated approach, where we detect an unusually large number of files changes in a small time period, is going to be harder to circumvent by CryptoLocker. The good news is that we have a free (it’s really free, not a trial) software tool available which can do just that. It can:
- detect file changes
- measure the rate of file changes (through event log alerts)
- stop/start services or launch processes
- send out alerts
EventSentry (Light) to the rescue
EventSentry Light is the free version of our full-spectrum monitoring & compliance solution EventSentry. The features we can utilize to come up with a defense are:
- File Checksum Changes (part of System Health Monitoring)
- Filter Thresholds (part of Event Log Monitoring)
- Action (control services, send out emails)
File Checksum Monitoring
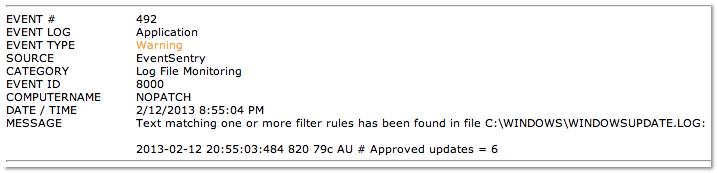
Monitors any folder and detects file size changes, checksum changes and file additions and deletions. EventSentry Light will log file checksum changes to the event log (it’s big brother can also log them to a database), which in turn is monitored by the real-time event log monitoring component.
Event Log Monitoring & Thresholds
This component supports a variety of sophisticated features, one of which are thresholds. The thresholds feature lets you essentially detect event log entries that occur at a certain pace. For example, if 10 specific events occur in 1 minute then let me know and/or take corrective action.
Service Action, Email Action
EventSentry supports a variety of action types to be triggered when an event occurs, with email usually being the most commonly used one. You can also control services, use REST APIs, launch processes and much more. We’ll use the former to stop the file sharing services (LanmanServer) when we have determined that CryptoLocker is on the loose.
I will go into step-by-step instructions on how to configure EventSentry at the end of the post.
The Baseline
The most difficult thing to determine is the maximum rate of file changes we deem normal, as we need to have a baseline in order to configure the threshold slightly above that. This number will vary from network to network, with file servers serving lots of users obviously requiring a larger threshold. I’d like to repeat that determining the right threshold is very important. If it is too low, then normal user activity will trigger an alarm; if it is too high then the alarm may never be triggered and CryptoLocker won’t be caught in time.
The best approach is to setup file monitoring and let it do its job for 1-2 days to determine a baseline. Once the baseline is established, we can increase it by a certain factor (say 1.5) and use that as the threshold.
Setting up the trap requires 3 steps. In this case we assume that EventSentry is either installed directly on the file server, or an agent is deployed on the file server (in which case you will need to make sure that configuration updates are pushed to the file server(s) in question).
Step 1: Monitoring the directory/ies
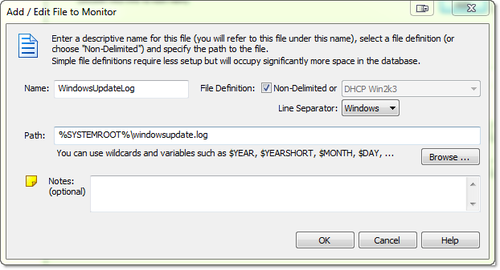
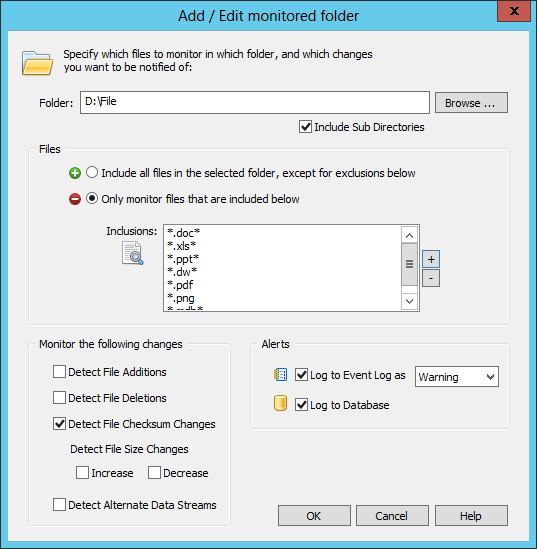
In EventSentry, right-click the system health packages and add a new package. Right-click the package, select “assign” and assign it to all file servers. Right-click the package again and add a “File Monitoring” package. Click the new object. Directories are monitored in real time by default, but EventSentry requires a recurring scan as well – in case Windows doesn’t send real time notifications. This is usually a good thing, but when you are monitoring large directories it’s best to set the interval very high (future versions will allow for this to be unchecked).
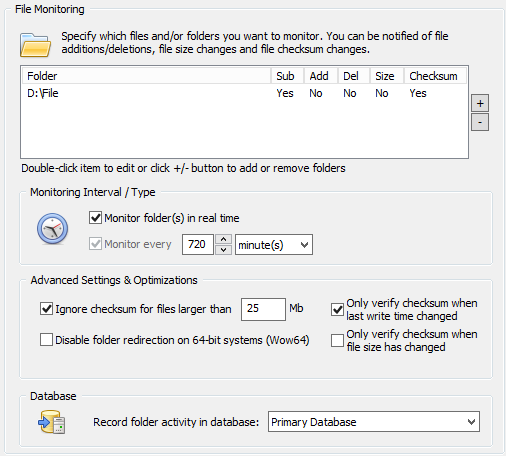
In the package, add all the folders which should be monitored and only check the “checksum change” check box. Do not check any of the other check boxes in the bottom left section at this time. Since we haven’t established a baseline yet, we’ll set the severity of the event log alerts to “Information”. If the monitored folders contain a lot of non-Office files then it may be a good idea to adjust monitoring so that only office files (e.g. .doc, .xls, etc.) are monitored. If you prefer to monitor all files, simply change the setting to the green PLUS icon and make sure the list of exclusions is empty (or specifies files that should be excluded, e.g. *.tmp). Below is a screenshot of how this can be configured.
When you save the configuration, EventSentry will enumerate all files in the folder and create an initial checksum for every file. The agent will log event 12215 when the scan starts, and event 12216 when the scan is complete. When that happens, EventSentry is essentially “armed” and will detect, and log, all checksum changes to any of the files in the monitored directories.
At this point we’ll want to let this run for at least 24 hours during a “normal” work day, as to determine how many file changes occur on average. You are going to be at a bit of an advantage if you are running the full or the trial version with database support, as it will be a lot easier to determine the number of file changes occurring through the web-based reporting.
Step 2: Setting up the trap
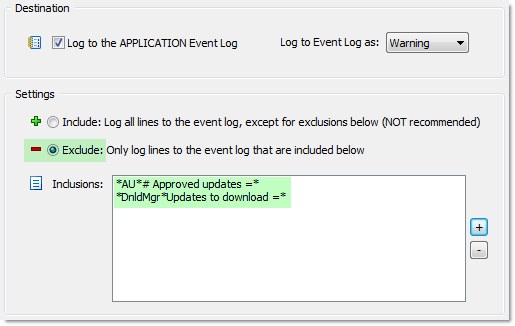
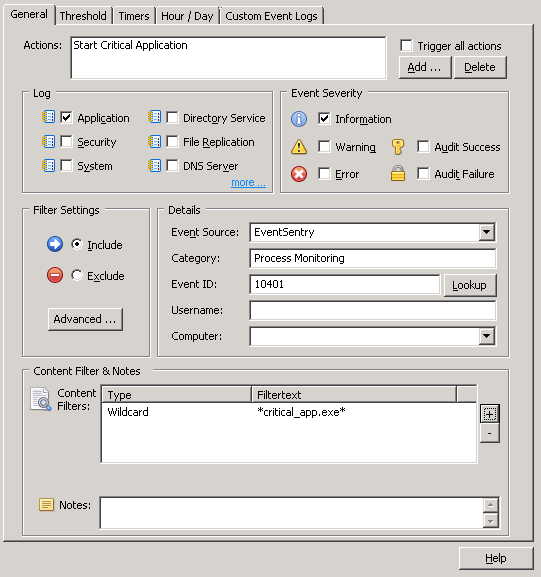
Now that we have established a baseline, we’re ready to setup a threshold. This time we’ll create a new event log monitoring package. Right-click “Event Log Packages” and add a new package and call it “CryptoLocker Rules”. Like before, assign it to the file servers we are monitoring. Right-click the package again and add a new event log filter. Configure the filter as shown in the screenshot below. Note that we are triggering an email action for now. The content filter can be used to restrict the filter further, e.g. to only match certain directories if you are monitoring several directories with EventSentry.
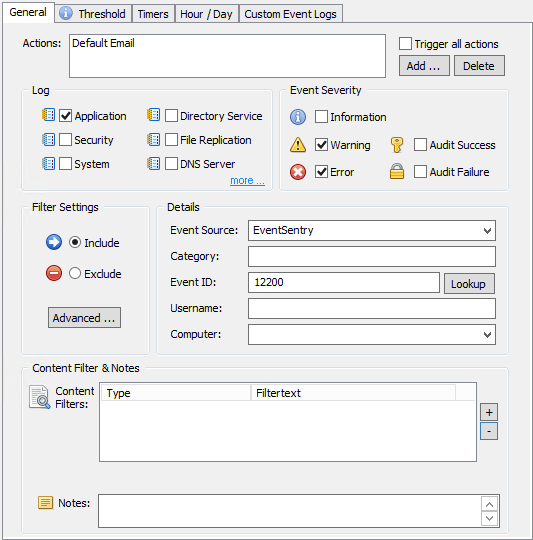
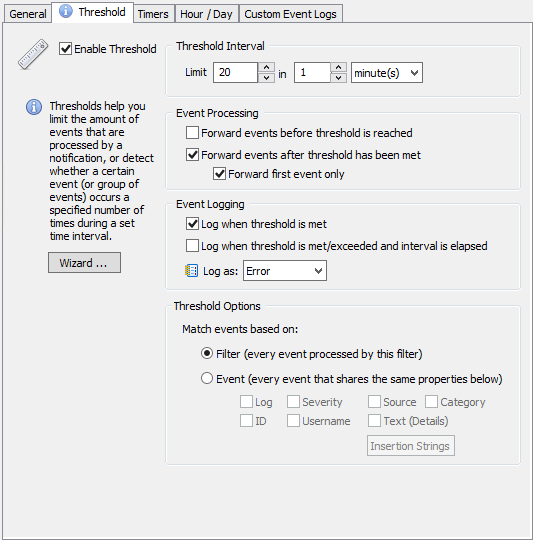
Now things are getting interesting. The goal is to create an error event in the event log when X amount of file checksum changes occur in a given time period. To get there, we’ll start with the “General” tab where we tell the filter what type of event we are interested in (see below). Once that event is defined, we’ll move on to the “Threshold” tab which is where we specify the threshold parameters. For the purpose of an example, let’s assume that we have established a baseline of 100 file checksum changes per day, with a work day starting at 8am and ending at 7pm. Assuming that activity is somewhat spread throughout the day, this amounts to about 9 file changes per hour. Naturally we’ll have to assume that file changes aren’t always evenly spread out throughout the day, but setting up a “if 20 checksum changes occur in 1 minute shut file sharing down” is probably a reasonable threshold. Configure the threshold as shown in the screenshot below, with whichever threshold you came up with.
Step 3: Triggering corrective action
When our threshold is reached, EventSentry will log an error to the event log with event id 10601 and trigger the specified action(s) from the “General” tab (Default Email) one time per threshold interval.
At this point we would merely receive an alert when we suspect that CryptoLocker is at it again. If you are cautious then you can retain this setup for a little while (e.g. a day or two) to ensure that you are not getting any alerts about the threshold being met (assuming that CryptoLocker is not active on your network in which case you should get the emails).
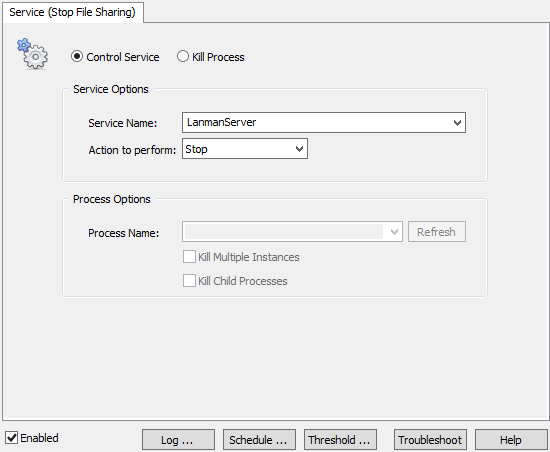
To go all in and trigger a server service shutdown, we’ll need to create a service action now. On Windows, file sharing services are provided by the “Server” service, which uses the internal name of “LanmanServer”. The service action allows you to control any service (start/stop/restart), and in this case we’ll obviously want to stop the server service, so that clients cannot access the file shares on your server anymore. We’ll trigger an email action at the same time of course, so that the sysadmin in charge is aware of what is going on. While shutting down all file services seems a bit extreme, it’s unfortunately the most effective way to prevent more files from becoming encrypted.
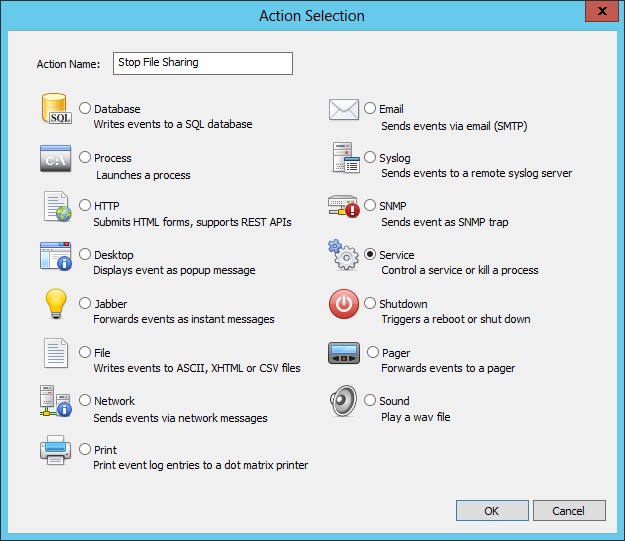
So for the next step, right-click the “Actions” container and select “Add Action”. At the selection dialog choose the “Service” action, enter a descriptive name (e.g. “Stop File Sharing”) and hit enter.
Then, configure the settings of the service as shown in the screenshot below.
The last step of our setup (congratulations if you’ve made it that far) is to assign the service action to the filter we previously created. After all, a service action which isn’t referenced anywhere doesn’t do much good. So head back to the Event Log Packages, find the “CryptoLocker Rules” package and edit the filter in the package. In the action list on top, click the “Add” button and add the action you just created.
Testing
If at all possible I’d recommend testing the EventSentry setup at a time when your users are not interrupted. Adding a few template files to one of the monitored folders and changing them in short succession (a script may be necessary depending on how short your threshold interval is) should trigger the file services shutdown procedure. Once verified, you can just start the “Server” service again.
Conclusion
Just like in the real world, network viruses come in all shapes and sizes – only limited by technology and the imagination of the cyber-evildoers.
I hope that this article gave you some insight into CryptoLocker and a good way to guard against it. As always, make sure that your company has the following in place:
- Email Attachment scanning
- Working, tested backups
- User education
- AntiSpyware software
With those in place, one should be able to keep future infections to a minimum.
Stay safe & decrypted.
 Part of our larger EventSentry network-management solution, the freeware EventSentry SysAdmin Tools offer a set of graphical and command-line utilities designed to help you with your daily administrative tasks. These tools are constantly under development, always being honed to provide simple yet powerful functionality. Three of these tools are vital security utilities: Password Assistant, Service Secure, and Task Secure. Let’s take a look at what they offer.
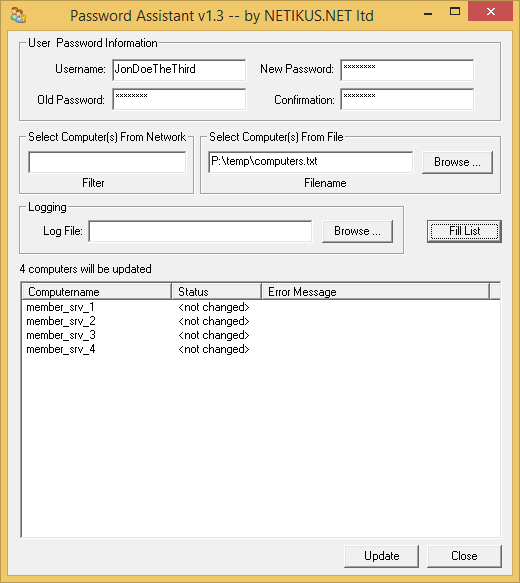 eters of the command-line utility are provided in clear terms: The /u (or /username) parameter specifies the username whose password needs to be changes, the /pwold parameter takes that account’s old password, and the /pwnew parameter accepts the new password; there are also /n (or /network), /f (or /filepath), and /filter parameters for specifying computers, as mentioned above. The /ignore_rest parameter ignores the rest of the labeled arguments following this flag, and the /version parameter displays version information and exits.
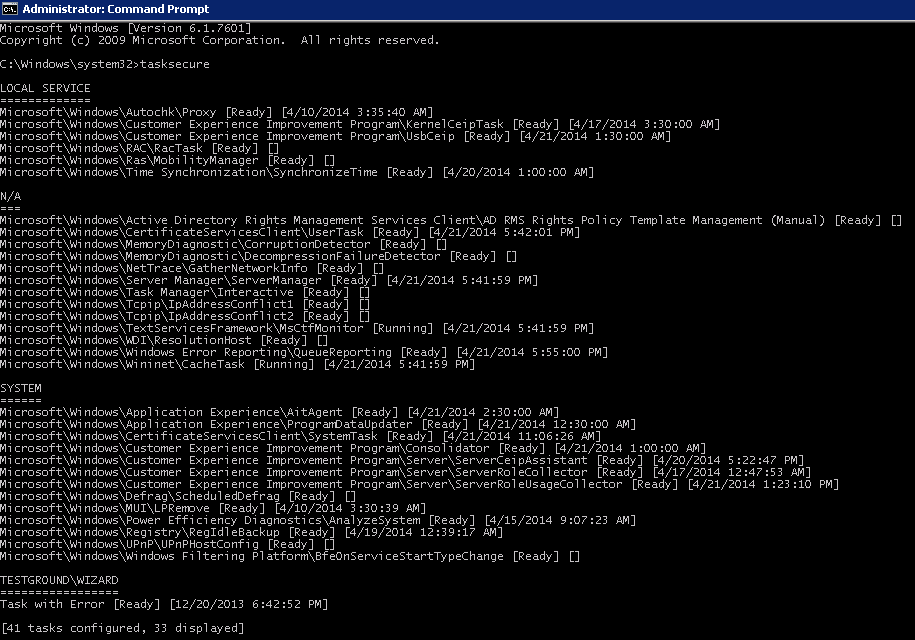 All the parameters of the command-line utility are provided in clear terms: The /r (or /remote_host) parameter lists all the scheduled tasks on a given host; the /u (or /username) parameter lists only those scheduled tasks running under a certain username; the /p (or /password) parameter sets a password for every scheduled task configured for a certain user account; the /ignore_rest parameter ignores the rest of the labeled arguments following this flag; the /version parameter displays version information and exits.

 This is where