I always enjoy visiting customer sites for training or consulting since I learn about their unique challenges and requirements, and how EventSentry can meet them.
During a recent visit an interesting question came up: How can I identify (certain) processes which run longer than a certain time period? It may sound like an odd requirement, but some software suites spawn worker processes which perform certain tasks which take a predictable amount of time, such as processing a document for example. If something goes wrong and one of the worker processes hangs, you’d want to know about it.
EventSentry does include a process monitoring feature which can ensure that a certain number of instances of processes are running, even taking their command line arguments into consideration; however it doesn’t evaluate the duration of process.
Even though you cannot do this out of the box (and given that most users don’t require this sort of thing we’re probably not going to add it), there is a pretty easy solution with a (VB)script and the application scheduler. As a reminder, the application scheduler is the standard way of extending EventSentry’s functionality.
Even though VB(Script) is not the most popular scripting language these days, we like to utilize it for a number of reasons:
* The interpreter (cscript.exe) is pre-installed on all versions of Windows
* It was developed on and for Windows, and can handle easy to moderate scripting pretty well
* It’s easy to read and customize, even by people who don’t write code on a regular basis
Of course you can utilize any scripting language with the application scheduler as long as the interpreter is installed. Now let’s see what this VBScript would look like (if you have ever used the Scriptomatic then the structure of this script may look familiar to you):
On Error Resume Next
Const wbemFlagReturnImmediately = &h10
Const wbemFlagForwardOnly = &h20
' Customize start
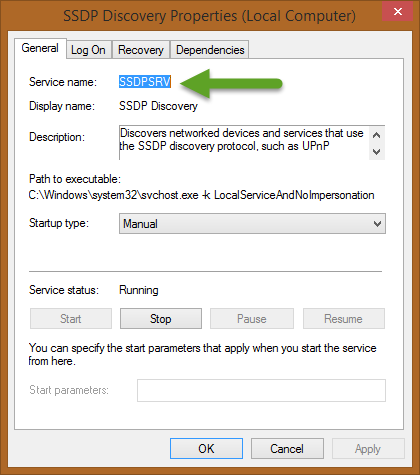
Const processName = "parser.exe"
Const maxAgeSeconds = 120
' Customize end
Dim returnCode
returnCode = 0
Set objWMIService = GetObject("winmgmts:\\localhost\root\CIMV2")
Set colItems = objWMIService.ExecQuery("SELECT * FROM Win32_Process WHERE Caption='" & processName & "'", "WQL", _
wbemFlagReturnImmediately + wbemFlagForwardOnly)
For Each objItem In colItems
Dim secAge
secAge = DateDiff("s", WMIDateStringToDate(objItem.CreationDate), Now())
If secAge > maxAgeSeconds Then
WScript.Echo "Process " & objItem.Caption & " (" & objItem.ProcessId & ") has been running for " & secAge & " seconds, since " & WMIDateStringToDate(objItem.CreationDate)
returnCode = 1
End If
Next
Function WMIDateStringToDate(dtmDate)
WMIDateStringToDate = CDate(Mid(dtmDate, 5, 2) & "/" & _
Mid(dtmDate, 7, 2) & "/" & Left(dtmDate, 4) _
& " " & Mid (dtmDate, 9, 2) & ":" & Mid(dtmDate, 11, 2) & ":" & Mid(dtmDate,13, 2))
End Function
In a nutshell, the script uses WMI to retrieve all running processes and then subtracts the current timestamp from the process start time to determine the runtime (duration) of the process. If it exceeds the pre-configured threshold, the script will return 1 and subsequently log an error to event log.
To get started, first configure the process name and maximum duration in lines 7 & 8. Then, added the script as an embedded script (Tools -> Embedded Scripts) with a descriptive name. Remember to give the file the correct (.vbs) extension here.
Once the file is setup as an embedded script, you can reference it from the application scheduler or an action (although it wouldn’t make much sense to use this script as an action). Create a new system health package, or add the “Application Scheduler” object to an existing system health package. Make sure the package is assigned to the correct computer or group!
To finish, add a schedule to the newly created application scheduler object; in most cases you will want to use a “Recurring Schedule” which will run in regular intervals. On the main application scheduler dialog you will want to make sure that the “Log application return code > 0 to the event log as “Error” is checked. These types of events can then be forwarded to a recipient via email for example.
This script is a pure monitoring script, it won’t take any corrective action by itself. But the script could easily be modified to automatically terminate the process if it has been running for too long. For example, you could either terminate the process with the Terminate() method via WMI, or execute pskill (Sysinternals suite) from within the VBScript. The latter may be more reliable but will require that pskill is installed on all the machines running this script. A modified version of the script is shown below:
' using "Terminate()"
    If secAge > maxAgeSeconds Then
        WScript.Echo "Process " & objItem.Caption & " (" & objItem.ProcessId & ") has been running for " & secAge & " seconds, since " & WMIDateStringToDate(objItem.CreationDate) & ", and will be terminated"

        objItem.Terminate()

        returnCode = 1
    End If

' using pskill
    If secAge > maxAgeSeconds Then
        WScript.Echo "Process " & objItem.Caption & " (" & objItem.ProcessId & ") has been running for " & secAge & " seconds, since " & WMIDateStringToDate(objItem.CreationDate) & ", and will be terminated"

          WshShell.Exec "PSKill " & objProcess.ProcessId

        returnCode = 1
    End If
So there you have it, how to keep long-running processes in check. Since embedded scripts are integrated into the EventSentry configuration, there is no need to manage the script on the remote host.
A nice feature of EventSentry is that any email alert you will get will automatically include the output of the script – delivered straight into your inbox.


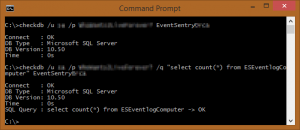 You can optionally run a SQL statement of your choice. CheckDB is particularly useful because it doesn’t merely verify that a database server is online (e.g. through a port check), it also verifies that a SQL statement was successful. That capability improves the usability of this tool because it verifies that the SQL server is accepting logins and is working correctly (at least as far as that statement is concerned). Also, this tool will work with any database that supplies ODBC drivers, so it will work with MySQL, MSSQL, and so on. You can schedule CheckDB from within EventSentry (“Application Scheduler”), and even time it. The scheduling capability is a bit advanced, and the setup requires a few steps, but after getting it up and running, you can easily schedule a statement and configure it to notify you if it takes more than two seconds, for example. The parameters of this command-line utility are straightforward: The <DSN/Connectionstring> parameter is the DSN or connection strong to connect to; the /q (or /query) parameter is the SQL query you can run upon successful connection; the /u (or /username) parameter is the DSN unsername to connect as; and the /p (or /password) parameter is the password for “username.” CheckDB can log output either to the console or to the event log, making it easy to receive alerts from the utility through EventSentry or any other log monitoring software. The /I (/logToLog) and /c (/logToConsole) parameters take care of this functionality.
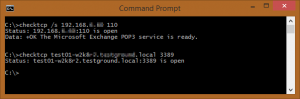 For that, you can simply run “checktcp server123 3389.” It’s not fancy, but it accomplishes a vital task. If you use the /s switch, you can get only the first line of the response. For example, if you use it against a mail server, you would get this:
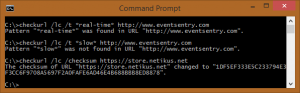 The scheduling capability is a bit advanced, and the setup requires a few steps, but after getting it up and running, you can easily schedule a statement and configure it to notify you if it takes more than two seconds, for example. At NETIKUS.NET, we monitor our online store that way. If the store takes more than three seconds to load, we get an alert. Like CheckDB, CheckURL can log output either to the console or to the event log, making it easy to receive alerts from the utility through EventSentry or any other log monitoring software. CheckURL supports SSL as well as proxy servers.