EventSentry v3.5 continues to increase visibility into networks with additional vantage points, making it easier for EventSentry users to reduce their attack surface as well as discover anomalies.
Process & Network Activity Tracking
One major focus of this release is process network activity, an important component in any monitoring strategy. Do you know which applications listen for incoming connections on your monitored machines – or when a new process suddenly starts accepting incoming traffic? Do you know which processes perform outgoing network connections, and to where? How much data are they transferring?
Figure 1: View process network activity from Sysmon
To help you (and possibly your overzealous auditors) answer these questions, EventSentry v3.5 takes the existing process tracking functionality to the next level by integrating with Sysmon and showing processes with active or listening network connections. With EventSentry deployed you can now see:
Complete Process Details (start & stop times, duration, caller, PID)
Process checksum
Process command line
All processes listening for incoming connections
All active processes
Network activity initiated by a process (Figure 1, requires Sysmon)
Correlation with EventSentry NetFlow (Figure 2, requires NetFlow component)
This means that you can easily see which network connections a host establishes if you have Sysmon installed, and can even correlate that information with the EventSentry NetFlow component with just a click (see below). This information is invaluable for forensics and troubleshooting alike.
Figure 2: Detailed process network activity from NetFlow data
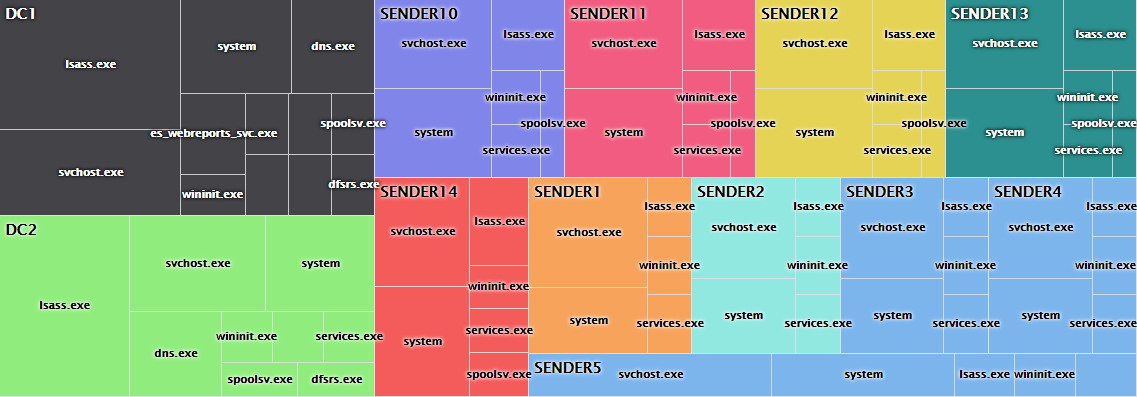
But even without Sysmon, EventSentry can now show you every open TCP port on a monitored machine (optionally all active connections as well), making it easy to discover rogue services on a network – even if they are blocked by the firewall. Figure 3 below shows all active processes which are listening for incoming connections, grouped by host.
Figure 3: All active processes which are listening for incoming network connections
Registry Tracking
A new member in the compliance tracking features family is registry tracking. Similar to file access tracking, it normalizes all registry audit events on a monitored machine, making it much easier to report on the registry activity and changes. Configuring registry tracking to work with existing registry auditing is incredibly easy and can be enabled in 60 seconds if the proper audit settings are already in place. The screen shots below show a list of recent registry activity as well as the details of changes:
Registry activity on monitored machines
List of changes made to critical registry values
Tags
Users managing a large number of hosts will appreciate the new “Tags” feature which addresses a shortcoming with the existing flat group structure. Tags allow groups or hosts to be tagged with keywords (e.g. production, staging, development). The created tags can then be used in the web reports (e.g. Show me disk space from all hosts tagged with “development”) and for dynamic package assignments.
FIM
The file checksum monitoring component received a few enhancements to help reduce noise while also adding new functionality.
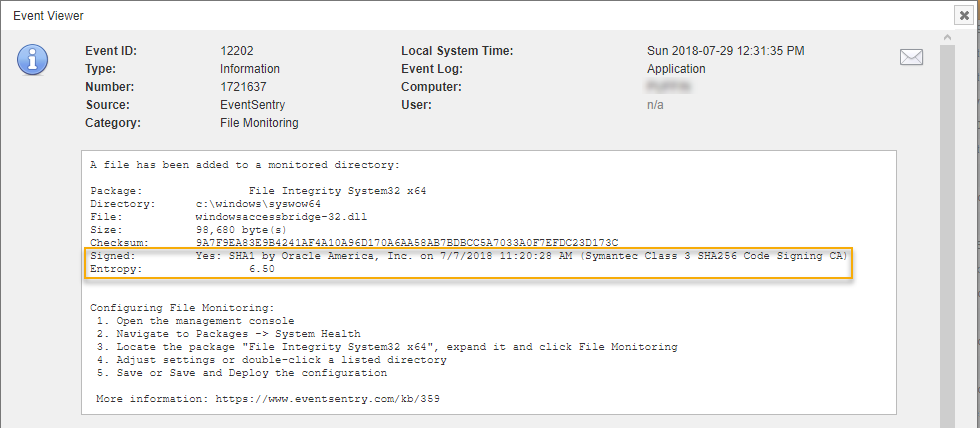
FIM can now verify the digital signature of executable files and optionally suppress alerts if a file is digitally signed – think Windows updates. This can reduce the number of alerts you get significantly and thus make the remaining alerts more meaningful. The digital signature status can also be displayed in the web reports as a new column.
FIM can also calculate the entropy (essentially a measure of randomness) of files with a scale from 0 to 10, with 10 being the maximum of a completely random file. This is useful for Ransomware detection, since encrypted (and compressed files as well) files have a higher entropy than regular files. Combined with a threshold filter this can detect when a large number of encrypted files are suddenly being processed in a given directory and thus indicate a Ransomware infection.
File monitoring alerts now include signature details and entropy
We also replaced the existing SHA-256 checksum algorithm with a faster version in 3.5 which should result in a lower CPU utilization on systems which need to calculate a large number of checksums.
Disk Space Monitoring
A common annoyance with disk space monitoring are large volumes where an otherwise useful limit of, say 5%, is just not useful. For example, 5% of a 2 Tb drive is still 100 Gb, and in most cases there is probably no reason to sound an alarm. Dynamic thresholds (a new feature) addresses this issue by automatically adjusting the limit based on the drive size. The result: Fewer alerts!
EventSentry will log an event to the application event log when dynamic thresholds are enabled AND the current settings warrant a change. An event will look something like this:
The percentage-based threshold on drive F:\ has been dynamically adjusted from 5 percent to 0.5 percent based on the total drive size of 999 GB. A low disk space alert will be triggered when the available space on this volume falls below 19 GB.
Other Improvements
The software inventory page (detailed tab) will now show which hosts do NOT have a particular software installed when the search is restricted to a specific software product. Also related to processes, process tracking can now generate the checksum of all execute files, which can then be searched for at Malware databases like virustotal.com. If you utilize the maintenance mode feature in EventSentry then you can now see whether a host is in maintenance mode or not in the web reports. And last but not least, event logs can now be sent to a remote Syslog receiver via TLS.
Under the Hood
We always tweak and improve EventSentry to ensure it runs as efficiently as possible. In this release we replaced the SHA 256 algorithm with a more efficient version, resulting in less CPU usage by the agent when calculating SHA 256 checksums. As we gradually move to a full 64-bit monitoring suite, the Heartbeat Agent is the next component now also available as a 64-bit process so that all EventSentry services are now available in 64-bit. We plan on porting all executables over to 64-bit within the next 6-12 months. At that point you will not be able to run EventSentry on 32-bit platforms anymore; monitoring 32-bit hosts will of course still be supported for the foreseeable future.
To help with the stability of all EventSentry and simply troubleshooting, all server-side components will now automatically generate crash dumps if they encounters a problem. Finally, the management console includes additional context and ribbon buttons.
Windows supports a code-signing feature called Authenticode, which allows a software publisher to digitally sign executable files (e.g. .exe, .msi, …) so that users can verify their autenticity. The digital signature of a file can be viewed in the file properties in Windows explorer on the “Digital Signature” tab.
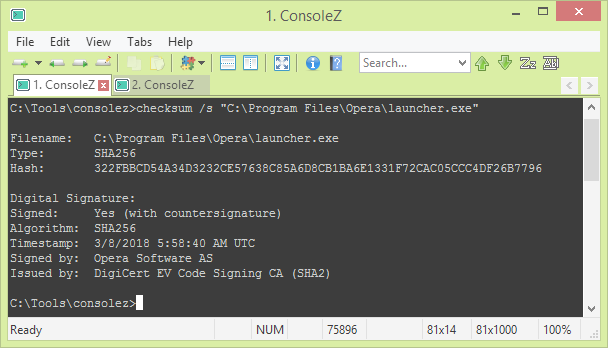
Viewing the digital signature of the Opera browser
Digital signature verification has been added to the checksum utility, which already calculates the checksum and entropy of a file. When using the new /s switch, checksum.exe will tell you whether:
the file is digitally signed
a counter signature exists
the digital signature is valid
the algorithm used (e.g. SHA 256)
who signed the file
who issued the certificate
when the file was signed
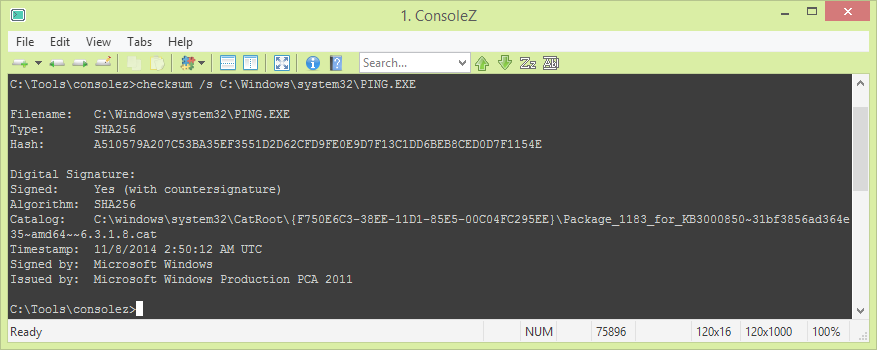
The utility also sets the ERRORLEVEL variable accordingly; if a signature check is requested with the /s switch but the file is unsigned, then checksum.exe will return %ERRORLEVEL% 2. Below is a sample output of the utility in action:
Viewing the digital signature of the Windows ping utility
Digital signature verification will be added to EventSentry’s FIM monitoring component (“File Checksum Monitoring”) in the upcoming v3.4.3 release, which will give you the option to only get notified when unsigned files are changed, thus reducing overall noise.
You can download the latest version from here – enjoy!
In part one I provided a high level overview of PowerShell and the potential risk it poses to networks. Of course we can only mitigate some PowerShell attacks if we have a trace, so going forward I am assuming that you followed part 1 of this series and enabled
Module Logging
Script Block Logging
Security Process Tracking (4688/4689)
I am dividing this blog post into 3 distinct sections:
Prevention
Detection
Mitigation
We start by attempting to prevent PowerShell attacks in the first place, decreasing the attack surface. Next we want to detect malicious PowerShell activity by monitoring a variety of events produced by PowerShell and Windows (with EventSentry). Finally, we will mitigate and stop attacks in their tracks. EventSentry’s architecture involving agents that monitor logs in real time makes the last part possible.
But before we dive in … the
PowerShell Downgrade Attack
In the previous blog post I explained that PowerShell v2 should be avoided as much as possible since it offers zero logging, and that PowerShell v5.x or higher should ideally be deployed since it provides much better logging. As such, you would probably assume that basic script activity would end up in of the PowerShell event logs if you enabled Module & ScriptBlock logging and have at least PS v4 installed. Well, about that.
So let’s say a particular Windows host looks like this:
PowerShell v5.1 installed
Module Logging enabled
ScriptBlock Logging enabled
Perfect? Possibly, but not necessarily. There is one version of PowerShell that, unfortunately for us, doesn’t log anything useful whatsoever: PowerShell v2. Also unfortunately for us, PowerShell v2 is installed on pretty much every Windows host out there, although only activated (usable) on those hosts where it either shipped with Windows or where the required .NET Framework is installed. Unfortunately for us #3, forcing PowerShell to use version 2 is as easy as adding -version 2 to the command line. So for example, the following line will download some payload and save it as calc.exe without leaving a trace in any of the PowerShell event logs:
does the exact same thing. So when doing pattern matching we need to use something like -v* 2 to ensure we can catch this parameter.
Microsoft seems to have recognized that PowerShell is being exploited for malicious purposes, resulting in some of the advanced logging options like ScriptBlockLogging being supported in newer versions of PowerShell / Windows. At the same time, Microsoft also pads itself on the back by stating that PowerShell is – by far –the most securable and security-transparent shell, scripting language, or programming language available. This isn’t necessarily untrue – any scripting language (Perl, Python, …) can be exploited by an attacker just the same and would leave no trace whatsoever. And most interpreters don’t have the type of logging available that PowerShell does. The difference with PowerShell is simply that it’s installed by default on every modern version of Windows. This is any attackers dream – they have a complete toolkit at their fingertips.
So which Operating Systems are at risk?
PowerShell Version 2 Risk
Windows Version
PowerShell V2
Active By Default
PowerShell V2
Removable?
Threat Level
Windows 7
Yes
No
Vulnerable
Windows 2008 R2
Yes
No
Vulnerable
Windows 8 & later
No
Yes
Potentially Vulnerable – depends on .NET Framework v2.0
Windows 2012 & later
No
Yes
Potentially Vulnerable – depends on .NET Framework v2.0
Versions of Windows susceptible to Downgrade Attack
OK, so that’s the bad news. The good news is that unless PowerShell v2 was installed by default, it isn’t “activated” unless the .NET Framework 2.0 is installed. And on many systems that is not the case. The bad news is that .NET 2.0 probably will likely be installed on some systems, making this downgrade attack feasible. But another good news is that we can detect & terminate PowerShell v2 instances with EventSentry (especially when 4688 events are enabled) – because PowerShell v2 can’t always be uninstalled (see table above). And since we’re on a roll here – more bad news is that you can install the required .NET Framework with a single command:
Of course one would need administrative privileges to run this command, something that makes this somewhat more difficult. But attacks that bypass UAC exist, so it’s feasible that an attacker accomplishes this if the victim is a local administrator.
According to a detailed (and very informative) report by Symantec, PS v2 downgrade attacks haven’t been observed in the wild (of course that doesn’t necessarily mean that they don’t exist), which I attribute to the fact that most organizations aren’t auditing PowerShell sufficiently, making this extra step for an attacker unnecessary. I do believe that we will start seeing this more, especially with targeted attacks, as organizations become more aware and take steps to secure and audit PowerShell.
1. Prevention
Well, I think you get the hint: PowerShell v2 is bad news, and you’ll want to do one or all of the following:
Uninstall PowerShell v2 whenever possible
Prevent PowerShell v2 from running (e.g. via AppLocker)
Detect and terminate any instances of PowerShell v2
If you so wish, then you can read more about the PowerShell downgrade attack and detailed information on how to configure AppLocker here.
Uninstall PowerShell v2
Even if the .NET Framework 2.0 isn’t installed, there is usually no reason to have PowerShell v2 installed. I say usually because some Microsoft products like Exchange Server 2010 do require it and force all scripts to run against version 2. PowerShell version 2 can manually be uninstalled (Windows 8 & higher, Windows Server 2012 & higher) from Control Panel’s Program & Features or with a single PowerShell command: (why of course – we’re using PowerShell to remove PowerShell!):
While running this script is slightly better than clicking around in Windows, it doesn’t help much when you want to remove PowerShell v2.0 from dozens or even hundreds of hosts. Since you can run PowerShell remotely as well (something in my gut already tells me this won’t always be used for honorable purposes) we can use Invoke-Command cmdlet to run this statement on a remote host:
Just replace WKS1 with the host name from which you want to remove PowerShell v2 and you’re good to go. You can even specify multiple host names separated by a comma if you want to run this command simultaneously against multiple hosts, for example
Well congratulations, at this point you’ve hopefully accomplished the following:
Enabled ModuleLogging and ScriptBlockLogging enterprise-wide
Identified all hosts running PowerShell v2 (you can use EventSentry’s inventory feature to see which PowerShell versions are running on which hosts in a few seconds)
Uninstalled PowerShell v2 from all hosts where supported and where it doesn’t break critical software
Terminate PowerShell v2
Surgical Termination using 4688 events
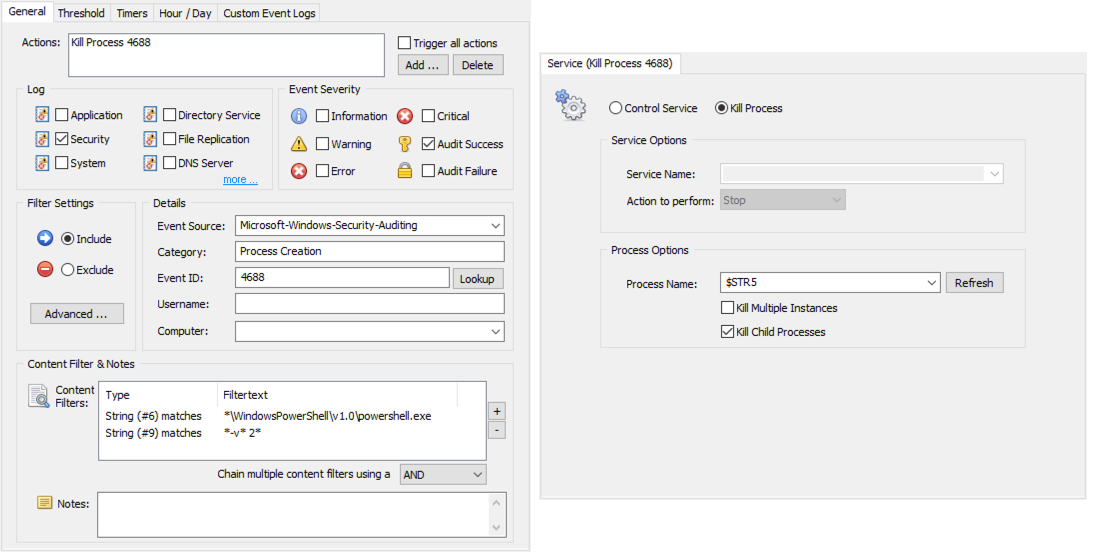
If you cannot uninstall PowerShell v2.0, don’t have access to AppLocker or want to find an easier way than AppLocker then you can also use EventSentry to terminate any powershell.exe process if we detect that PowerShell v2.0 was invoked with the -version 2 command line argument. We do this by creating a filter that looks for 4688 powershell.exe events that include the -version 2 argument and then link that filter to an action that terminates that PID.
Filter & Action to terminate PS v2.0
If an attacker tries to launch his malicious PowerShell payload using the PS v2.0 engine, then EventSentry will almost immediately terminate that powershell.exe process. There will be a small lag between the time the 4688 event is logged and when EventSentry sees & analyzes the event, so it’s theoretically possible that part of a script will begin executing. In all of the tests I have performed however, even a simple “Write-Host Test” PowerShell command wasn’t able to execute properly because the powershell.exe process was terminated before it could run. This is likely because the PowerShell engine does need a few milliseconds to initialize (after the 4688 event is logged), enough time for EventSentry to terminate the process. As such, any malicious script that downloads content from the Internet will almost certainly terminated in time before it can do any harm.
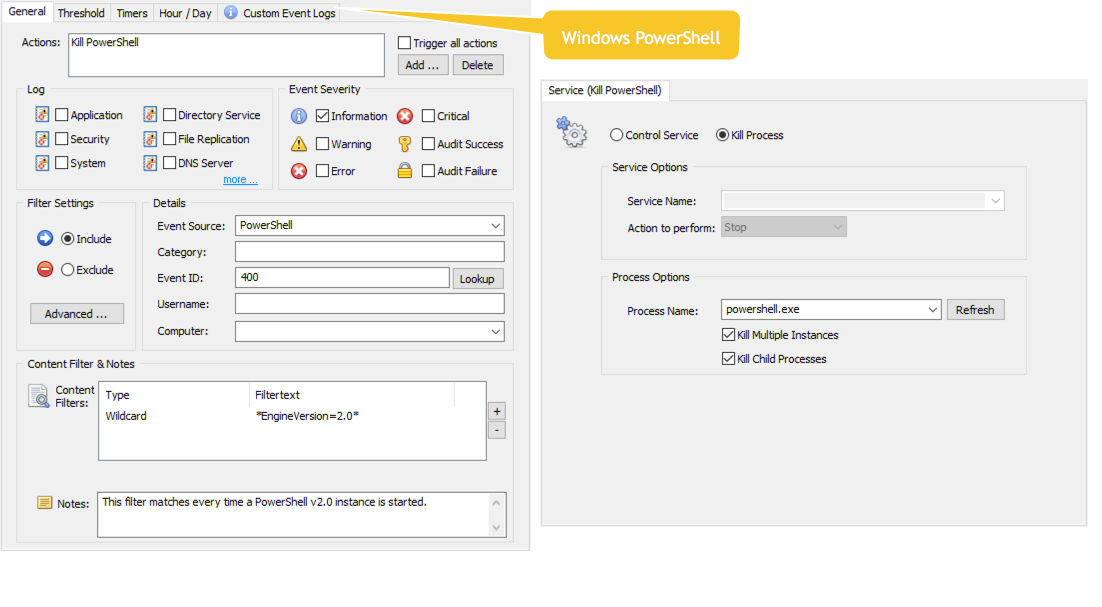
Shotgun Approach
The above approach won’t prevent all instances of PowerShell v2.0 from running however, for example when the PowerShell v2.0 prompt is invoked through a shortcut. In order to prevent those instances of PowerShell from running we’ll need to watch out for Windows PowerShell event id 400, which is logged anytime PowerShell is launched. This event tells us which version of PowerShell was just launch via the EngineVersion field, e.g. it will include EngineVersion=2.0 when PowerShell v2.0 is launched. We can look for this text and link it to a Service action (which can also be used to terminate processes).
Terminate all powershell instances
Note: Since there is no way to correlate a Windows PowerShell event 400 with an active process (the 400 event doesn’t include a PID), we cannot just selectively kill version 2 powershell.exe processes. As such, when a PowerShell version instance is detected, all powershell.exe processes are terminated, version 5 instances. I personally don’t expect this to be a problem, since PowerShell processes usually only run for short periods of time, making it unlikely that a PowerShell v5 process is active while a PowerShell v2.0 process is (maliciously) being launched. But decide for yourself whether this is a practicable approach in your environment.
2. Detection
Command Line Parameters
Moving on to detection, where our objective is to detect potentially malicious uses of PowerShell. Due to the wide variety of abuse possibilities with PowerShell it’s somewhat difficult to detect every suspicious invocation of PowerShell, but there are a number of command line parameters that should almost always raise a red flag. In fact, I would recommend alerting or even terminating all powershell instances which include the following command line parameters:
Highly Suspicious PowerShell Parameters
Parameter
Variations
Purpose
-noprofile
-nop
Skip loading profile.ps1 and thus avoiding logging
-encoded
-e
Let a user run encoded PowerShell code
-ExecutionPolicy bypass
-ep bypass, -exp bypass, -exec bypass
Bypass any execution policy in place, may generate false positives
-windowStyle hidden
Prevents the creation of a window, may generate false positives
-version 2
-v 2, -version 2.0
Forces PowerShell version 2
Any invocation of PowerShell that includes the above commands is highly suspicious
The advantage of analyzing command line parameters is that it doesn’t have to rely on PowerShell logging since we can evaluate the command line parameter of 4688 security events. EventSentry v3.4.1.34 and later can retrieve the command line of a process even when it’s not included in the 4688 event (if the process is active long enough). There is a risk of false positives with these parameters, especially the “windowStyle” option that is used by some Microsoft management scripts.
Modules
In addition to evaluating command line parameters we’ll also want to look out for modules that are predominantly used in attacks, such as .Download, .DownloadFile, Net.WebClient or DownloadString. This is a much longer list and will need to be updated on a regular basis as new toolkits and PowerShell functions are being made available.
Depening on the attack variant, module names can be monitored via security event 4688 or through PowerShell’s enhanced module logging (hence the importance of suppressing PowerShell v2.0!), like event 4103. Again, you will most likely get some false positives and have to setup a handful of exclusions.
Command / Code Obfuscation
But looking at the command line and module names still isn’t enough, since it’s possible to obfuscate PowerShell commands using the backtick character. For example, the command.
could easily be detected by looking for with a *Net.WebClient*,*DownloadString* or the *https* pattern. Curiously enough, this command can also be written in the following way:
This means that just looking for DownloadString or Net.WebClient is not sufficient, and Daniel Bohannon devoted an entire presentation on PowerShell obfuscation that’s available here. Thankfully we can still detect tricks like this with regex patterns that look for a high number of single quotes and/or back tick characters. An example RegEx expression to detect 2 or more back ticks for EventSentry will look like this:
^.*CommandLine=.*([^`]*`){2,}[^`]*.*$
The above expression can be used in PowerShell Event ID 800 events, and will trigger every time a command which involves 2 or more back ticks is executed. To customize the trigger count, simply change the number 2 to something lower or higher. And of course you can look for characters other than the ` character as well, you can just substitute those in the above RegEx as well. Note that the character we look for appears three (3) times in the RegEx, so it will have to be substituted 3 times.
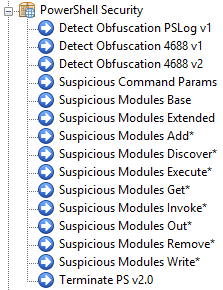
To make things easier for EventSentry users, EventSentry now offers a PowerShell event log package which you can download via the Packages -> Download feature. The package contains filters which will detect suspicious command line parameters (e.g. “-nop”), detect an excessive use of characters used for obfuscation (and likely not used in regular scripts) and also find the most common function names from public attack toolkits.
Evasion
It’s still possible to avoid detection rules that focus on powershell.exe if the attacker manages to execute PowerShell code through a binary other than powershell.exe, because powershell.exe is essentially just the “default vehicle” that facilitates the execution of PowerShell code. The NPS (NotPowerShell) project is a good example and executes PS code through a binary named nps.exe (or whatever the attacker wants to call lit), but there are others. While the thought of running PowerShell code through any binary seems a bit concerning from a defenders perspective, it’s important to point out that downloading another binary negates the advantage of PowerShell being installed by default. I would only expect to see this technique in sophisticated, targeted attacks that possibly start the attack utilizing the built-in PowerShell, but then download a stealth app for all subsequent activity.
This attack can still be detected if we can determine that one of the following key DLLs from the Windows management framework are being loaded by a process other than powershell.exe:
System.Management.Automation.Dll
System.Management.Automation.ni.Dll
System.Reflection.Dll
You can detect this with Sysmon, something I will cover in a follow-up article.
3. Mitigation
EventSentry PowerShell Rules
Now, having traces of all PowerShell activity when doing forensic investigations is all well and good, and detecting malicious PowerShell activity after it happened is a step in the right direction. But if we can ascertain which commands are malicious, then why not stop & prevent the attack before it spreads and causes damage?
In addition to the obvious action of sending all logs to a central location, there are few things we can do in response to potentially harmful activity:
1. Send out an alert
2. Mark the event to require acknowledgment
3. Attempt to kill the process outright (the nuclear option)
4. A combination of the above
If the only source of the alert is from one of the PowerShell event logs then killing the exact offending PowerShell process is not possible, and all running powershell.exe processes have to be terminated. If we can identify the malicious command from a 4688 event however, then we can perform a surgical strike and terminate only the offending powershell.exe process – other potentially (presumably benign) powershell.exe processes will remain unharmed and can continue to do whatever they were supposed to do.
If you’re unsure as to how many PowerShell scripts are running on your network (and not knowing this is not embarrassing – many Microsoft products run PowerShell scripts on a regular basis in the background) then I recommend just sending email alerts initially (say for a week) and observe the generated alerts. If you don’t get any alerts or no legitimate PowerShell processes are identified then it should be safe to link the filters to a “Terminate PowerShell” action as shown in the screenshots above.
Testing
After downloading and deploying the PowerShell package I recommend executing a couple of offending PowerShell commands to ensure that EventSentry will detect them and either send out an alert or terminate the process (or both – depending on your level of conviction). The following commands should be alerted on and/or blocked:
Any detection rules you setup, whether with EventSentry or another product, will almost certainly result in false alerts – the amount of which will depend on your environment. Don’t let this dissuade you – simply identify the hosts which are “incompatible” with the detection rules and exclude either specific commands or exclude hosts from these specific rules. It’s better to monitor 98 out of 100 hosts than not monitor any host at all.
With EventSentry you have some flexibility when it comes to excluding rules from one or more hosts:
Create exclude filters that only match specific commands and/or hosts
Conclusion
PowerShell is a popular attack vector on Windows-based systems since it’s installed by default on all recent versions of Windows. Windows admins need to be aware of this threat and take the appropriate steps to detect and mitigate potential attacks:
Disable or remove legacy versions of PowerShell (=PowerShell v2)
Enable auditing for both PowerShell and Process Creation
Collect logs as well as detect (and ideally prevent) suspicious activity
EventSentry users have an excellent vantage point since its agent-based architecture can not only detect malicious activity in real time, but also prevent it. The PowerShell Security event log package, which can be downloaded from the management console, offers a list of rules that can detect many PowerShell-based attacks.
Imagine someone getting the seemingly innocent ability to run a couple of commands on a machine on your network WITHOUT installing any new software, but those commands resulting in a reverse shell running on that same machine – giving the intruder a convenient outpost in your network. Now stretch your imagination even further and pretend that all of this happens without leaving any unusual traces in logs – leaving you completely in the dark. It’s like somebody living in your house or apartment yet you have no idea they’re there. Are you getting goose bumps yet?
Not too long ago I talked with Michael, the creator of the popular cheat sheets which cover PowerShell, the Windows Registry, Windows Logging, and more. Michael ran a few scenarios by me that involved exploiting PowerShell and was curious how EventSentry could help detect those. This really sparked my interest in the topic, and after coming up with a few RegEx expressions that could be used in an EventSentry filter I decided to look more into this subject. I really have to take the opportunity to thank Michael here, whose cheat sheets and input helped me come up with this article and the new PowerShell Security event log package in EventSentry.
If you’re not an InfoSec professional then you may not be fully aware that PowerShell – you know, the language you’re supposed to be fluent in by now – is quite commonly used in attacks. In fact, InfoSec already reported back in 2016 that 38% of all attacks utilize PowerShell in one way or another. And let’s be honest – why wouldn’t you utilize a tool that is pretty much guaranteed to be installed while giving you full access to the .NET Framework and all Windows APIs? So if you haven’t already done so, then securing PowerShell in your environment is something you should think about sooner rather than later. This and the follow-up articles will assist you with this effort.
So what’s so potentially bad about PowerShell in particular? Now, Windows has always shipped with VBScript, a scripting language that’s easy to use for both simple and potentially more complex tasks. In fact, most of the things people do in PowerShell can be done with VBScript just the same. A key benefit of PowerShell, however, is the ability to utilize the .NET framework, something VBScript can’t since it can only interact with COM objects. And since PowerShell is, well, a shell, you get to pipe input/output and create powerful one-liners. On top of that, PowerShell contains some nifty features like encoding scripts, making it possible to run fairly complex code without ever having to use an actual .ps1 script file on disk. It’s VBScript on Steroids.
Here are some concrete examples as to what evildoers can do with PowerShell:
Remember when I talked about “without leaving a trace” above? That’s because Microsoft didn’t introduce the ability to log detailed PowerShell activity until version 5, although PowerShell 3 & 4 generate reasonably useful audit logs as well. In order to protect ourselves against PowerShell attacks, we need to first detect it, which we can only do if PowerShell leaves traces. PowerShell’s ability to produce useful audit logs greatly depends on the version, however, which the table below illustrates:
Which version of Windows ships with which version of PowerShell
What is the highest supported version of PowerShell for each version of Windows
Shows the versions of PowerShell that ship with Windows as well as the highest supported version of PowerShell
As you can see from the table above, thankfully most versions of Windows are compatible with PS v5, so unless you’re unfortunate enough to be running Server 2008 (or Vista), you should be able to deploy PowerShell 5.1 to most of your systems. I say most, because some Microsoft applications (e.g. Exchange Server 2010) aren’t compatible with PowerShell v5, so you’ll want to make sure you do some research on those machines that actively use PowerShell to prevent disruption.
Coexistence & Legacy
An important thing to note here is that PowerShell v1/v2 can peacefully coexist with PowerShell v3-v5, while versions 3 and later are always upgraded to the latest version. This means that you could have v2 and v4 installed (and many systems do), but not v3 and v5. What’s also interesting is that PS v2 is installed with every major version of Windows (including Server 2016!) although not usable until the .NET Framework v2.0.50727 is installed.
Starting with EventSentry v3.4.1.34 you can thankfully use EventSentry’s software inventory to determine which versions of PowerShell are installed on your network. If you haven’t manually deployed PS v5 yet and aren’t running Windows Server 2016 widely yet, then you will probably see PowerShell v2 and v4 installed on most hosts on your network. EventSentry’s grouping mechanism comes in real handy here.
PowerShell Version Inventory (click for animation)
Please note that even though PowerShell v2 may be installed on a machine it doesn’t necessarily mean that PowerShell v2 is actually usable. PowerShell relies on the .NET Framework being installed, and PowerShell v2 specifically relies on the .NET Framework 2.0.50727 (which is part of the 3.5 .NET Framework) – something that is usually not installed by default. I will explain later why this is a good thing.
OK, but enough about boring PowerShell versions. If you just remember one thing from the above tables and paragraphs it’s this:
Thankfully you don’t need version 5.x to get useful logging – even PowerShell v3 & v4 can log relevant details in the (Windows PowerShell) event log, e.g. the PowerShell command line or commands executed within the PowerShell shell. In fact, even the (decoded) commands are logged to the event log when obfuscated with the -encoded switch.
Logging Options
Logging can be enabled either through group policy or via registry settings. There are three general areas for logging available:
Module Logging
Script Block Logging
PowerShell Transcription
Module Logging Since everything that is executed in PowerShell is essentially located in a module, module logging will at least generate a high-level audit trail of PowerShell activity and potentially malicious activity. At minimum this will show which commands were executed through PowerShell. This logging level should always be enabled and is useful starting with PS version 3.
Important: Module Logging only works if you specify at least one module to be monitored. Since it’s difficult and cumbersome to predict and edit a list of all modules that could potentially cause harm, I recommend just specifying the * wildcard characters as the module list – see screenshots below.
Script Block Logging Script Block Logging is more verbose than module logging and provides additional context and output, especially when functions are called and function output itself is invoked as a command. The amount of noise heavily depends on the type of PowerShell activity, but I’d recommend turning this option on as well. If it ends up producing too much noise / volume it can always be disabled or customized later.
Transcription This provides a full log of all input and output and requires additional considerations in regards to where the transcription files are placed. I’d only recommend this for high-secure environments, you can learn more about it here. Transcript files are stored in the file system, so it’s a little more work than just adding up a couple of registry values. If you enable this feature then you’ll need to make sure that the actual transcript files (which likely contain sensitive data) are protected from unauthorized access.
Enabling Logging
It’s definitely recommended to configure these options via Group Policy to ensure that all machines in the domain receive the settings. If changing group policy is not an option in the short term then you can at least set the registry options until you have an opportunity to set it via group policy. You can use a tool like the EventSentry Admin Assistant to push registry settings out to multiple hosts with just a few clicks.
Group Policy: Configuring this is unfortunately less straightforward than you’d think or expect, depending on the OS version of your domain controller. You can expect the “Module Logging” option to be available in the group policy editor on 2008 R2 and later, however “Script Block Logging” is only available on server 2016 or after manually updating ADMX files. See this thread on how to update your ADMX files. In my environment I just had to replace the PowerShellExecutionPolicy.admx and en-US\PowerShellExecutionPolicy.adml files in the %SYSTEMROOT%\SYSVOL\sysvol\[DOMAINNAME]\Policies\PolicyDefinitions directory with the newer versions after installing the latest version from here.
PowerShell auditing with Group Policy: Administrative Templates → Windows Components → Windows PowerShell
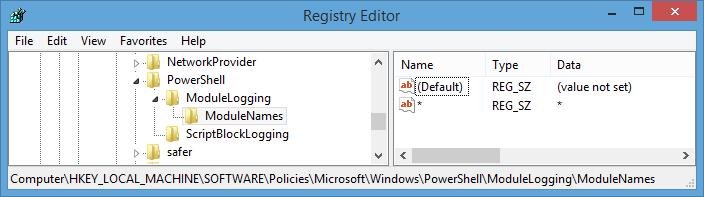
Registry: Only the HKEY_LOCAL_MACHINE\SOFTWARE\Policies\Microsoft\Windows\PowerShell key exists by default, the other two sub keys “ModuleLogging” and “ScriptBlockLogging” have to be created before you can add the “EnableModuleLogging” and “EnableScriptblockLogging” DWORD values inside those sub keys.
For Module Logging, as shown in the screenshot below, you’ll also need to create the “ModuleNames” sub key along with a list of modules that will be monitored. I recommend just using the asterisk character which monitors any module.
PowerShell Registry Logging
Configuring PowerShell Event Logging
Registry
Group Policy
Module Logging
Key: HKLM\SOFTWARE\Policies\Microsoft\Windows\PowerShell\ModuleLogging Name: EnableModuleLogging Data: 1 (DWORD)Key: HKLM\SOFTWARE\Policies\Microsoft\Windows\PowerShell\ModuleLogging\ModuleNames Name: [ModulePattern] Data: [ModulePattern] (REG_SZ)See the screenshot above for example on module logging.
Policies\Administrative Templates\Windows Components\Windows PowerShell\Turn on Module Logging
You don’t need to restart after setting the registry values, they will become effective immediately. The same applies to group policy – as soon as the target host has applied the group policy settings, PowerShell will enforce the new logging options.
PowerShell logs a lot of different events to two different event logs, and the table below shows the events I have observed on test systems. Even though the table may not be 100% complete, it does list all the events that are relevant for threat detection. If an event is not listed below then it is likely not relevant for forensics. We will update the list if necessary.
What’s interesting to note is that newer versions of PowerShell will often log to both event logs simultaneously.
Security Event Log Auditing
PowerShell logging is great, but given the discrepancies between the different versions and the possibility to evade it (more on that later), I prefer to have as many methods as possible at my disposal that tell me what PowerShell is doing.
Since PowerShell code is usually invoked via powershell.exe (I’m point this out because you technically don’t have to use powershell.exe, and attackers are coming up with creative ways to launch it through other ways – more in part 2 of this series), and because we’re after that processes’ command line, it’s important to monitor Process Start (event id 4688) events from the security event log in addition to events logged by PowerShell itself. This means you’ll need audit the following sub categories from the Detailed Tracking category:
Process Creation: Success and Failure (event id 4688)
Process Termination: Success and Failure (event id 4689)
If you are not using EventSentry then I recommend collecting both 4688 and 4689 events so that you can not only determine whether a powershell.exe process was started, but also how long it remained active. If you are an EventSentry user then you just need to verify that Process Tracking (an object for Compliance Tracking) is enabled and configured to capture the command line of a process. EventSentry can automatically parse and correlate 4688 and 4689 events and provide a history of all processes on a monitored system.
EventSentry users can also utilize the Audit Policy Status page to verify that process creations are indeed being audited. You’ll also want to make sure that “Include command line in process creation events” is activated, so that Windows logs the command line of every process as part of 4688 events. After all it doesn’t help us that much just knowing that powershell.exe has been running, we need to know what exactly it has been running.
This can either be enabled via group policy (Administrative Templates\System\Audit Process Creation\Include command line in process creation events) or via the registry (set HKLM\Software\Microsoft\Windows\CurrentVersion\Policies\System\Audit\ProcessCreationIncludeCmdLine_Enabled to 1).
Disclaimer: This option is available starting with Windows 7 / Server 2008 R2, earlier versions of Windows don’t support it. Things are a little easier for EventSentry users, which attempts to obtain the command line of a process if it’s not included in the 4688 event and subsequently makes it available as variable $STR9. But more on that in part 2 when we discuss ways to detect and mitigate attacks.
I hope I was able to convince you of the risks that PowerShell poses, what versions of PowerShell are out there, and what type of logging needs to be enabled in order to detect and stop malicious PowerShell in its tracks. In part 2 I’ll talk about how to actually mitigate PowerShell-based attacks – with specific instructions for EventSentry.
In Mr. Robot‘s episode 9 of season 2 (13:53), Angela Moss needs to obtain the Windows domain password of her superior, Joseph Green, in order to download sensitive documents that would potentially incriminate EvilCorp. Since her attack requires physical access to his computer, she starts with a good old-fashioned social engineering attack to get the only currently present employee in the office to leave.
Angela “obtaining” logon credentials
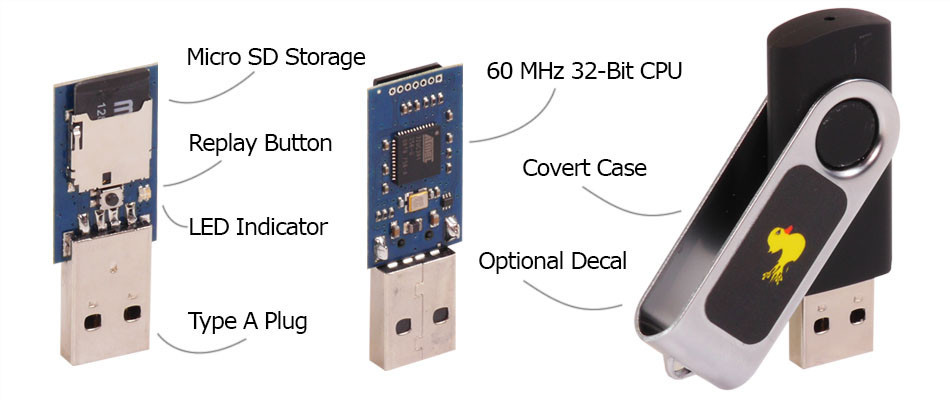
Once in his office, she uses a USB Rubber Ducky, a fast and automated keyboard emulator, to obtain Joseph’s clear text password using mimikatz. Please note that there are some holes in this scene which I will get into later. For now we’ll assume that she was able to obtain his credentials by having physical access to his computer.
USB Rubber Ducky
After she gets back to her workstation, she analyzes the capture which reveals Joseph’s password: holidayarmadillo. Not the best password, but for this particular attack the quality of the password wouldn’t have mattered anyways. Mimikatz was (is) able to get the password from memory without utilizing brute force or dictionary techniques. Once she has the password, she logs off and logs back on with Joseph’s user and downloads the documents she needs.
Mimikatz Output
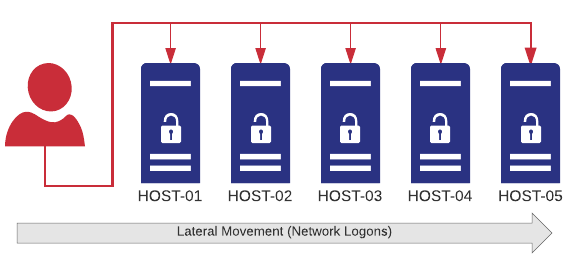
As somebody who helps our users improve the security of their networks, I of course immediately contemplated how this attack could have been detected with EventSentry. Since most users only log on to one workstation on any given day with their user account, Angela logging in with Joseph’s account (resulting in “joseph.green” logging on to two different workstations) would actually be an easy thing to detect.
Lateral Network Movement
Introduced with v3.4, collector-side thresholds allow the real-time detection of pretty much any user activity that originates from an event, for example user logons or process launches. You can tell EventSentry that (physical) logons for any user on more than one host (within a given time period – say 9 hours) should trigger an alert (aka as “lateral movement”). Had this been in place at EvilCorp, Angela logging in as Joseph would have immediately triggered an alert. With the right procedures in place, countermeasures could have been taken. Of course most viewers wouldn’t want Angela to be caught, so please consider my analysis strictly technical. Watch a short video on lateral detection with EventSentry here.
So what’s the hole? Well, the rubber ducky (mimikatz, really) requires access to an active logon session, which Angela most likely didn’t have. It looked like Joseph had been out of the office for a while, so his computer was likely either locked or turned off, rendering any attack based on mimikatz useless. Mimikatz – since it obtains passwords from memory – only works if the computer is unlocked. And had the computer been unlocked then she could have just downloaded the files from his computer – although this would have been even more risky with people walking around the office.
Cyber attacks are becoming more potent every year and are often sponsored by powerful criminal gangs and/or governments. It’s important that companies employ multiple layers of defense to protect themselves (and their customers) from these increasingly sophisticated and destructive attacks.
EventSentry is the only monitoring solution that utilizes robust agent-based technology that goes beyond logs, enabling the fusion of real-time log monitoring with in-depth system monitoring to not only detect but also react to attacks and anomalies. See for yourself and download a free evaluation of EventSentry.