Auditing Changes to Microsoft SQL Server Database Tables

Database servers store massive amounts of data, often including sensitive information. It is not uncommon for there to be databases holding millions of rows of data, where a small subset of rows are considered critical or sensitive. This could be anything from a Social Security number to an EventSentry entry of a security event. Being notified when existing data in your database changes is crucial for log data, and can be accomplished by using triggers with Microsoft SQL Server.

For those of you not familiar with triggers, a database trigger executes code in response to events on a table or database. Triggers are essentially hooks into a table, and they usually execute SQL statements as a response to another SQL statement.

Since we love the windows event log, we’ll take advantage of SQL Server’s ability for triggers to log an event to the event log when a row in a table is modified. This allows us to not only log that activity, but also get notified immediately when suspicious or important activity occurs in the EventSentry database.

In EventSentry, we have a table named ESEventlogMain that stores Windows event information. This table constantly gets new data inserted into it, and it often gets purged as well to manage the size of the database. However, there is no reason this data should ever be modified. If it is, then we know that something is amiss and we want to trigger an event in the event log. It is also useful to know what account made that change.

The first step is to create the message in SQL. You can use this SQL statement to create it:

sp_addmessage 80000, 10, ‘Data Integrity Alert: %s’, @with_log = TRUE

The first argument is a unique SQL server message ID that should be 50001 or higher, you can delete it again using sp_dropmessage. The number 10 is the severity level, but you can read more about the different options for sp_addmessage here.

Now we create the trigger that will use this message:


CREATE TRIGGER Trigger_ESEventlogMain_Modified ON
ESEventlogMain
FOR UPDATE
AS

IF UPDATE(eventmessage) OR UPDATE(eventid) OR UPDATE(eventtime) OR UPDATE(eventcomputer)
BEGIN

     DECLARE @Msg VARCHAR(8000)
     DECLARE @EventNumber INT
     DECLARE @EventID INT
     DECLARE @Computer VARCHAR(255)
     DECLARE @EventMessageOld VARCHAR(8000)
     DECLARE @EventMessageNew VARCHAR(8000)

     SET @EventNumber = (SELECT eventnumber from deleted)
     SET @EventID = (SELECT eventid from deleted)
     SET @Computer = (SELECT A.eventcomputer from ESEventlogComputer as A, deleted as B WHERE A.id = B.eventcomputer)
     SET @EventMessageOld = (SELECT eventmessage from deleted)
     SET @EventMessageNew = (SELECT eventmessage from inserted)

     SET @Msg = ‘ESEventlogMain modified by ‘ + CONVERT(VARCHAR(20), USER_NAME(USER_ID())) + ‘ at ‘ + CONVERT(VARCHAR(20), GETDATE()) + ‘. Computer: ‘ + @Computer + ‘, Event ID: ‘ + CONVERT(VARCHAR(8), @EventID) + ‘, Event Number: ‘ + CONVERT(VARCHAR(16), @EventNumber) + ‘, EventMessage (old) =’ + @EventMessageOld + ‘, EventMessage (new) = ‘ + @EventMessageNew

     RAISERROR( 80000, 10, 1, @Msg)
END

This creates a trigger which will generate an event when the eventmessage column in the ESEventlogMain table is modified. You can remove the “IF UPDATE(eventmessage) …” clause (as well as the BEGIN & END statements) if you want to be notified of any changes to that table, this might however create some noise since acknowledging events will also perform an UPDATE on this table.

FYI: “deleted” and “inserted” are keywords that refer to either the old
record that was updated (=deleted) or the new data (=inserted).

dbtriggers_event.jpg
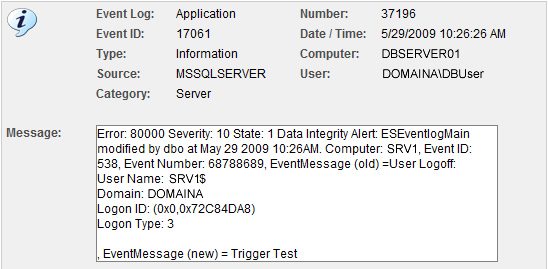
As you can see from the screen shot above, the message text from a logoff event was renamed to “Trigger Test”. So now that the event is in the event log, we can set up a filter in EventSentry to alert us:

trigger_filter.png
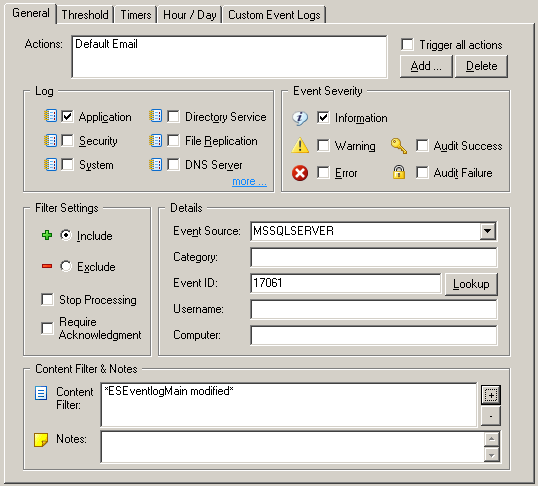
Events generated from triggers always have the event id 17061, so it’s a good idea to restrict the filter further using the “Content Filter” field. From now on, when the ESEventlogMain table is modified, we will get an entry in the event log as well as an email.
Just remember that any database administrator can delete or modify triggers, so it’s crucial that you keep dba access to your database as restricted as possible.

Please see the Table Relationships topic in the EventSentry help file for more information on the database tables used by EventSentry.

Best,
Tames, Ingmar + Ryan.

Read more

Applying Patches and Updates with Group Policy

Recently, Adobe published security bulletin APSB08-15 that affects almost all versions of the Adobe Reader and could allow attackers take control of a machine. Since most corporate computers have Adobe Reader installed, patching a vulnerability like this quickly and efficiently is crucial. If the computers running Adobe Reader are part of a Windows 2000 (or later) domain, then you can easily utilize the Active Directory’s Software Installation feature to push this patch out. Deploying updates and patches through Group Policy is easier than you think and can save you hours of work.

Note: You can use Group Policy to deploy any application update, as long as the patch is available as a MSI file. We’re just using this particular patch as an example.

Since the Adobe Reader Updates comes in an executable instead of an MSI, we need to first extract the MSI file. Luckily, Adobe does give you the steps needed to do this here. After following those steps, you will have a folder which includes the MSI and some other needed files. Put these on a share that all computers can reach. It is generally a good idea to give everybody READ access to this share and the underlying NTFS permissions.

Next, we need to open Active Directory Users and Computers. Right click on an OU you want this to apply to, in our case it is called “Workstations”. Then choose properties and click on the “Group Policy” tab.

Now you should see a list of GP objects that apply to that group (if any). Click “New” to create a new policy. Give it a descriptive name such as “Security Update for Adobe Reader”. Click on it and choose “Edit”.

GroupPolicySoftwareInstallation.jpgThe Group Policy Editor will now come up and allow us to choose the options we want. Expand “Computer Configuration” -> “Software Settings”. Then, right-click “Software installation” and choose New -> Package.We need to browse to the network share (e.g. \\YOURFILESERVER\SoftwareUpdates) that contains the MSI file for Adobe Reader, then pick the MSI file and click Open. It will ask you which deployment method to use, you can choose Assigned for this. Remember that this file share needs to be accessible to all computers that need to install this update.

The newest version of Adobe Reader will now be deployed to that group. You can also assign that Group Policy to other groups of computers that you want it to apply to.

Using a mechanism like Group Policy to deploy application updates has several advantages of course:

  1. It’s included with Windows for “free”, so there is no additional cost.
  2. Updates are installed automatically, no reason to physically touch the workstation.
  3. The updates are always installed, you don’t have to rely on the users to patch their applications

Most updates that are assigned to computers are installed when the computer reboots, so it will take a day before this update will be installed. If you are running EventSentry, then you can use the Software Inventory feature to make sure that the update has been installed on all computers.

P.S.: You can also deploy Firefox this way using FrontMotion’s Firefox MSI.

The tale of the dying capacitors

We were recently helping out a company in the same building as ours with a server issue they were having. They noticed it had rebooted out of nowhere a couple times within a week. None of the event logs showed anything, no crash dump file, pretty much no trace software wise. Luckily EventSentry sent us a 6009 event from the system log, letting us know that the server had rebooted. Knowing when this event occurs is great, especially on nights or weekends when users may not notice.

I was 99% sure it was a hardware issue since it was out of the blue with no recent hardware or software changes. We ran some basic diagnostics, including the ones from Dell. Everything kept coming back clean. After contacting Dell, they recommended re-seating all the RAM, the CPU’s, VRM’s etc. They have had problems in the past with CPU’s coming out of the sockets from the heatsink compound drying up and causing the same issue. I should have instantly noticed the problem then, but we will get to that.

None of this was helping and the reboots were becoming more and more frequent. The server was not under warranty so Dell couldn’t help out much more than that. I was actually amazed how helpful they were at all since it wasn’t. Their last suggestion was to start disabling hardware until we got to the root of the problem.

I went into device manager and disabled anything I could. The system became much more stable, although useless without the devices. I started enabling hardware again one at a time. After I enabled the built in NIC, the computer crashed. We threw in a PCI network card, and disabled the onboard NIC in the BIOS. The server booted up and all was great. For about 3 days…

The crashes started again, this time Windows couldn’t even finish loading before it would reboot. We opened the server again and this time I instantly saw what was wrong. I had seen this in a workstation before so I couldn’t believe I missed it. Almost all the capacitors on the board were bulging at the top.

This has become so common lately, I highly recommend looking for that right away on any critical server you have. There were even a few motherboard makers sued over this.

Some makers, like Gigabyte, are using solid state capacitors instead of the cheaper, more common electrolytic ones for some of their boards. I’m sure it costs them a little more, but for reliability I think it is completely worth it.

We ordered a new motherboard for the server, and sure enough it had a completely different brand of capacitors. Once we swapped it out and booted it up, the server has been running smooth. An extra $5 for some quality capacitors would have probably prevented the whole situation.

Here are some pictures of what to look for:

Taken from http://img.photobucket.com/albums/v711/whurd/Bad.jpg

Bad.jpg

The tops should be completely flat. If there is any bulging at all, it is most likely on its way out. The picture below shows leaking capacitors, also not a good thing.

Taken from http://macmedics.com/images/imac-logicaboard-with-leaking-capacitors.jpg

imac-logicaboard-with-leaking-capacitors.jpg

So, next time one of your servers starts acting up out of the blue, without any recent hardware or software changes, take a close look at those capacitors 🙂

Who Is In My Server Room?

As some of you already know, EventSentry allows you to use different environment sensors to be alerted about changes in your server room. One of these happens to be a motion sensor (scroll down).

It is great to be alerted when somebody is moving around in there, but it would also be helpful to know who it is. We picked up an Axis 207 network enabled camera from Axis Communications so we can take a peak in there though any available web browser. This works great as long as we are near a computer at the time we get the motion alerts from EventSentry, but not very useful if we aren’t.

Luckily, our Axis camera has a pretty good API that you can access. It has the ability to grab a .jpg image by going to a URL (http://cameraIP/jpg/image.jpg). I needed a way to attach this .jpg to an email so that not only am I alerted, but I also have an image of who or what caused it.

There may be other cameras out there that can do this as well. If you know of one please post it in the comments section.

I came up with a batch file that uses some free utilities to accomplish this task. For good measure, I also decided to allow you to grab a series of pictures, put them to a web site directory, thumbnail them, and finally create an HTML page that displays them.

Building maintenance entering a server room at night. Image quality depends on lighting, and camera quality.

This could probably have been done easier using Perl or another scripting language, but I had already started with a batch file and wanted to just finish it! Feel free to come up with a better way.

The tools needed are included in this zip file:

  • gethttp.exe – Taken from our free EventSentry SysAdmin Tools, used to grab the image from the camera
  • sleep.exe – Also taken from EventSentry SysAdmin Tools. Allows you to put pauses in your script
  • blat.exe – Blat is a great command line utility that allows you to send emails
  • printf.exe – Taken from the GNU tools for Windows. A lot more flexibility than using ECHO
  • convert.exe – Command line utility from ImageMagick. Used to create the thumbnails.

The zip file also contains the actual script used named “getimages.cmd”. You will need to change some of the settings inside of it to get started. Most are self-explanatory and include:

  • cameraIP – IP address of the camera
  • binPath – Path to the needed utilities above
  • imagePath – Where you want the images stored
  • numImages – The number of images you want to capture each time
  • timePause – Miliseconds to wait between images
  • netLocation – URL to your web server hosting the images
  • eMail – Email address you want the alerts sent to. Comma separate for multiple people.
  • eSender – Address email comes from
  • subj – The subject for the email
  • server – Your SMTP server

Now to make it run when EventSentry detects motion. To do this, create a new action in EventSentry. I named mine “Motion Alert”. Go to the “Process” tab at the top and put in the path to the “getimage.cmd”.

Next, we will need an event filter to trigger the action. Here are the settings you need:

  • Event Log: Application
  • Type:  Error
  • Source: EventSentry
  • Category: Environment Sensors
  • Event ID: 10912

That is it, from now on you should know who is setting off your motion sensor.

You can download the entire package from here.

If you have any comments or suggestions, we would love to hear them.