Trapping CryptoLocker/CryptoWall with Honey (Part 2/3)


! Updates !
There has been a follow-up post to this article with even better approaches to defeating ransomware. I highly recommend that you jump directly to the most recent article which offers the best & easiest approach for protecting against Ransomware:

Defeating Ransomware with EventSentry & Auditing (Part 3)


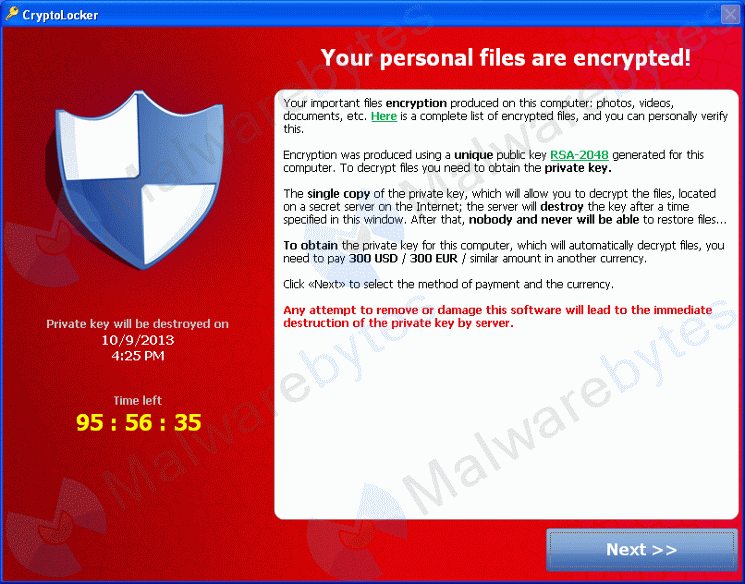
When I wrote my first, original post about CryptoLocker (“CryptoLocker Defense for Sysadmins”), I didn’t intend there to be a part 2 or even a part 3. But alas, due to the “popularity” of CryptoLocker and the recent release of CryptoWall 4.0 I decided to write a much-needed sequel to my first blog post. Part #2 differs from the first part with a different (and more simple) detection “algorithm” combined with a more reliable way to stop the “Server” service when CryptoLocker is indeed detected.

The capitol of São Tomé and PríncipeSurprisingly (or not surprisingly), almost 2 years after I wrote my first article, CryptoLocker and its descendants like CryptoWall are still around, thriving, and keeping Sysadmins around the world busy. A recent report stated that CryptoWall 3.0 cost victims a combined $325 million, although it fails to mention whether this is an annual or lifetime figure. This is the same as the GDP of the small African country of São Tomé and Príncipe (population of about 200,000) in 2014.

Now there is something to think about – the criminals behind the various ransomware software collected as much money as a country with 200,000 people. Alright, this is all very interesting but doesn’t help us protect ourselves from ransomware so let’s focus.

In part #1 we used EventSentry’s file monitoring feature to index and inventory all files on a susceptible file share, a very accurate and resilient way to detect any sort of software which would modify large numbers of files in a short time period. While this approach works well, it does require more time to setup and may not work in real-time when monitoring extremely large directories. Consequently we’ll be using a different approach here, and we will look at yet another approach in part #3.

EventSentry’s file checksum monitoring feature was originally intended to monitor only key Operating System folders such as the System32 directory, but increased customer demand prompted us to tweak the feature over time to allow real-time monitoring of even very large folders (as is the case for file servers) as well. But enough of the past, let’s tackle Crypto*.

What’s New?
New versions of software (especially free) are usually exciting, but I’m guessing that the latest “improvements” rolled into the various types of ransomware, including CryptoWall, are only exciting for security researches and the people behind the ransomware. There are three major new features included (for free) in the latest version of CryptoWall:

  • Files are not only encrypted, but file names are now also mangled, making it almost impossible to link the encrypted file(s) with their originals.
  • Shadow copies are being deleted if possible, so that past versions of files are no longer accessible
  • The encryption process seems to be less linear and less complete, resulting in some folders being left alone and thus making detection more difficult.

HoneyThe Theory
If you’ve been working in the IT (security) field for a while then you’ll have probably heard of honeypots before. Honeypots are usually systems emulating a production server with the purpose of detecting an attacker and potentially triggering counter-measures or alerts.

We’ll apply the concept of honeypots to detect CryptoLocker, but instead of emulating entire systems we’ll plant on or more fake files throughout on one or more file shares with the assumption that any CryptoLocker infection will attempt to change and encrypt those files. Once detected, we can trigger a counter measure such as stopping the server service. The three biggest risk factors with this approach are:

  • Accidental modification by a user
  • CryptoLocker detects (and skips) the honeypot files
  • The bait files get modified too late

But not to worry – we can mitigate all of the risks.

Accidental Modification
Since any unsuspecting user with write access may accidentally modify or delete our bait file, it’s possible that some users curiosity may result in some sort of a accidental DoS attack. Making the file read-only defeats the purpose of detecting CryptoLocker of course, since CryptoLocker itself won’t be able to modify it. I was able to come up with two possible solutions for this problem:

1. Give the file a boring name which discourages users from opening it (e.g. meeting_notes_cl1.docx)
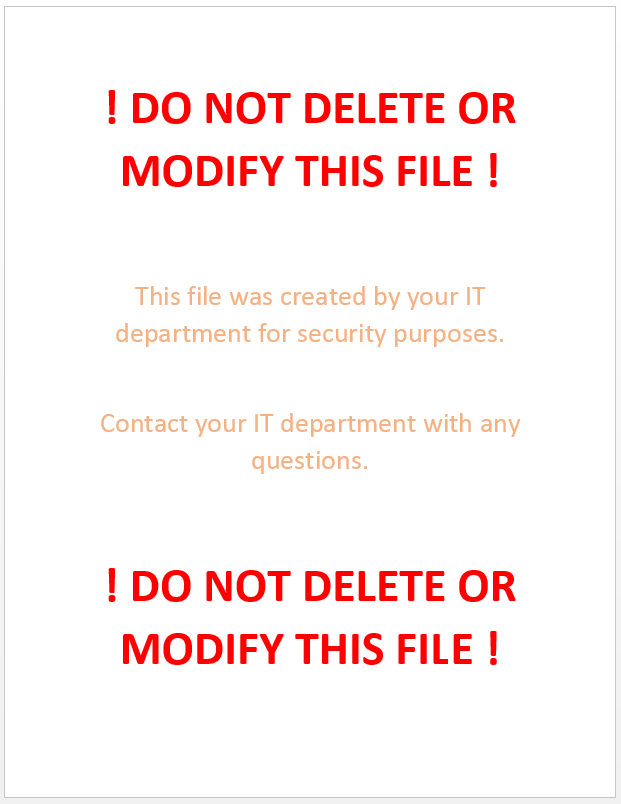
2. Put clear instructions into the file in large font, instructing users not to modify or delete the file. I’d recommend against mentioning any words like CryptoLocker, Virus, etc since CryptoLocker may be parsing the contents of the file.

Example Bait File

Honeypot is not sweet enough
Since we don’t have access to CryptoLocker and its constantly evolving code, we don’t know whether it has any honeypot detection capabilities, and if it does, how it attempts to detect them. Since I’m rather safe than sorry, I’m assuming that it has some basic capabilities. It could be as simple as skipping files which are smaller than a pre-defined threshold or looking for specific file names. E.g., based on this article CryptoLocker could now skip any file named meeting_notes_cl1.docx. To maximize our chances for success:

1. Make sure the file is not too small and exhibits properties of other office documents (e.g. 1Mb in size, multiple pages)
2. Give the file a unique, meaningful name, see previous paragraph.

Once you have created the file, place it strategically on your file server among other office documents. I recommend deploying multiple honeypot files if you have multiple file shares. It may be advisable to give the files unique names (e.g. meeting_notes_cl1.docx, meeting_notes_cl2.docx, …) as well.

Too little, too late
The bait file getting modified too late is the biggest risk unfortunately. If you have a directory with 50,000 files but only one bait file, then it won’t help us to detect CryptoLocker. Since we don’t know how CryptoLocker enumerates files (alphabetical, sorted by size, …), it’s probably best to sprinkle them throughout the various vulnerable file shares, using file names which start various letters of the alphabet, e.g.:

  • a_meeting_notes_cl.docx
  • m_meeting_notes_cl.docx
  • s_meeting_notes_cl.docx
  • z_meeting_notes_cl.docx

A name pattern is not required but helpful when configuring EventSentry later, since it allows you to just specify a wildcard (e.g. *_meeting_notes_cl.docx) instead of specifying dozens of files manually.

Creating multiple bait files is particularly important for newer versions of CryptoLocker which doesn’t always parse/encrypt all directories. So it’s best to create multiple bait files and distribute them across multiple directories, e.g.:

  • marketing\m_meeting_notes_cl.docx
  • sales\a_meeting_notes_cl.docx
  • accounts_payable\z_meeting_notes_cl.docx

This way we’ll have a higher chance of detecting malicious behavior. CryptoWall is fast (of course depending on the speed of the infected host) and can often encrypt tens of thousands of files in an hour.

Implementation
We will use EventSentry’s File Checksum Monitoring feature to monitor the bait files and trigger events when one or more of these files are changed or deleted (=renamed). When they are, we will trigger a script which will stop the server service on the file server in order to avoid more damage being done. Click here to learn more about EventSentry’s architecture.

Monitoring files only for (checksum) changes is no longer sufficient since newer variants of CryptoWall not only modify but also rename (and subsequently delete) documents.

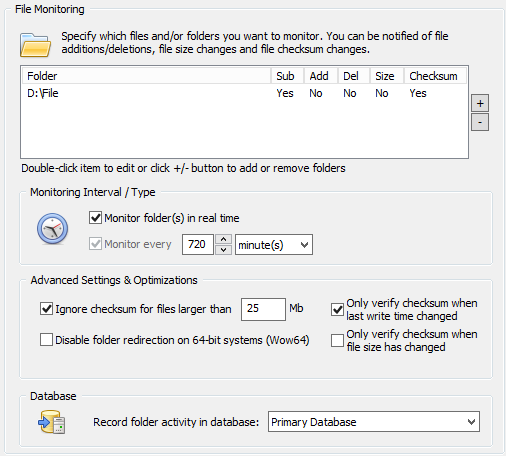
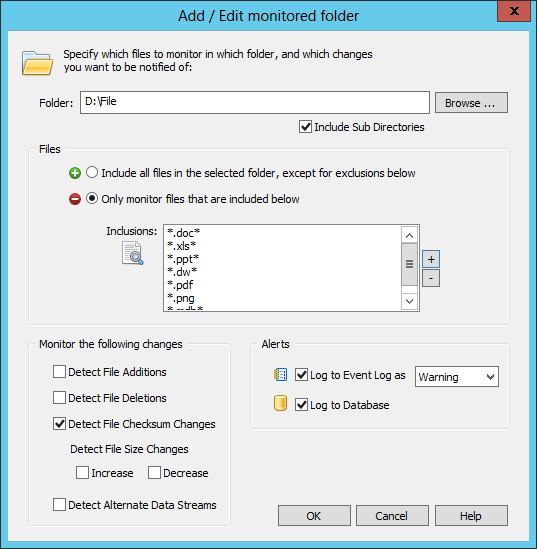
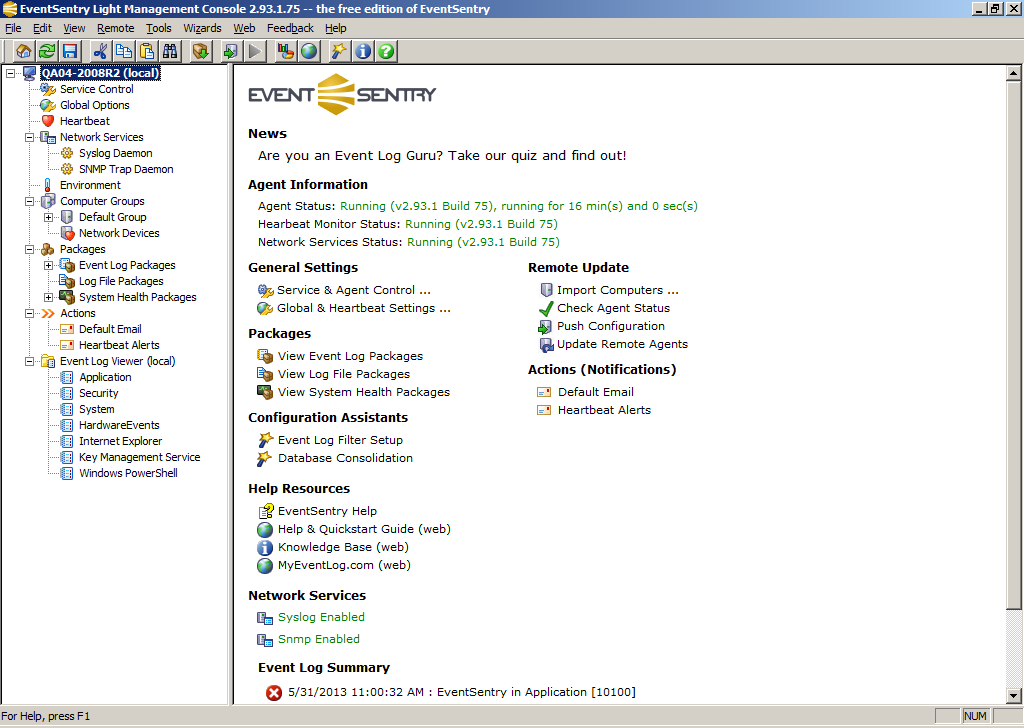
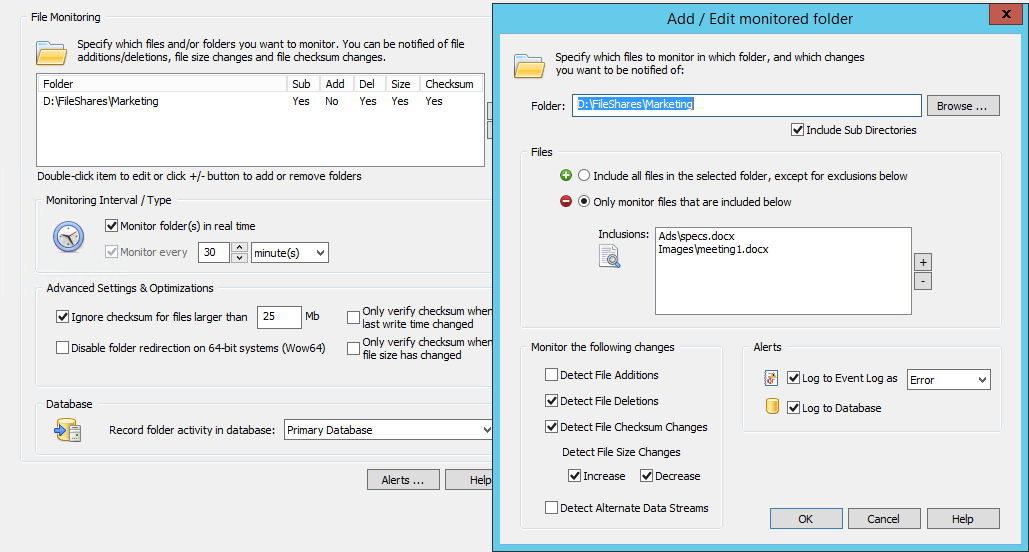
In EventSentry, create a new System Health package with the name “CryptoLocker Detection” and assign it to any server on your network that is monitoring with EventSentry and is serving files through a file share. Now, add the “File Checksum Monitoring” object to the package and ensure the following:

  • “Monitor folder(s) in real time” is checked
  • Disable (uncheck) both “Only verify checksum when ..” optimizations

Then, click the “plus” icon to add the (first) folder where a bait file exists to the list of monitored folders. There are a few things to consider when setting this up

  • The folder/directory name should be specified as it exists on the file server, UNC paths are not recommended.
  • Check the “Include Sub Directories” check box you are monitoring files in sub folders
  • Check “Detect File Deletions” and “Detect File Checksum Changes”. File size increases and decreases may also be checked but is not required.
  • Configure the “Files” section to “Only monitor files that are included below” and specify the file name either with a full (relative) path or with a wild card.
  • Select a severity of “Error” under “Log to Event Log as”

File Monitoring Configuration

Example
Your file server has a directory called C:\FileShares\Marketing with two sub directories, Ads and Images. If we were to add a bait file to both subdirectories (say specs.docx and meeting1.docx) then we would specify C:\FileShares\Marketing as the folder, and then add

  • Ads\specs.docx and
  • Images\meeting1.docx

as the files to be monitored. This is because we always specify the path relative to the main folder being monitored when specifying the file names.

Splendid, EventSentry will now log an event to the event log when any of these files change. Try it out – open the file in word, make a change & save – you should get an alert in the event log almost instantly.

Process action to stop the server serviceDive! Stopping the Server Service
Stopping the server service may seem like a drastic step, but it’s unfortunately the most efficient way to prevent an impending CryptoLocker infection from spreading. Sure, blowing up the bridge might seem crazy at first, but if it prevents an army of Zombies (who obviously can’t swim) from entering your town, then we can probably live with the collateral damage.

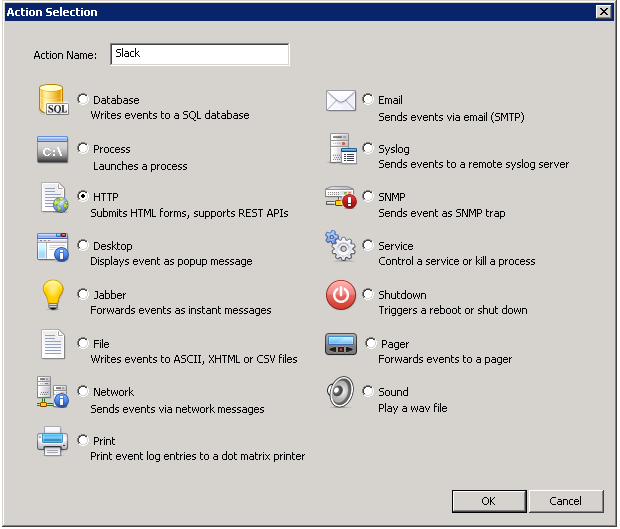
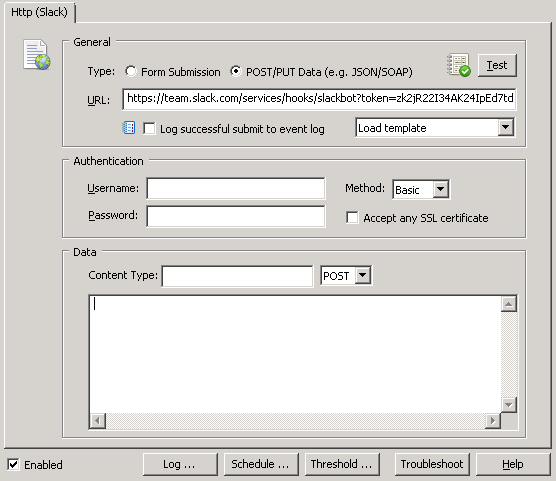
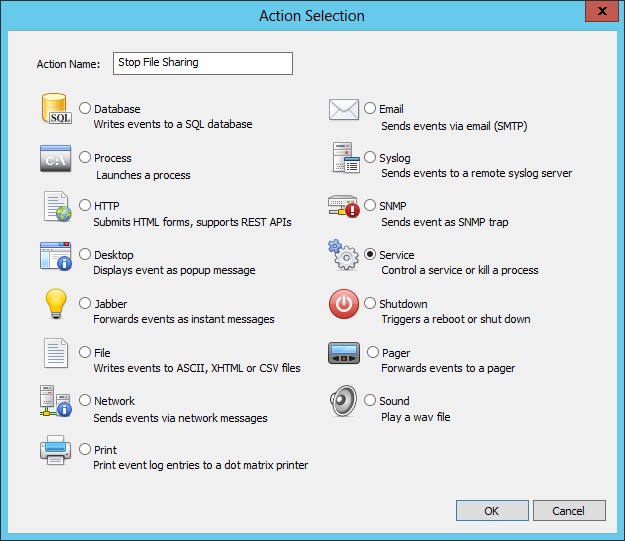
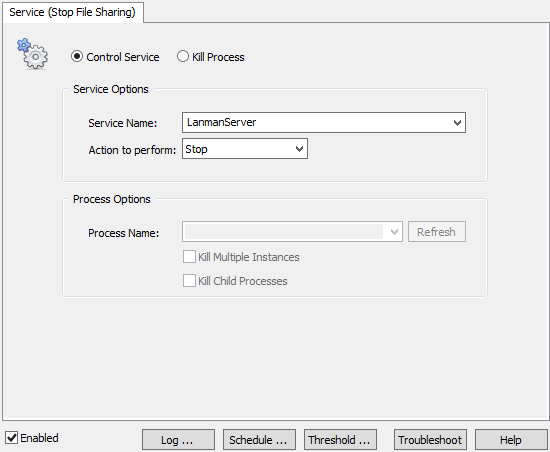
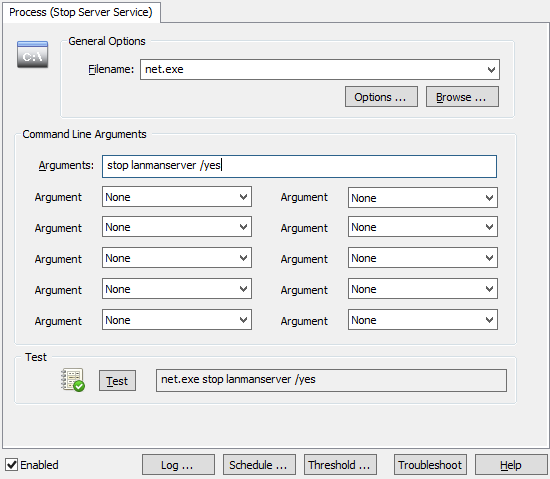
You can stop a service in 2 ways with EventSentry; with the “Service / Process Control” action as well as with a custom script. Creating a “Service / Process Control” action is easier, but only works for stopping services which have no dependencies. You can probably guess where I’m going with this – the server service depends on other services (e.g. when the “File Sharing Role” is enabled) and thus cannot be stopped with the EventSentry action. Consequently we will go a different route and create a process action instead, which essentially allows you to trigger any process, script etc. Better safe than sorry.

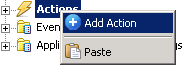
Right-click the Actions container and click “Add” to create a new action called “Stop Server Service”, and select “Process” as the action type. Specify “net.exe” as the Filename, and “stop lanmanserver /yes” as the command line arguments. The “/yes” switch ensures that any service which depends on the “Server” service also gets stopped.

Connecting the dots
Since we now assume that a modification of one or more of our bait files only happens when a CryptoLocker outbreak is under way, the only thing missing now is to have the file change event trigger the process action and shut down the service.

EventSentry uses the concept of “Event Log Filters” to link events to actions, such as sending an email and/or triggering a process. Filters need to be part of an “Event Log Package”, and we can now either create a new package or add our filter to an existing package. For documentation purposes and to keep things orderly we will create a new event log package called “CryptoLocker Prevention”.

We do this by selecting the “Packages – Event Logs” container and clicking “Add” from the ribbon, you can also right-click that container. Give it a descriptive name and select the package, which we now need to assign to one or more hosts and/or groups. Click “Assign” in the ribbon to assign the package, you can also make the package global by clicking the respective button.

With the package all ready to go, we now need to add the filter. With the package still selected, on the ribbon click the “Add” button under “Event Log” and select “Include”. This event log filter, as is, would not apply to any event, since no event log and no severity is selected.

Event Log Filter

Anything detected by the EventSentry agent (e.g. a file checksum change, service status change, low disk space) is logged to the Application event log with the source “EventSentry”, a matching category (e.g. “File Monitoring”) and usually with a configurable or dynamic severity. In our case the file checksum change events will be logged as Errors, as configured earlier.

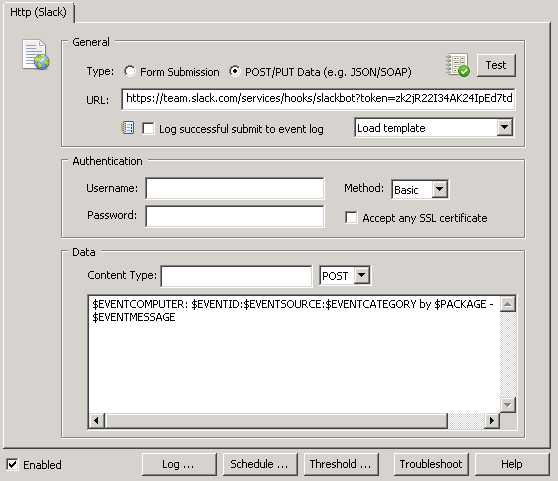
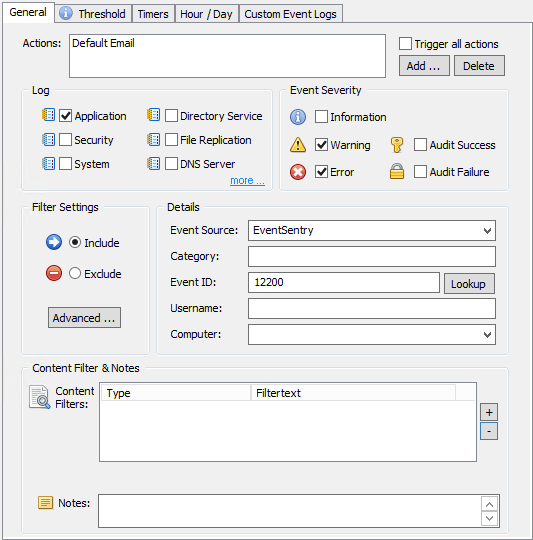
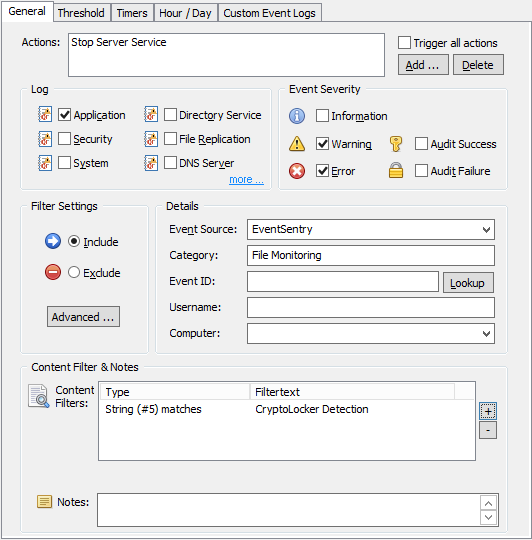
So let’s first configure the event properties as shown in the screenshot:

Log: Application
Event Severity: Error
Source: EventSentry
Category: File Monitoring

We also add the “Stop Server Service to the list of actions to be triggered. Since we may have other system health packages which log File Monitoring events, we want to make sure that this filter only applies to those, which we do by restricting the filter further with an event id as well as with a Content Filter.

For CryptoLocker we want to get notified about every change that happens to our bait file. Whether it’s deleted, a checksum change or a file size change. As such, we leave the event id field empty and specify the “File Monitoring” category instead.

Important Note: If you are running a German version of Windows, the category will need to be specified in German (“Dateiüberwachung”) since EventSentry is localized for German.

Our filter could still apply to unrelated file checksum changes (e.g. OS files were changed by a Windows Update), but since any file checksum change event includes the package name which triggered the event, we can filter based on that name (we called the package “CryptoLocker Detection”) to ensure that we only match file changes from CryptoLocker. In the “Content Filter” section click the “+” button to add a new content filter.

The quickest way to specify the content filter is to leave the “Wildcard match” setting in place and simply specify *CryptoLocker Detection* as the content filter. A more elegant way is to use an Insertion String match and selecting insertion string 5, which represents the package name (click “Preview” to see the insertion string numbers).

Event Log Content Filter

The setup is now complete, and you can now push the configuration to the remote host(s) which has the bait files and should be protected. If you have multiple file servers with a different directory structure, then you can easily create multiple system health packages which contain a file monitoring object, and assign them accordingly. For example, you could create packages named:

  • CryptoLocker Detection Server1
  • CryptoLocker Detection Server5

The process action doesn’t have to be duplicated, since the stopping the service is the same process for all hosts. The event log filter may need to be adjusted depending on how it was setup. A wild card like *CryptoLocker Detection* would match “CryptoLocker Detection Server5” as well, but an insertion string filter would need to be modified to something like CryptoLocker Detection* in order to match multiple more than one package.

An alternative to email alerts. Part 2: Integrating EventSentry with Slack

Slack is a flexible, web-based messaging app for teams which supports multiple (mobile) platforms with the goal of streamlining communication and collaboration. In some ways, Slack feels like a combination of Hipchat, IRC and Dropbox (you can also send alerts to Hipchat from EventSentry).

Event submitted to slack by EventSentry

By creating channels (e.g. chat rooms) and also allowing for direct 1:1 communication, interacting with your team is straightforward and easy. What’s more, you can send 3rd party feeds such as Twitter notifications directly into a channel, giving you the ability to see data from multiple sources in one central location.

Slack naturally lends itself to receiving EventSentry notifications with its web-based API. And, since you can create multiple channels, it’s easy to divert EventSentry alerts into different channels, e.g. #alerts-windows and #alerts-development.

Since Slack offers native clients (e.g. Windows, MacOSX) in addition to their web-based site, you can choose to opt in to receive a visual notification every time an alert is received by Slack.

If you’re not already using Slack, then you can sign up for free at http://slack.com and see for yourself whether this is a communication platform you will want to use. If you already use Slack, then you will just need to make sure that the “slackbot remote integration” is setup. You can find information on how to enable this integration here: https://api.slack.com/slackbot.

Enabling slackbot

Once the Slackbot Remote Control integration is configured in Slack, follow these steps within the EventSentry Management Console using the slackbot URL provided by Slack to set up an HTTP action. The HTTP action will be triggered by one or more filters in an event log package to submit events/alerts to Slack.

1. Add a new action
In the left pane right click “Actions” and select “Add Action”

Adding an EventSentry action

2. Selecting the correct action type
On the “Action Selection” screen type your name for the new action (Ex: Slack), select “HTTP” and then press OK

EventSentry Action Dialog

3. Configuring the HTTP action
In the right pane you should now see the settings for your new Slack action, update the URL field with the slackbot URL provided by Slack. If you did not specify a channel in your url after the token add “&channel=%23” followed by the name of your channel.

Example: https://team.slack.com/services/hooks/slackbot?token=zk2jR22I34AK24IpEd7tdyroGt&channel=%23es-alerts

Configuring the HTTP action for Slack

4. Configuring the data to submit

In the right pane configure the Data you’d like slackbot to post to the channel, the following is suggested for basic information:

$EVENTCOMPUTER: $EVENTID:$EVENTSOURCE:$EVENTCATEGORY by $PACKAGE - $FILTER
 $EVENTMESSAGE

Configuring data to submit

Additional variables can be found in our documentation.

Once the action is configured click “Test” and you should see the test message in Slack.

5. Finishing up

You can now apply the action to any existing or new packages and filters. To learn more about filters review the documentation or walk through this tutorial.

Save the EventSentry configuration and push the configuration to the remote hosts.

Done!

CryptoLocker Defense for Sysadmins (Part 1/3)


! Updates !
There have been 2 (!) follow-up posts to this article (part 2 and part 3), with even better approaches to defeating ransomware. I highly recommend that you jump directly to the most recent article which offers the best & easiest approach for protecting against Ransomware:

Defeating Ransomware with EventSentry & Auditing (part 3)


It seems as if CryptoLocker has been making the rounds lately, much to the dismay of users who don’t have working backups of their precious office documents.

While I admire Cryptolocker’s simplicity and effectiveness from a purely technical and entrepreneurial standpoint, what the software is doing does appears to be illegal in most countries and so I’d like to offer some advise on how to tame the beast. If you’re looking for a 5-minute fix then I have bad news: implementing the CryptoLocker defense I have outlined below, while completely free, will take a little more than 5 minutes to implement. But knowing that you have an effective defense against CryptoLocker may very well be worth it. After all, CryptoLocker seems to find its way into a lot private networks these days.

CryptoLocker Screenshot

The ideas set forth in this blog post apply mostly to Windows-networks with file servers, but could be adapted for individual computers as well (though this is not covered here – let me know if you’d like me to include this scenario).

About CryptoLocker
For those who have not heard of CryptoLocker yet, it is a piece of software which encrypts pretty much all common office-type documents, including Microsoft Office, AutoCAD, PDFs, images and more. This blog article from MalwareBytes has a complete list of extensions. Once encrypted, CryptoLocker charges you to decrypt (your own files) again. It’s public key cryptography gone wrong; I wonder if Diffie & Hellman saw this one coming. And to make the whole spiel even more interesting, you only get a limited amount of time to pay before your files will remain encrypted. Forever. Oh – and the longer the wait, the more you have to pay. And with recent bit coin exchange rates in excess of USD 1000, the amount that needs to be paid can be uncomfortably high.

It is pretty difficult to defend against something like CryptoLocker other than through usual means of AntiSpyware software, user eduction and strict policies against opening and downloading files from the Internet, email attachments and such. In most cases CryptoLocker comes in form of a ZIP attachment disguised with a PDF icon.

One reason CryptoLocker is so effective – yet difficult to block – is because it exhibits the same behavior as users would: It “simply” accesses and modifies files like a user would. And infecting a machine isn’t all that difficult since CryptoLocker doesn’t require any elevated permissions to run. On the contrary, it wants to run in the same context the user does, so that it can access and see the same files a user does. As such, security features like UAC are utterly useless against ransomware like CryptoLocker – it’s a whole new type of software.

Backups
The most effective defense against CryptoLocker is to have a working, tested backup. Let me repeat this: A WORKING and TESTED backup. Users have lost all their data because they thought that they had a backup in place when their backup was broken in some way.

We’ve seen posts of users who deleted all the files CryptoLocker encrypted, thinking they had a working backup. They had a backup, but it was apparently not recently tested and as a result the user lost all of their data.

Naturally, CryptoLocker does not like backups. It dislikes them so much that when CryptoLocker runs, it even tries to delete any Windows Shadow Copy backups. Cloud backup services (including Dropbox, Skydrive and Google Drive etc.) which keep versions of your files offer some protection, but restoring older versions of your files may be a tedious process.

The Defense
The most obvious defense against CryptoLocker is AntiSpyware software, e.g. MalwareBytes. Most AntiSpyware & AntiVirus software still uses signatures however, so new versions of the ransom ware often remain undetected at least for a few days.

So instead of detecting CryptoLocker itself, we can sniff its tracks so to speak. CryptoLocker’s predictable behavior can be used against it. CryptoLocker’s objective is of course to encrypt and hold hostage as many files as possible, so to increase the likelihood of the user purchasing the decryption key from the thugs.

And it is that very pattern that we will try to exploit and use as a trigger to detect and take corrective measures. The approach consists of measuring how many files are being changed in a certain time interval, and if a certain threshold is being exceeded (say more than 10 files modified in 1 minute) we assume that CryptoLocker found its way into our castle. Even though users modify their documents on a regular basis, users can usually make only so many changes at a time and most likely at a much slower rate than any sort of script / software would.

Another approach would be to create one or more honeypot or canary files, which we know (or hope) a user would not modify. If a checksum change in one of those files were detected, we could (more or less) safely assume that CryptoLocker was on one of his rampages again and take corrective measures. The honeypot file would have to be modifiable by users (otherwise CryptoLocker would also not be able to modify it), which makes accidental modifications by users possible (although somewhat unlikely).

This 2nd approach isn’t quite as solid in my opinion, since CryptoLocker is most certainly adapting to changes, and may skip files that it may suspect are a trap. For example, it could skip small files or skip directories with a very small number of files and so forth.

A more sophisticated approach, where we detect an unusually large number of files changes in a small time period, is going to be harder to circumvent by CryptoLocker. The good news is that we have a free (it’s really free, not a trial) software tool available which can do just that. It can:

  • detect file changes
  • measure the rate of file changes (through event log alerts)
  • stop/start services or launch processes
  • send out alerts

EventSentry (Light) to the rescue
EventSentry Light is the free version of our full-spectrum monitoring & compliance solution EventSentry. The features we can utilize to come up with a defense are:

  • File Checksum Changes (part of System Health Monitoring)
  • Filter Thresholds (part of Event Log Monitoring)
  • Action (control services, send out emails)

File Checksum Monitoring
Monitors any folder and detects file size changes, checksum changes and file additions and deletions. EventSentry Light will log file checksum changes to the event log (it’s big brother can also log them to a database), which in turn is monitored by the real-time event log monitoring component.

Event Log Monitoring & Thresholds
This component supports a variety of sophisticated features, one of which are thresholds. The thresholds feature lets you essentially detect event log entries that occur at a certain pace. For example, if 10 specific events occur in 1 minute then let me know and/or take corrective action.

Service Action, Email Action
EventSentry supports a variety of action types to be triggered when an event occurs, with email usually being the most commonly used one. You can also control services, use REST APIs, launch processes and much more. We’ll use the former to stop the file sharing services (LanmanServer) when we have determined that CryptoLocker is on the loose.

I will go into step-by-step instructions on how to configure EventSentry at the end of the post.

The Baseline
The most difficult thing to determine is the maximum rate of file changes we deem normal, as we need to have a baseline in order to configure the threshold slightly above that. This number will vary from network to network, with file servers serving lots of users obviously requiring a larger threshold. I’d like to repeat that determining the right threshold is very important. If it is too low, then normal user activity will trigger an alarm; if it is too high then the alarm may never be triggered and CryptoLocker won’t be caught in time.

The best approach is to setup file monitoring and let it do its job for 1-2 days to determine a baseline. Once the baseline is established, we can increase it by a certain factor (say 1.5) and use that as the threshold.

Setting up the trap requires 3 steps. In this case we assume that EventSentry is either installed directly on the file server, or an agent is deployed on the file server (in which case you will need to make sure that configuration updates are pushed to the file server(s) in question).

Step 1: Monitoring the directory/ies
In EventSentry, right-click the system health packages and add a new package. Right-click the package, select “assign” and assign it to all file servers. Right-click the package again and add a “File Monitoring” package. Click the new object. Directories are monitored in real time by default, but EventSentry requires a recurring scan as well – in case Windows doesn’t send real time notifications. This is usually a good thing, but when you are monitoring large directories it’s best to set the interval very high (future versions will allow for this to be unchecked).

File Checksum Monitoring Settings

In the package, add all the folders which should be monitored and only check the “checksum change” check box. Do not check any of the other check boxes in the bottom left section at this time. Since we haven’t established a baseline yet, we’ll set the severity of the event log alerts to “Information”. If the monitored folders contain a lot of non-Office files then it may be a good idea to adjust monitoring so that only office files (e.g. .doc, .xls, etc.) are monitored. If you prefer to monitor all files, simply change the setting to the green PLUS icon and make sure the list of exclusions is empty (or specifies files that should be excluded, e.g. *.tmp). Below is a screenshot of how this can be configured.

File Checksum Monitoring Settings

When you save the configuration, EventSentry will enumerate all files in the folder and create an initial checksum for every file. The agent will log event 12215 when the scan starts, and event 12216 when the scan is complete. When that happens, EventSentry is essentially “armed” and will detect, and log, all checksum changes to any of the files in the monitored directories.

At this point we’ll want to let this run for at least 24 hours during a “normal” work day, as to determine how many file changes occur on average. You are going to be at a bit of an advantage if you are running the full or the trial version with database support, as it will be a lot easier to determine the number of file changes occurring through the web-based reporting.

Step 2: Setting up the trap
Now that we have established a baseline, we’re ready to setup a threshold. This time we’ll create a new event log monitoring package. Right-click “Event Log Packages” and add a new package and call it “CryptoLocker Rules”. Like before, assign it to the file servers we are monitoring. Right-click the package again and add a new event log filter. Configure the filter as shown in the screenshot below. Note that we are triggering an email action for now. The content filter can be used to restrict the filter further, e.g. to only match certain directories if you are monitoring several directories with EventSentry.

Event Log Filter Setup

Now things are getting interesting. The goal is to create an error event in the event log when X amount of file checksum changes occur in a given time period. To get there, we’ll start with the “General” tab where we tell the filter what type of event we are interested in (see below). Once that event is defined, we’ll move on to the “Threshold” tab which is where we specify the threshold parameters. For the purpose of an example, let’s assume that we have established a baseline of 100 file checksum changes per day, with a work day starting at 8am and ending at 7pm. Assuming that activity is somewhat spread throughout the day, this amounts to about 9 file changes per hour. Naturally we’ll have to assume that file changes aren’t always evenly spread out throughout the day, but setting up a “if 20 checksum changes occur in 1 minute shut file sharing down” is probably a reasonable threshold. Configure the threshold as shown in the screenshot below, with whichever threshold you came up with.

Event Log Filter Threshold Setup

Step 3: Triggering corrective action
When our threshold is reached, EventSentry will log an error to the event log with event id 10601 and trigger the specified action(s) from the “General” tab (Default Email) one time per threshold interval.

At this point we would merely receive an alert when we suspect that CryptoLocker is at it again. If you are cautious then you can retain this setup for a little while (e.g. a day or two) to ensure that you are not getting any alerts about the threshold being met (assuming that CryptoLocker is not active on your network in which case you should get the emails).

To go all in and trigger a server service shutdown, we’ll need to create a service action now. On Windows, file sharing services are provided by the “Server” service, which uses the internal name of “LanmanServer”. The service action allows you to control any service (start/stop/restart), and in this case we’ll obviously want to stop the server service, so that clients cannot access the file shares on your server anymore. We’ll trigger an email action at the same time of course, so that the sysadmin in charge is aware of what is going on. While shutting down all file services seems a bit extreme, it’s unfortunately the most effective way to prevent more files from becoming encrypted.

So for the next step, right-click the “Actions” container and select “Add Action”. At the selection dialog choose the “Service” action, enter a descriptive name (e.g. “Stop File Sharing”) and hit enter.

Selecting an EventSentry Notification

Then, configure the settings of the service as shown in the screenshot below.

Action to stop the LanmanServer service

The last step of our setup (congratulations if you’ve made it that far) is to assign the service action to the filter we previously created. After all, a service action which isn’t referenced anywhere doesn’t do much good. So head back to the Event Log Packages, find the “CryptoLocker Rules” package and edit the filter in the package. In the action list on top, click the “Add” button and add the action you just created.

Testing
If at all possible I’d recommend testing the EventSentry setup at a time when your users are not interrupted. Adding a few template files to one of the monitored folders and changing them in short succession (a script may be necessary depending on how short your threshold interval is) should trigger the file services shutdown procedure. Once verified, you can just start the “Server” service again.

Conclusion
Just like in the real world, network viruses come in all shapes and sizes – only limited by technology and the imagination of the cyber-evildoers.

I hope that this article gave you some insight into CryptoLocker and a good way to guard against it. As always, make sure that your company has the following in place:

  • Email Attachment scanning
  • Working, tested backups
  • User education
  • AntiSpyware software

With those in place, one should be able to keep future infections to a minimum.

Stay safe & decrypted.

Mobile Alerts: Pushing EventSentry alerts directly to your mobile devices with Prowl and NMA

When it comes to mobile alerts, email seems to still be the prevalent method of choice for many IT pros. There are many good reasons why network alerts delivered via email are convenient:

  • easy to configure
  • uses existing infrastructure
  • every smartphone and tablet supports email
  • supports attachments (e.g. performance charts from EventSentry’s performance alerts)
  • integrates into your existing environment – everybody already uses email!

What’s not to like? Well, of course it turns out that some of these advantages can also be a disadvantage:

  • emails are not real time
  • problems on the email server often don’t surface immediately
  • important alerts can be overlooked in the inbox jungle
  • you cannot be alerted about email problems via email (duh!)

Viable Email Alternatives
Thankfully, there are a number of alternatives that can be used as an email substitute or addition for mobile alerts. In this article I’ll focus on two affordable services: Prowl (for the iOS platform) and Notify My Android (you may have guessed it – for the Android platform) – subsequently referred to as “NMA”. Both of these services consist of apps for their respective platform and a web-based back end which will push the notifications to your device(s) in near real time.

Mobile Alert on iPhone 5 with Prowl
EventSentry event sent to Prowl on an iPhone

Both services offer an HTTP API which we can connect to with EventSentry’s HTTP action. If you have never used the HTTP action in EventSentry, then here is some background: the HTTP action allows you to POST any event (whether it be an event from the security event log or a heartbeat alert for example) to either Prowl’s or NMA’s web service. These notifications are then pushed to one or more mobile devices.

Neither service currently requires a monthly subscription, but both require a purchase (Prowl costs USD 2.99 whereas NMA costs USD 4.99) if you want to send unlimited notifications to your mobile device(s). NMA is a little more welcoming to strangers – it supports up to 5 notifications per day at no charge.

Prowl: Getting Started
The iOS app costs USD 2.99, and supports up to 1000 API calls (=notifications) per hour. To get started:

  1. Purchase the Prowl: Growl Client from the Apple App Store and install it
  2. Register for free at prowlapp.com
  3. Login & create an API key

Notify My Android (NMA): Getting Started
The Notify My Android app is free in the Google Play store and supports up to 5 API calls (=notifications) per day  for free. Upgrading to a premium account will allow up to 800 API calls per hour. To get started:

  1. Download the Notify My Android app from the Google Play store
  2. Register for free at www.notifymyandroid.com
  3. Login & create an API key
  4. Optional: Upgrade to a Premium account to allow for unlimited notifications

Once you have the mobile app installed and the API key in hand, you can start setting up a HTTP action in EventSentry. Notifications essentially consist of three fields: The application name, a subject as well as a message field, all of which can be customized. As such, it’s up to you configure which part of an event log alert you will put in the subject, and which part you will put into the actual message. In our example, we generate a dynamic notification subject with the host name, event id, event source and event category. The notification body will simply consist of the event message text, though this can be customized as well.

Setting up a HTTP action
Right-click the “Actions” container (or, in v3.0, use the “Add” button in the Ribbon) and create a new HTTP action. The HTTP action requires a URL at minimum, optional credentials and the actual data fields to submit in the HTTP POST. Conveniently, both Prowl & NMA use the same field names. I suspect that they are adhering to some sort of standard, though I couldn’t find any references.

The first parameter to configure is the URL, which depends on the service you use:

Prowl: https://api.prowlapp.com/publicapi/add
NMA: https://www.notifymyandroid.com/publicapi/notify

Configuring authentication credentials is not necessary since you are essentially authenticating with the API key you generated. The last step is configuring the form fields. The bold field on the left is the name of the form element and the text to the right the value. A description follows in italic on the next line:

apikey: abdef123123abababafefefe
The API key you received

application: EventSentry
This will displayed as part of the notification. I use “EventSentry” here, but this can really be anything, so it could be the host name as well for example ($EVENTCOMPUTER)
Max Length: 256

event: $EVENTCOMPUTER-$EVENTID-$EVENTSOURCE-$EVENTCATEGORY
This is the subject of the notification. You can use any variables, including insertion strings $STR1, $STR2 etc.
Max Length: 1024 [Prowl], 1000 [NMA]

description: $EVENTMESSAGE
This is the main message body of the notification, the $EVENTMESSAGE seems like a pretty good candidate for this field
Max Length: 10000

priority: 0 (possible values are -2, -1, 0, 1 and 2)
This field is optional and doesn’t do anything with NMA. With Prowl however, a priority can be set to “2” (indicating an “emergency”) which may then override quiet hours on the mobile app (if quiet hours are configured in the Prowl mobile app).

Take a look at the respective API documentation for Prowl and NMA as well; each show additional fields which can be configured, as well as additional information that you may or may not find useful.

The screenshot below shows a fully configured HTTP action for Prowl:

EventSentry HTTP Action for Prowl

The HTTP action for NMA would look identical, with the exception of the URL which is different. You can click the “Test” button, which will submit the configured data to the specified URL and should, when configured correctly, immediately generate a notification on the mobile device. Please note that event variables will not be resolved when testing.

Threshold
To make sure that your mobile device doesn’t get flooded with alerts (some applications have the tendency to generate not one but hundreds of events in a short period of time), I highly recommend that you setup a threshold on the action or the event log filter referencing the action (I personally prefer the former). You can also setup a schedule so that notifications are only sent on certain days and/or during certain hours.

The last step would be to configure an event log filter to forward select events to the mobile device, something that is beyond the scope of this article. See the tutorials below for more information:

Reliability
It seems only natural to wonder whether alerts sent through these services can be used for mission critical systems. I’ve been using mostly Prowl as I’m an iPhone user, and have been very happy with it’s fast response times (which are almost instant), the service reliability and the stability of the iOS app. Nevertheless, both prowlapp.com and NMA state that you should not solely rely on their system for critical alerts and instead setup multiple channels for mission critical alerts. This sounds nice in theory, but suspect that most sysadmins will not want to dismiss alerts on more than one device – something that can get old if you get a fair number of alerts. Switching to a commercial system like PagerDuty with guaranteed up-time may be preferable in that case. I will talk more about PagerDuty in an upcoming post soon.

My experience with the NMA Android app wasn’t as good during the limited testing I performed. While it worked great when it worked, the app did crash on me a couple of times.

Conclusion
If you’re looking for a way to push alerts to your mobile device from EventSentry without using email and without spending big bucks, Prowl and NMA are worth looking into. They’re affordable, responsive and easy to configure.

EventSentry Light Supercharged

The latest EventSentry update brings significant and very exciting changes to the free light edition, EventSentry Light.

We have always seen EventSentry Light as a successor to the original EventwatchNT – a monitoring tool for small networks to alert sysadmins by sending real-time alerts about event log activity. As its big brother EventSentry continued to mature, most features from EventSentry made it into the light edition as well: Service Monitoring, Disk Space Monitoring, Performance Monitoring and many more. Since EventSentry Light was, and continues to be, free, it needed to distinguish itself from the commercial edition. As such, most feature were somewhat restricted in the light edition which only allowed a limited number of packages, event log filters, performance counters and such.

es_light.png

Over the last year we’ve been getting feedback that EventSentry Light was being constrained too much. Since our goal is, and always has been, to empower sysadmins and not constrain them, we decided to provide our users with more functionality in the free edition. The result of these efforts is build 2.93.1.75, and with this release you can:

  • Monitor event logs and log files in real time, setting up as many filter rules as you’d like, without restrictions.
  • Utilize all advanced event log filter capabilities like thresholds, timers, schedules and more!
  • Create as many event log, log file and system health packages as you like.
  • Utilize all system health monitoring features, such as file checksum monitoring, performance monitoring, service monitoring and more.
  • Create a variety of alerts using mail, HTTP, SNMP traps, Syslog messages and more.
  • Receive SNMP traps from SNMP v3 enabled devices.
  • Monitor up to 2 full hosts and 2 network devices.

Pretty impressive, no? So literally overnight, EventSentry Light has matured into a full-fledged monitoring solution which will alert IT professionals like sysadmins of critical (event) log events, performance issues and much more. What differences with EventSentry remain? A few, but the line is much more clear now:

  1. Reporting. With EventSentry, you get log consolidation, software/hardware inventory, performance trend reports, network dashboards, jobs, JSON/XML/CSV/… APIs and more.
  2. Compliance. EventSentry includes a variety of compliance functionality such as process tracking, logon tracking, account management tracking and more.
  3. Monitor multiple hosts. Monitor as many hosts as you are licensed for, and also utilize command line utilities to automate remote host management.
  4. Support. EventSentry includes quality email and phone support, something we pride ourselves on. EventSentry Light offers forum support.
  5. Mobile iPhone & Android apps are only available in the full edition since they require reporting.

So if you’re not already using EventSentry Light, or using an older version, then you should give it a try. It’s as free as it gets with no registration required, no advertisements and no nagging pop-ups. We hope you like it as much as we do. And did I mention that you can seamlessly upgrade from EventSentry Light to EventSentry? 🙂

Don’t forget to check out our other free tools and Facebook / Google+ pages!
Best,
Ingmar.